Central Configuration Management
Spectra Detect Manager allows users to modify configuration settings on Spectra Analyze and Spectra Detect appliances directly from the Manager interface. The Central Configuration feature makes it easier to configure appliances remotely, and to ensure that the settings are consistent and correct across multiple appliances. The appliances must first be connected and authorized on the Manager instance.
To start working with this feature, access the Central Configuration page by selecting in the upper right corner of the Manager interface.
The Central Configuration page contains different configuration modules that users can enable. Different combinations of modules and their configuration values can be saved as configuration groups. For example, users can create a group for Spectra Analyze and Worker appliances that should be connected to Spectra Intelligence, and another group for Spectra Analyze and Worker appliances that should be connected to T1000.
When appliances are added to a configuration group, all settings configured in the modules are applied to them, overwriting their previous settings.
Generally, the Central Configuration workflow includes the following steps:
Create a configuration group or edit an existing one.
Select which appliances should be in the group.
Modify settings in configuration modules.
Save changes
Apply modified settings to all appliances in the group.
Central Configuration Page
The Central Configuration page contains the Select configuration group pull-down list at the top, allowing users to switch between existing groups. There are also buttons for creating a new group and deleting the currently selected group.
If there are no configuration groups created on the Manager instance, the default group is displayed on the Central Configuration page. Users can manage appliances and modify settings in the default group, or create their own groups.
All configuration modules supported by the Manager are listed in the sidebar on the left. Selecting a module opens its configuration dialog on the right side of the page.
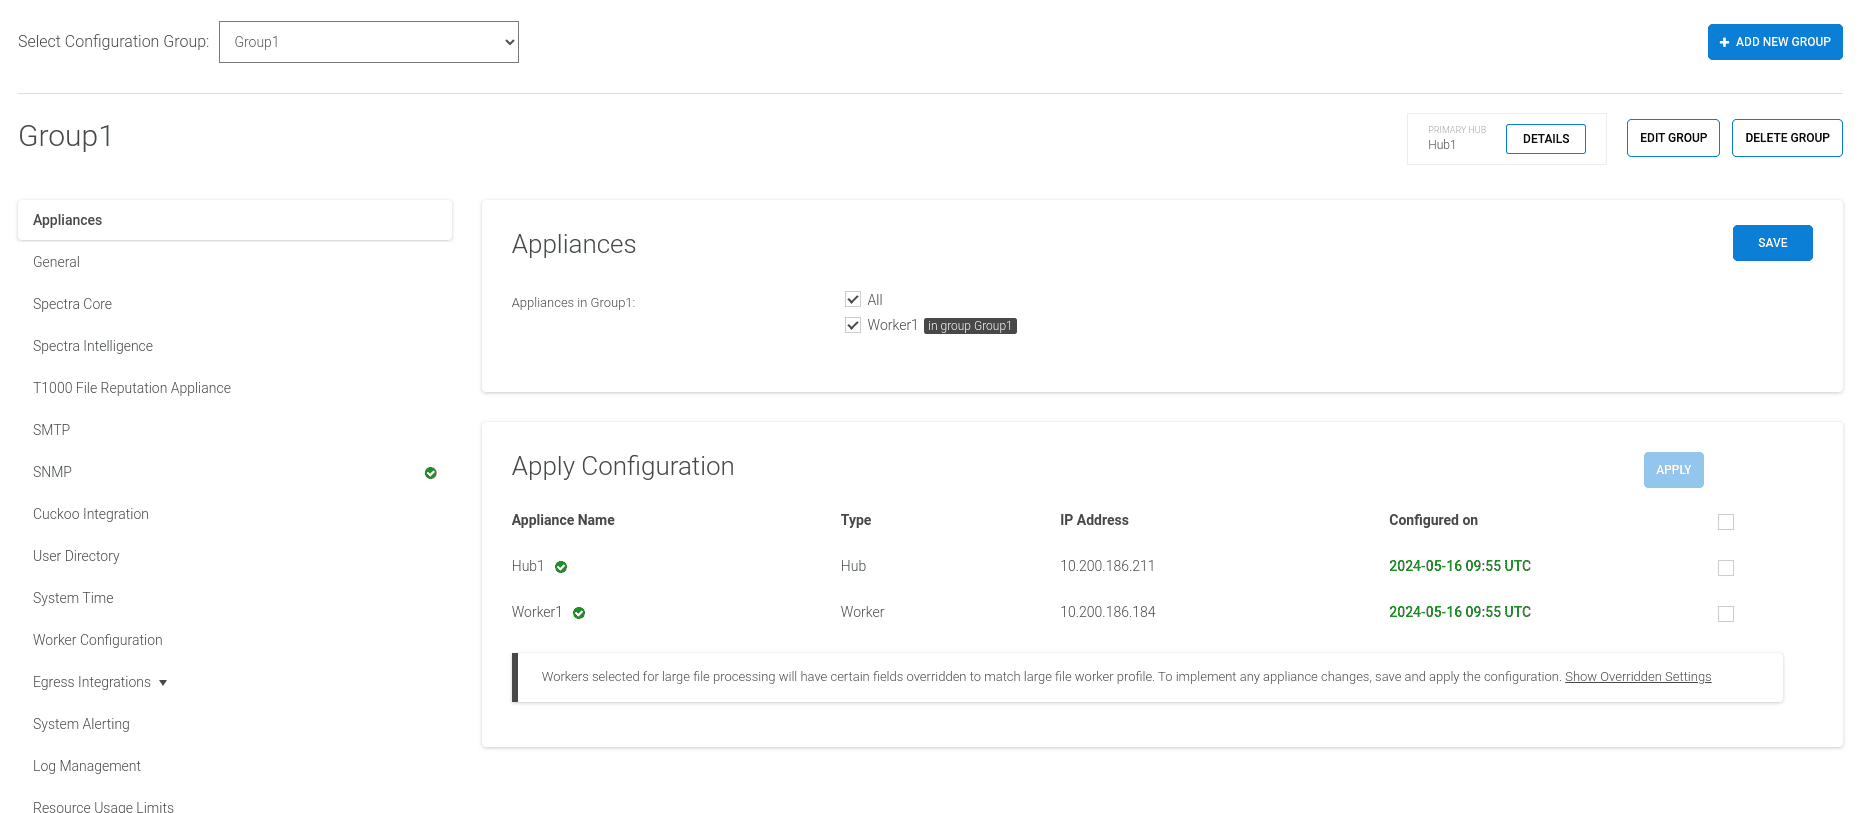
If the selected group is a Spectra Detect Hub group, an additional section is present at the top of the page. The section indicates which Hub instance in the group is the primary, and which is the fallback node. Clicking Details in this section displays more information about both Hub instances, such as their router IDs and configured priority values.
To see the list of appliances that can be added to the currently selected configuration group, select Appliances in the sidebar. Appliances that are already in the current group have a tick in the checkbox next to their name. Appliances that are in other configuration groups have an indicator next to the appliance name.
Users can save and/or apply configurations to appliances in the group by clicking on the Save button. This opens a pop-up dialog with the options to Save or Save and Apply the configuration to all appliances in the group.
To apply the configurations to specific appliances, select their checkboxes in the appliance list below, and click the Apply button at the top of the list.
Note that adding or removing appliances does not remove existing configuration on appliances.
Adding Appliances to a Configuration Group
Appliances that can be added to the current configuration group are listed in the Appliances section.
Select the checkbox next to the appliance(s) that should be added to the group, and click Save. This opens a dialog with the options to save the selected appliances to the group, and to optionally apply the current group configuration.
An appliance cannot be in two configuration groups at the same time. If an appliance is already in another configuration group, the Manager displays a warning message after clicking Save.
Confirming the change will move the appliance from the previous configuration group to the current one.
When an appliance is successfully added to a configuration group, the group’s configuration has to be manually applied to it either by clicking the Save button and selecting the Save and Apply option, or by selecting its checkbox in the Apply Configuration list and clicking the Apply button. The appliance will restart and start using the new configuration.
The configuration dialogs on the appliance will indicate that the settings are being managed by the Manager. Although the configuration values modified in the group will still be editable in the appliance’s configuration dialogs, any changes saved on the appliance will not be applied as long as the appliance is managed through Central Configuration.
If an appliance is added to a group and the configuration is applied, but the appliance is offline or unreachable by the Manager at that time, its settings will be modified when it becomes reachable.
Creating Configuration Groups
To create a new configuration group, click Add new group at the top of the Central Configuration page.
Tip
It’s also possible to create a configuration group by clicking Add new group on the Appliance Management tab on the Dashboard page.
Group names are case-sensitive, so “example” and “Example” are treated as two different groups. Supported characters for group names are a-z, A-Z, 0-9, and the underscore ( _ ).
If the group name contains an unsupported character, an error message is displayed. Likewise, a warning is displayed when trying to create a configuration group with a name that is already taken by another group.
The dialog also requires selecting the group type. Two types are supported:
Configuration group (for Spectra Analyze and Spectra Detect Worker appliances),
Hub group (for setting up a high-availability cluster.).
Select the first type (“Configuration Group”) and click Add to confirm changes and create a new configuration group. The newly created group will not contain any appliances, and there won’t be any active configuration modules.
Important
Some configuration modules and options apply only to specific appliance types. For example, the “Splunk” configuration module and its options apply only to the Worker. Read more in the Supported Configuration Modules section.
To enable a configuration module, select it in the sidebar on the Central Configuration page and modify the options in it. The indicator in the sidebar warns about unsaved changes in the module. Unsaved changes are lost if the user navigates away from the Central Configuration page without clicking Save first.
Configuration modules that are not enabled do not have any indicators in the sidebar. Those that are enabled and properly configured have a green indicator. If there are issues with the configuration of a module, the indicator changes to red.
Save changes in the module by clicking Save. The indicator in the sidebar shows whether the module is configured properly. Repeat this procedure for every configuration module that needs to be enabled in the configuration group.
To disable a configuration module, select it in the sidebar and click Remove Central Control.
When this button is clicked, the configuration options are unlocked for editing on each appliance in the group, and are no longer controlled by Spectra Detect Manager. The options configured in the module are not erased automatically when the module is disabled. In other words, the current configuration is preserved, and needs to be modified manually on the appliance.
The full list of supported configuration modules and options for all appliance types is available in Supported Configuration Modules section.
Managing Configuration Groups
The following changes can be made to any configuration group on the Manager:
enable and disable configuration modules
change options in enabled configuration modules
add and remove appliances from a group
move appliances from one group to another
delete the entire group (does not apply to the default group, which cannot be deleted)
Depending on the type of change, appliances may be automatically restarted. Only applying new configurations to an appliance will trigger a restart of that specific appliance. Adding an appliance to a group, removing it from a group, moving it between groups, or deleting a group will not restart the appliances.
Depending on the type of appliance, the process of restarting and reloading configuration values might take some time. Spectra Detect Worker appliances generally take longer to restart.
Supported Configuration Modules
The configuration modules listed in this section can be enabled on the Central Configuration page, and their options can be modified.
Some configuration modules support all types of ReversingLabs appliances, but specific options within the modules apply only to one or two types of appliances. Such options are indicated by a comment in the Manager interface.
General
Root SSH login can be enabled for use with password management systems. These checkboxes are not available by default. To enable them, do the following:
Log in via SSH to the Manager.
Run
sudo rlapp configure --sshd-control-enable. This will enable the checkboxes on the Manager.In the browser, go to Spectra Detect Manager > Central configuration, select the Hub group which will have root SSH login enabled, then go to General > SSH
Enable Permit SSH configuration
Enable Permit root SSH login
Note that this can only be applied to Hub groups.
For SSH credentials, contact ReversingLabs Support .
This section also includes the option to disable the use of swap memory. Swap memory is disk space used as RAM. Note that this option isn’t applicable if the appliances are deployed as Docker images.
Spectra Core
This section lists configuration settings related to static analysis performed by Spectra Core.
Processing Settings
This setting determines which file formats will be unpacked by Spectra Core for detailed analysis. “Best” fully processes all formats supported by the appliance. “Fast” processes a limited set of file formats.
Fast option does not support unpacking and/or validation of several file formats, providing only minimal information for: Archives (ActiveMimeMSO, ARC (.arc, .ark), ARSC, BLZ, CGBI, CRTF, DICOM (.dicom, .dcm, .dic), PE .Net Resources, LZ4, LZIP, LZMA, LZOP, MAR, NuGet, PAK, PCAP (http, smtp), PYZ, SQX, TIFF, WARC, XAR, ZOO); Documents (bplist, Certutil (.crt, .cert, .pem), CHM, HTML (.html, .htm, .xhtml, .xht), IQY, SettingContent (.xml), SYLK, URL); Mobile Applications (Android (.apk), iOS (.ipa), Windows Phone (.xap), APPX); Multimedia (BMP, GIF, JPEG, PNG, SWF); File System/Firmware (cramfs, HFSP, jffs2, squashfs, yaffs); Web Applications (Google Chrome (.crx), Opera (.oex), Mozilla FireFox (.xpi)); Quarantine formats (KasperskyKLQ, SymantecQBD, SymantecVBN); Emails (UUE, YENC); Disk Images (VHD, WIM (.wim, .swm)) and others (CxMacro, Docker, PyInstaller, SMTP, sqlite3 (.db, .sqlite), VBE(.vbe, .jse)). Additionally, the report metadata will no longer include overlay and resources hashes, storyteller descriptions, Spectra Intelligence XREF data, Mitre ATT&CK mappings, IoC reasons, as well as mobile, browser and media details.
CEF Messages Configuration
Spectra Detect can log events using the Common Event Format (CEF) to ensure compatibility with security information and event management software products (SIEMs). CEF is an extensible, text-based logging and auditing format that uses a standard header and a variable extension, formatted as key-value pairs.
Select the checkbox to enable sending CEF messages to a syslog receiver.
String extraction configuration
Spectra Core can extract information from binaries in the form of strings. While useful in some contexts, this metadata can also be very extensive. This section allows setting the minimum and maximum length of extracted strings that make it into the analysis report. A maximum length of zero (0) is interpreted as unlimited length.
Entropy limit: Set the maximum allowed entropy as a floating-point value in range from 0 to 8. Default is 0.0. For every file analyzed by Spectra Core, file entropy can be calculated. A higher entropy value indicates that the file content is more random in nature, and therefore more likely to be compressed or encrypted.
Decompression configuration
Decimal value between 0 and 999.9. Used to protect the user from intentional or unintentional archive bombs, terminating decompression if size of unpacked content exceeds a set quota. The maximum allowed unpacked content size is calculated as:
MaximumDecompressionFactor * (1000 / ln(1 + InputFileSize * pow(10, -5)))
Unpacking will stop once the size of all extracted content exceeds the theoretical maximum of the best-performing compression algorithm. Setting it to 0 will disable decompression management. ReversingLabs recommend against disabling decompression management.
Propagation
When propagation is enabled, files can be classified based on the content extracted from them. This means that files containing a malicious or suspicious file will also be considered malicious or suspicious.
Goodware overrides ensure that any files extracted from a parent file and whitelisted by certificate, source or user override can no longer be classified as malicious or suspicious. Additionally, this goodware classification can be propagated from extracted files to their parent files in order to prevent and suppress possible false positives within highly trusted software packages. Goodware overrides will apply to all files with the trust factor value equal to or lower than the value configured here. Trust factor is expressed as a number from 0 to 5, with 0 representing the best trust factor (highest confidence that a file contains goodware).
Enable Classification Scanners
Fine-tune which scanners are used in the static analysis performed by Workers.
Images: heuristic image classifier
PECOFF: Heuristic Windows executable classifier
Documents: Document format threat detection
Certificates: Checks whether the file certificate passes the certificate validation in addition to checking white and black certificate lists
Hyperlinks: Embedded hyperlink threat detection
Emails: Phishing and email threat detection
Ignore the Following Threat Types
Selected threat types will be excluded from final classification decision. The classification returned will be Goodware with reason Graylisting.
Adware
Packer
Riskware
Hacktool
Spyware
Spam
Password List
Appliances will use the passwords defined in this list when attempting to decrypt password-protected compressed files submitted for analysis. Prior to submitting password-protected compressed files to the appliance, users can add the password for each file to this list (one password per line).
Spectra Intelligence
Applies to Spectra Analyze, Spectra Detect Worker
Option |
Description |
|---|---|
Enable Spectra Intelligence |
Receive additional classification from the Spectra Intelligence cloud. By default, it is false. |
Spectra Intelligence URL |
The host address for the Spectra Intelligence cloud. Click the Test connection button to test the connectivity. The default URL is https://appliance-api.reversinglabs.com |
Username |
Spectra Intelligence username |
Password |
Spectra Intelligence password |
Timeout |
Default Spectra Intelligence connection timeout in seconds (maximum 1000). |
Enable proxy |
Enables the configuration of an optional proxy connection. By default, it is false. |
Proxy host |
Proxy host name for routing requests from the appliance to Spectra Intelligence (e.g., 192.168.1.15). |
Proxy port |
Proxy port number (e.g., 1080). |
Proxy username |
User name for proxy authentication. |
Proxy password |
Password for proxy authentication. |
Maximum fetch file size - Spectra Analyze only |
Maximum size of an individual file (in MB) that is allowed to be fetched from the Spectra Intelligence cloud for further analysis on Spectra Analyze. The default value is 100 MB, the minimum is 1 MB, and the maximum is 500 MB. |
Cache Spectra Intelligence results to preserve quota and bandwidth when analyzing sets of samples containing a lot of duplicates or identical extracted files.
Parameter Name |
Description |
|---|---|
Enable |
Enable or disable the caching feature. Default: False |
Cache max size (%) |
Maximum cache size expressed as a percentage of the total allocated RAM on the Worker. Default: 6.25, Range: 5 - 15 |
Cache cleanup window |
How often to run the cache cleanup process, in minutes. It is advisable for this value to be lower, or at least equal to the TTL value. Default: 10, Range: 5 - 60 |
Maximum number of idle upstream connections |
The maximum number of idle upstream connections. Default: 50, Range: 10 - 50 |
Cache entry TTL |
Time to live for cached records, in minutes. Default: 120, Range: 1 - 3600 |
T1000 File Reputation Appliance
Applies to Spectra Analyze, Spectra Detect Worker
Option |
Description |
|---|---|
Enable T1000 |
When enabled, an integration with ReversingLabs T1000 instance to receive additional classification information is configured. By default, it is false. |
T1000 URL |
The host address for the on-premises T1000 File Reputation appliance. |
Username |
T1000 user name for authentication. Note: this user name needs to be created via the T1000 Web administration application. |
Password |
T1000 password for authentication. |
Timeout |
Default T1000 service connection timeout in seconds (maximum 60). |
Enable proxy |
Enables the configuration of an optional proxy connection. By default, it is false. |
Proxy host |
Proxy host name for routing request from the appliance to T1000 (e.g., 192.168.1.15). |
Proxy port |
Proxy port number (e.g., 1080). |
Proxy username |
User name for proxy authentication. |
Proxy password |
Password for proxy authentication. |
SMTP
Applies only to Spectra Analyze
Option |
Description |
|---|---|
Enable SMTP |
Select the checkbox to enable the SMTP (Simple Mail Transfer Protocol) service on the appliance. This allows the appliance to send email notifications to the configured email address. |
SMTP hostname |
The host to use for sending email. This field is empty by default. For the SMTP service to function properly, the user needs to input the host. |
SMTP port |
Port of the host used for sending email. This field is empty by default. For the SMTP service to function properly, the user needs to input the port. |
Username |
SMTP user name for authentication. |
Password |
SMTP password associated with the specified user name. |
Default “from” email address |
The email address used by the appliance as the “from” address when sending email (for password resets, error alerts…). |
Use TLS |
Select the checkbox to use a secure connection (TLS; Transport Layer Security) when communicating with the SMTP server. |
SNMP
Applies to Spectra Analyze, Spectra Detect Worker
Option |
Description |
|---|---|
Enable SNMP service |
Select the checkbox to enable the Simple Network Management Protocol service. |
Community |
Enter the name of an SNMP community list for authentication. Community is a list of SNMP clients authorized to make requests. The SNMP service will not function properly if this field is not configured. |
Enable trap sink |
Select the checkbox to enable sending SNMP traps to the sink server. Traps are asynchronous, unsolicited SNMP messages sent by the SNMP agent to notify about important events on the appliances. |
Trap community |
Enter the SNMP trap community string. If the Enable SNMP service and Enable trap sink checkboxes are selected, then this field is required. |
Trap sink server |
Enter the host name or the IP address of the trap sink server. The sink server is the location to which SNMP traps will be sent. If the Enable SNMP service and Enable trap sink checkboxes are selected, then this field is required. |
SNMP trap thresholds |
A set of configuration fields allowing the user to set the thresholds (values that will trigger an SNMP trap) for supported types of events. Thresholds can be configured for average system load in 1, 5, and 10 minutes (as a percentage), used memory and used disk space (as a percentage), the size of Spectra Detect queues (maximum value is 20000) and the size of the classifications queue (maximum value is 20000). |
Cuckoo Integration
Applies only to Spectra Analyze
Option |
Description |
|---|---|
Service enabled |
Select the checkbox to enable Cuckoo Sandbox integration. |
API scheme and host |
Cuckoo Sandbox host API server address, including the scheme (http/https). Example: http://192.168.15.15 |
API port |
Cuckoo Sandbox host API server port. On a standard installation of Cuckoo, the default value is 8090. |
Use API host for Web host |
Select the checkbox to use the same host for both the API and Web server addresses. |
Web scheme and host |
Cuckoo Sandbox host web server address (for accessing the Cuckoo Web UI), including the scheme (http/https). Example: http://192.168.15.15 |
Web port |
Cuckoo Sandbox host web server port. On a standard installation of Cuckoo, the default value is 8080. |
Show links to Cuckoo tasks |
Select the checkbox to display links to Cuckoo tasks on the Cuckoo Web server from the appliance UI. |
User Directory
Applies only to Spectra Analyze
The User Directory central configuration module allows uploading a TLS certificate file from a Manager to multiple Spectra Analyze appliances in a configuration group.
The TLS certificate is used for verifying the LDAP host identity. The certificate must be in PEM file format.
To successfully apply the certificate, the options “TLS” and “TLS require certificate” must be enabled in the User Directory central configuration module on the Manager.
Select the certificate file from the local storage by clicking Browse.
When the certificate file is selected, confirm changes by clicking Submit. The certificate file will be uploaded to Spectra Analyze appliances in the active configuration group.
If the certificate is valid and trusted, the appliances will be successfully connected to the LDAP server.
Option |
Description |
|---|---|
Enable LDAP authentication |
Select the checkbox to enable LDAP authentication on the appliance. |
Connection |
|
LDAP server host |
Host name or IP address of the server providing LDAP authentication. Example: ldap.example.com. Click the Test button to verify the connection to the server. |
LDAP server port |
LDAP server host port. Defaults: 389 (LDAP) or 636 (LDAPS). |
TLS |
Select to use a TLS (secure) connection when communicating with the LDAP server. |
TLS require certificate |
Select to require TLS certificate verification when communicating with the LDAP server. |
Select TLS CA Certificate file |
The dialog that opens when clicking Browse allows the user to upload their own TLS certificate for verifying the LDAP host identity. The certificate must be in PEM file format. To apply the certificate, the options TLS and TLS require certificate must be enabled. |
Bind DN or user |
User to use when logging in to the LDAP server for searches. DN stands for Distinguished Name. Example: “user@example.com” or “cn=user;dc=example,dc=com” |
Password |
Password for the Bind user account. |
User Schema |
|
Base DN |
Root node in LDAP from which to search for users. Example: “cn=users,dc=example,dc=com” |
Scope |
Scope of the user directory searches (base, one level, subordinate, subtree). |
User Object Class |
The objectClass value is used when searching for users. Example: “user” |
User Name Attribute |
The user name field. Examples: “sAMAccountName” or “cn” |
Group Schema |
The fields in this section are the same as in the “User Schema” section, except the settings relate to groups. |
User attribute mapping |
|
First name |
Field to map to a user’s first name. Example: “givenName” |
Last name |
Field to map to a user’s last name. Example: “sn” |
Field to map to email. Example: “mail” |
|
User access |
|
Active flag group |
Group DN. Users will be marked as active only if they belong to this group. Example: “cn=active,ou=users,dc=example,dc=com” |
Superuser flag group |
Group DN. Users will be marked as superusers only if they belong to this group. Example: “cn=admins,ou=groups,dc=example,dc=com” |
Require group |
Group DN. Authentication will fail for any user that does not belong to this group. Example: “cn=enabled,ou=groups,dc=example,dc=com” |
Deny group |
Group DN. Authentication will fail for any user that belongs to this group. Example: “cn=disabled,ou=groups,dc=example,dc=com” |
System Time
Applies to Spectra Analyze, and Spectra Detect Worker
Option |
Description |
|---|---|
Enable network time synchronization |
Select the checkbox to enable server clock synchronization via NTP, which uses port 123. |
NTP servers |
A list of servers, one per line, to use for system clock synchronization. |
Spectra Detect Worker Configuration
General
Limits
It is possible to set up limits on file processing:
maximum file size
number of daily uploads
File size is in MB, and the daily limit includes files uploaded through a connector. It also resets at midnight.
Large Report Size Limit (MB) - Reports over this size will be handled by optimizing memory consumption (RAM), which may result in longer processing and post-processing times. Views are not supported for the full report; they can only be used with the split report option. Use this option when minimizing memory usage is important. Setting to 0 disables this option.
Health Monitoring
Processing and Postprocessing Service Status Check
Processing and postprocessing service status fields can be used to configure how often the services will be checked for timeouts. If any issues are detected, the process will be restarted. The default for both fields is 720 minutes. Setting to 0 will disable this option.
Monit Memory Threshold
Monit Memory Threshold is the percentage of memory, between 50 and 100, that services can use. If memory usage reaches the number configured here, the system will restart services. If this number is set to 100, the restart will be disabled.
Health Thresholds
Set the health thresholds to true or false to enable or disable the thresholds functionality.
Disk High Threshold: Specify the highest allowed percentage of hard disk usage on the system. If it exceeds the configured value, the appliance will start rejecting traffic.
Queue High Threshold: Specify the maximum number of items allowed in the queue. If it exceeds the configured value, the appliance will start rejecting traffic.
Cleanup
All values are in minutes
- File age limit
How long an unprocessed file is present on the appliance before being deleted. Processed files are deleted immediately after processing. Default: 1440.
- Task age limit
How long before the record of a completed processing task is deleted. Default: 90.
- Unprocessed task limit
How long before an incomplete processing task is cancelled. Default: 1440.
Spectra Analyze Configuration
Spectra Analyze IP address or FQDN: Specify the hostname or IP address of Spectra Analyze appliance associated with the Worker. This address will be referenced in Splunk reports to enable retrieving additional processing information.
File Processing
Processing
Processing Mode: Choose the processing mode of the Worker instance to improve pressure balancing. Supported modes are standard and advanced. In advanced mode, files larger than the threshold specified below are processed individually.
Large File Threshold: If advanced mode is selected, files larger than the threshold specified here will be processed individually, one by one. If standard mode is enabled, this parameter is ignored. The threshold value is expressed in MB. Default is 100.
Unpacking Depth: Select how “deep” a file is unpacked. For example, if a file contains other files, each of those containing other files etc., by default (when this value is set to zero), Workers will unpack everything until no more files can be unpacked. Setting this value to something else than zero specifies the depth of recursion, which can be useful for quicker (but shallower) analyses.
Processing Timeout: Specify how many seconds Worker should wait for a file to process before terminating the task. The default is 28800 seconds (8 hours). The minimum allowed value is 1.
Caching
Enable caching: When caching is enabled, the SHA1 of file contents is used to determine if there have been recent analysis reports for the same file, and if those reports can be reused instead of processing the file again.
Cache Timeout: If file processing caching is enabled, this parameter can be used to specify for how long the analysis reports should be preserved in the cache and reused before they expire (in seconds). Restarting the Worker or changing configuration will clean the cache. Setting the value to 0 will use the timeout of 600 seconds.
Scaling
- Processing
Specify how many copies of Spectra Core instances to run. Changing this setting from the default is not recommended.
- Post-processing
Specify how many report post-processing instances to run. These instances will then modify and save reports as specified by the user. Increasing this value can increase throughput for servers with extra available cores. Default: 1.
- Load size
Defines the maximum number of individual files that can simultaneously be processed by a single instance of Spectra Core. When one file is processed, another from the queue enters the processing state. Default is zero (0), which sets the maximum number of files to be processed to the number of CPU cores on the system.
- Concurrency Count
Defines the number of concurrent threads per Spectra Detect instance that should be used for processing. Default is zero (0), which sets the number of threads to the number of CPU cores on the system. Modifying this option may cause issues with the system. Consult with ReversingLabs Support before making any changes to the parameter.
Analysis Report
Default Report Settings
Strings: Select the checkbox to enable extracting strings from files during Spectra Detect file analysis.
Relationships: When enabled, the relationships section of the report lists hashes of files that are found within a given file.
Relationships for First Report Only: If disabled, the reports for samples that contain children files will include the relationships of all their descendants. This can lead to a lot of redundant information in the report. If enabled, relationship metadata will be included only for the root parent file.
Network Reputation Report: If enabled, Spectra Detect Worker (4.1+) file analysis reports will contain a new section,
network_reputation, with reputation information on any network resources found within the file. This feature is unavailable if Spectra Core > Processing Settings is set toFast, as it relies on interesting strings extracted during analysis.
API Report Settings
This section configures the default report view applied to a Spectra Detect report if no other view has been applied elsewhere. It allows you to specify the report type that should be applied to the Worker analysis report.
Report types are results of filtering the full report. In other words, fields can be included or excluded as required.
Report Type: Available report types are extended_small, small, medium, and large, as well as classification, classification_tags, extended, mobile_detections and short_cert which contain metadata equivalent to views with the same name.
Report View: Apply a view for transforming report data to the large report type to ensure maximum compatibility.
See Spectra Detect Product Documentation > Analysis and Classification > Customizing Analysis Reports for detailed information about how report types and views work.
Enable the Top Container Only option to only include metadata for the top container. Reports for unpacked files will not be generated.
Enable the Malicious Only option for the report to contain only malicious and suspicious children.
Additional hashes
CRC32 |
MD5 |
SHA384 |
SHA512 |
SSDEEP |
TLSH |
Spectra Core calculates file hashes during analysis and includes them in the analysis report. Select which additional hash types should be calculated for files analyzed on connected Worker appliances. MD5 is selected by default. SHA1 and SHA256 hashes are always included, and therefore aren’t configurable. Note that selecting additional hash types may cause the report to generate slower.
Authentication
Tokens
Specify tokens required for authorizing to the listed Spectra Detect Worker endpoints. Every token must be a string of alphanumeric characters between 16 and 128 characters in length.
Egress Integrations
After analysis, Spectra Detect can save:
original files
unpacked files
file analysis reports
These are forwarded to one or more external storage providers:
AWS S3
Network file share (SMB, NFS)
Microsoft Cloud storage (Azure Data Lake, OneDrive, SharePoint)
AWS S3
There are two ways to connect to an output bucket:
Using your own S3 credentials.
Using an IAM role.
The AWS S3 Access Key ID and AWS S3 Secret Access Key (in the General tab) must be provided in both cases. If ReversingLabs hosts the appliance and you use an IAM role, we will provide the access key and secret key.
Bucket naming conventions: regardless of the type of storage (files, unpacked files, reports), input fields for S3 buckets expect the bucket names to conform to specific rules. The bucket name can be between 3 and 63 characters long, and can contain only lowercase characters, numbers, periods, and dashes. Each label in the bucket name must start with a lowercase letter or number. The bucket name cannot contain underscores, end with a dash, have consecutive periods, or use dashes adjacent to periods. The bucket name cannot be formatted as an IP address.
General
- AWS S3 Access Key ID
Specify your access key ID.
- AWS S3 Secret Access Key
Specify your secret access key.
- AWS S3 Endpoint URL
Enter S3 endpoint URL if you want to use S3 over HTTP. Only required in non-AWS setups in order to store files to an S3-compatible server. When this parameter is left blank, the default value is used (https://aws.amazonaws.com). Supported pattern(s): https?://.+
- SSL Verify
This checkbox enables SSL verification in case of an
httpsconnection.- CA Path
Path to the certificate file for SSL verification. If this parameter is left blank or not configured, SSL verification is disabled. By default, it is set to /etc/pki/tls/certs/ca-bundle.crt.
- AWS S3 Region
The default value is
us-east-1.- AWS S3 Signature
Used to authenticate requests to the S3 service. In most AWS regions, only Signature Version 4 is supported. For AWS regions other than
us-east-1, the values3v4must be configured here.- AWS S3 Number of Upload Retries
Maximum number of retries when saving a report to an S3-compatible server.
AWS IAM Role Settings
Using S3 storage in a way where the customer secret key isn’t shared with the Spectra Detect system requires setting up an IAM role for Spectra Detect in the AWS console. This requires setting up the Amazon Resource Name (ARN) for Workers, which they can use to obtain temporary tokens. These temporary tokens allow saving files to S3 buckets without the customer secret access key.
For this setup, an external ID is also required. This is provided by the entity which owns an S3 bucket. The owner of that bucket takes the AWS Account ID of the account that owns the appliance and builds an ARN with it (in the hosted Spectra Detect deployment, we provide our AWS Account ID).
- ARN Session Name
Name of the session visible in AWS logs.
- Token duration
How long the authentication token lasts before it expires and is refreshed. The minimum value is 900 seconds.
- Refresh Buffer
Number of seconds defined to fetch a new ARN token before the token timeout is reached. This must be a positive number, and the default value is 5.
File Storage
This section configures how original files are stored. There are two “modes” (Output Bucket Destination Options):
Storing files in one or more default buckets
Storing files in buckets that are mapped to specific input buckets
If you map input buckets to output buckets, there will be two ways of connecting to the output bucket:
Standard AWS connection that uses an access key and secret access key for that output bucket.
IAM role for that specific input-output mapping. This mode has two additional configuration options:
using the general AWS settings (which were set in General tab)
using custom AWS settings, in which case an additional access key and secret access key must be provided for the entity that will be assigned that specific ARN role
Additional options for file storage are:
- Worker AWS S3 Server-Side Encryption Algorithm
The server-side encryption algorithm can be any server-side encryption configured on the target default bucket (such as
aws:kmsorAES256). “Test Connection” will attempt to verify the selected server-side encryption.- Worker AWS S3 Folder
Folder where samples will be stored on given S3 bucket. The folder name can be between 3 and 63 characters long, and can contain only lowercase characters, numbers, periods, and dashes. Each label in the folder name must start with a lowercase letter or number. The folder name cannot contain underscores, end with a dash, have consecutive periods, or use dashes adjacent to periods. The folder name cannot be formatted as an IP address.
Unpacked Files Storage
This section configures how unpacked files are stored. There is just one output mode: a default bucket that needs to be specified in the Bucket Name field (with an optional Folder name).
Unpacked files are saved in two possible formats:
Individual unpacked files are saved in subfolders, which can be named in three different ways:
Subfolder naming Date-based
YYYY/mm/dd/HHDate-and-time-based
YYYY/mm/dd/HH/MM/SSSHA-1-based
first four characters of a sample’s SHA-1 hash
Unpacked files are saved as ZIP archives, which can optionally be password-protected.
Report Storage
This section configures how file analysis reports are stored. There are three possible output options:
Input-output mapping: save the report in an S3 bucket that corresponds to a specific input bucket. In other words, if a file that was analyzed comes from bucket A, save the reports for all files from bucket A into bucket B.
Same as input bucket: save the report into the same origin bucket from which the analyzed file came.
Only default bucket: save all reports into one default bucket.
If you map input buckets to output buckets, there will be two ways of connecting to the output bucket:
Standard AWS connection that uses an access key and secret access key for that output bucket.
IAM role for that specific input-output mapping. This mode has two additional configuration options:
using the general AWS settings (which were set in General tab)
using custom AWS settings, in which case an additional access key and secret access key must be provided for the entity that will be assigned that specific ARN role
Additional options that can be configured for saving reports:
- Folder
Folder where report files will be stored on given S3 bucket. The folder name can be between 3 and 63 characters long, and can contain only lowercase characters, numbers, periods, and dashes. Each label in the folder name must start with a lowercase letter or number. The folder name cannot contain underscores, end with a dash, have consecutive periods, or use dashes adjacent to periods. The folder name cannot be formatted as an IP address.
- Report View / Report Type
See Spectra Detect Product Documentation > Analysis and Classification > Customizing Analysis Reports for detailed information about how report types and views work.
- Top Container Only
Enable to only include metadata for the top container. Reports for unpacked files will not be generated.
- Split Report
Split reports of extracted files into individual reports.
- Archive and Compress Split Report Files
Enable sending a single, smaller archive of split report files to S3 instead of each file. Relevant only when the “Split Report” option is used.
- Archive Password
If set, enables encryption of the archive file using this value as the password. Relevant only when the “Archive and compress split report files” option is used.
- Subfolder
Reports can be saved into subfolders, with specific naming formats:
Subfolder naming Date-based
YYYY/mm/dd/HHDate-and-time-based
YYYY/mm/dd/HH/MM/SSSHA-1-based
first four characters of a sample’s SHA-1 hash
- File timestamp
This refers to the naming of the report file itself (and not the subfolder in which it is stored). A timestamp is appended to the SHA1 hash of the file. The timestamp format must follow the strftime specification and be enclosed in quotation marks. If not specified, the ISO 8601 format is used.
SNS
You can enable publishing notifications about file processing status and links to Worker analysis reports to an Amazon SNS (Simple Notification Service) topic. The configured AWS account must be given permission to publish to this topic. The topic name is limited to 1000 characters.
Microsoft Cloud Storage Configuration
Azure
To set up saving on Azure, specify the storage account name and storage account key. In order to use a custom server, specify the endpoint suffix for the address of your Azure Data Lake container, which defaults to core.windows.net. The Azure integration can save analyzed files, unpacked files, as well as file analysis reports. The integration doesn’t support saving unpacked files or split reports into a single ZIP archive.
Regardless of the use, the container name must be a valid DNS name, conforming to the following naming rules:
Container names must start or end with a letter or number, and can contain only letters, numbers, and the dash (-) character.
Every dash (-) character must be immediately preceded and followed by a letter or number; consecutive dashes are not permitted in container names.
All letters in a container name must be lowercase.
Container names must be from 3 through 63 characters long.
Saving Files and Reports
Different integrations have different options available for saving analyzed files and reports, but all will require configuring the storage location (S3 bucket or buckets, Microsoft Cloud storage, Azure container, or network share) and a folder on that storage (optional). These settings relate to where Spectra Detect Workers or Spectra Analyze appliances save files.
Report customization
It’s possible to change the look of the report to further customize it, e.g. to “flatten” the JSON file, or modify it for Splunk indexing etc. See Spectra Detect Product Documentation > Analysis and Classification > Customizing Analysis Reports for detailed information about how report types and views work.
Splitting reports
All storage options allow splitting the report into several JSON files, one report per extracted file. In addition to that, S3 and network share sections also allow saving these individual reports together in an archive (optionally password-protected).
Report name format
Reports are saved with their timestamp at the end of their file name. By default, they will end with an ISO 8601 datetime string (YYYY-MM-DDTHH:mm:ss.SSSSSS) but this can be modified following the Python strftime() syntax. For example, to save reports only with their year and month, set the Filename Timestamp Format to %Y%m. This field is editable only if the Enable Filename Timestamp option is turned on.
Saving unpacked files
During analysis, a Worker can extract “children” from a parent file (the file initially submitted for analysis). Such child files can be saved to one of the external storage options (S3 bucket, Azure container, or network share). It’s also possible to sort them into subfolders based on date, date and time, or based on the first four characters of the sample’s SHA-1 hash.
S3 and network share sections also allow saving these unpacked files as a ZIP archive instead of each individual file (Archive and Compress Unpacked Files).
Callback
Select the checkbox to enable sending file analysis results to an HTTP server (“callback”), and optionally return the analysis report in the response. Specify the full URL that will be used to send the callback POST request. Only HTTP is supported. If this parameter is left blank, no requests will not be sent.
Additionally, specify the number of seconds to wait before the POST request times out. Default is 5 seconds. In case of failure, the Worker will retry the request up to six times, increasing waiting time between requests after the second retry has failed. With the default timeout set, the total possible waiting time before a request finally fails is 159 seconds.
CA path
If the Callback URL parameter is configured to use HTTPS, this field can be used to set the path to the certificate file. This automatically enables SSL verification. If this parameter is left blank or not configured, SSL verification will be disabled, and the certificate will not be validated.
Report options and views
It’s possible to change the look of the report to further customize it, e.g. to “flatten” the JSON file, or modify it for Splunk indexing. See Spectra Detect Product Documentation > Analysis and Classification > Customizing Analysis Reports for detailed information about how report types and views work. Names for views can only include alphanumerical characters, underscores and dashes.
Enable the Top Container Only option to only include metadata for the top container. Reports for unpacked files will not be generated.
Enable the Malicious Only option for the report to contain only malicious and suspicious children.
Enable the Split Report option to split reports of extracted files into individual reports.
Enable the Include Full Report option to retrieve the full report. By default, only the summary report is provided in the callback response.
Archiving
only for S3 and Azure
Files can be stored either as-is or in a ZIP archive. This archive can further be password-protected and customized:
Zip Compression Level: 0 (no compression) to 9 (maximum compression). The default is 0.
Maximum Number of Files: Specify the maximum allowed number of files that can be stored in one ZIP archive. Allowed range: 1 … 65535
File Filters
Applies only to Spectra Detect Worker
The S3 File Filter feature is used by the Worker to control which files will be excluded from storing in S3 as part of Worker file post-processing. Users can set up one or more filters to select the types of files they want to filter out.
Supported file filtering criteria are classification, threat factor, file type, and file size. For a file to be filtered out by the Worker, at least one of the filters has to report a “True” value in the generated file report.
To enable the feature, select the File filters checkbox in the dialog.
Then, use the Add new filter button to create custom file filters. Every filter can be individually enabled or disabled by selecting or deselecting the Active checkbox, or the checkbox to the right of the filter name.
All created filters are listed in the dialog. Every filter can be expanded by clicking the arrow to the left of the filter name. When a filter is expanded, users can modify any of the filtering criteria, or remove the entire filter by clicking Delete.
S3 File Filtering Criteria
CRITERIA |
DESCRIPTION |
|---|---|
Classification |
Allows the user to filter out files by their classification. Supported values are “Known” and “Unknown”. Both values can be provided at the same time. Malicious and suspicious files cannot be filtered out. |
Factor |
Allows file filtering based on threat factor. When a file is processed, it is assigned a threat factor value, represented as a number from 0 to 5, with 5 indicating the most dangerous threats (highest severity). Enter one value from 0 to 5. The filter program will filter out files with the threat factor of N (entered value) or less. |
File Type |
Spectra Detect Worker can identify the file type for every analyzed file. To filter out files by type, select one or more file types, or select the “All” checkbox. |
File Size |
To filter out files by size, specify the file size in any of the supported units, and the file size condition (greater than or less than). The file size value should be provided as an integer; if it is not, it will automatically be rounded down to the nearest whole integer. |
Splunk
Applies only to Spectra Detect Worker
Option |
Description |
|---|---|
Enable |
Select the checkbox to enable Splunk integration. |
Host |
Specify the hostname or IP address of the Splunk server that should connect to the Worker appliance. |
Port |
Specify the TCP port of the Splunk server’s HTTP Event Collector. Allowed range(s): 1 … 65535 |
Token |
Specify the API token for authenticating to the Splunk server. Not mandatory. |
Use HTTPS |
Select the checkbox to use the HTTPS protocol when sending information to Splunk. If it’s not selected, non-encrypted HTTP will be used. |
SSL require certificate |
If HTTPS is enabled, selecting this checkbox will enable certificate verification. The Worker host needs to have correct certificates installed in order to successfully pass verification. |
Timeout - Worker only |
Specify how many seconds to wait for a response from the Splunk server before the request is considered failed. If the request fails, the report will not be uploaded to the Splunk server, and an error will be logged. Default is 5 seconds |
Report type |
Specify the report type that should be applied to the Worker analysis report before sending it to Splunk. Report types are results of filtering the full report. In other words, fields can be included or excluded as required. Report types are stored in the |
Report view |
Specify the name of an existing transformation view that should be applied to the Worker analysis report before sending it to Splunk. Views can be used to control the presentation format and the contents of the analysis report; for example, to flatten the JSON hierarchy, or to preserve only selected parts of the report. Allowed characters are alphanumeric characters, underscore and dash. Views are stored in the |
Top Container Only |
Whether or not the report sent to Splunk should contain the reports for child files. |
Chunk size |
The maximum size (MB) of a single request sent to Splunk. If an analysis report exceeds this size, it will be split into multiple parts. The report is split into its subreports (for child files). A request can contain one or multiple subreports, as long as its total size doesn’t exceed this limit. The report is never split by size alone - instead, complete subreports are always preserved and sent to Splunk. |
System Alerting
Applies to Spectra Analyze, Spectra Detect Worker
Option |
Description |
|---|---|
Syslog receiver |
|
Enable |
Select the checkbox to receive alerts about the status of critical system services to a syslog server. Read more about which services are supported in the table below. |
Host |
Host address of the remote syslog server to send alerts to. |
Port |
Port of the remote syslog server. |
Protocol |
Communication protocol to use when sending alerts to remote syslog server. Options are TCP (default) and UDP. |
Email alerting - Spectra Analyze only |
|
Enable |
Select the checkbox to receive alerts about the status of critical system services to the email address configured below. |
Email error alerts to |
The appliance administrator’s email address for receiving error alerts. |
System Alerting: Supported Services
Syslog notifications are sent when any of the services or operations meets the condition(s) defined in the table.
SYSTEM OPERATION OR SERVICE |
NOTIFICATION TRIGGER |
|---|---|
RAM |
usage is over 90% for 10 minutes |
CPU |
usage is over 40% for 2 minutes |
CPU wait (waiting for IO) |
over 20% for 2 minutes |
Disk usage |
over 90% for 10 minutes |
UWSGI service |
down for 2 minutes |
NGINX service |
down for 2 minutes |
RABBIT-MQ service |
down for 2 minutes |
POSTGRES service |
down for 2 minutes |
MEMCACHED service |
down for 2 minutes |
CROND service |
down for 2 minutes |
SSHD service |
down for 2 minutes |
SUPERVISORD service |
down for 2 minutes |
SMTP |
if enabled, but stopped for 4 minutes |
NTPD |
if enabled, but stopped for 4 minutes |
Any of the SUPERVISORD services |
if it has crashed |
SCALE socket |
not detected/does not exist for 4 minutes |
SCALE INPUT queue |
receiving over 500 messages for 10 minutes |
SCALE RETRY queue |
receiving over 100 messages for 10 minutes |
COLLECTOR queue |
receiving over 1000 messages for 10 minutes |
CLASSIFICATION queue |
receiving over 5000 messages for 10 minutes |
In addition, the Manager sends syslog alerts for files that haven’t been processed in 24 hours and for file processing failures.
Log Management
Applies to Spectra Detect Worker
Users can configure the level of events that are sent to a syslog receiver (Syslog log level) or that are saved in internal logs (TiScale log level). Users cannot save high-severity events only but send lower-severity events to a syslog receiver. To send events, they first need to be saved, which is why the TiScale log level must always be equal or lower-severity than the value in Syslog log level.
Resource Usage Limits
Applies to Spectra Analyze
Option |
Description |
|---|---|
Memory Limit |
The percentage of used memory is set to 90 by default. If the entered value is less than 75, expect the error message: “Minimum memory limit is 75.”, and if the value is set to more than 100, the following error message will be shown: “Maximum memory limit is 100.”. |
Processing Queue Limit |
The number of messages is limited to 50 by default. If the value is set to any number between 0 and 9, expect the error message: “Any queue limit must be 0 to disable or greater than 9 to enable.”. |
Hagent Input Queue Limit |
The number of messages is limited to 50 by default. If the value is set to any number between 0 and 9, expect the error message: “Any queue limit must be 0 to disable or greater than 9 to enable.”. |
Collector Queue Limit |
The number of messages is limited to 50 by default. If the value is set to any number between 0 and 9, expect the error message: “Any queue limit must be 0 to disable or greater than 9 to enable.”. |
Classifier Queue Limit |
The number of messages is limited to 50 by default. If the value is set to any number between 0 and 9, expect the error message: “Any queue limit must be 0 to disable or greater than 9 to enable.”. |