OpenID Configuration Guide
Configuration
The configuration procedure consists of two parts:
Configuring AD FS on Windows Server 2016 in the customer’s organization
Configuring OpenID Connect on the appliance
The configuration procedure should be performed by authorized and experienced personnel only. Configuring OpenID on the appliance can only be performed by appliance administrators.
Part 1 - Configuring AD FS on Windows Server 2016
This guide describes only the specific configuration options required for setting up OpenID connect to work with the appliance.
Customers should consult the official Microsoft documentation for all details regarding the AD FS setup.
Create an Application Group
The first step is to create an application group on AD FS 2016 in the customer’s organization.
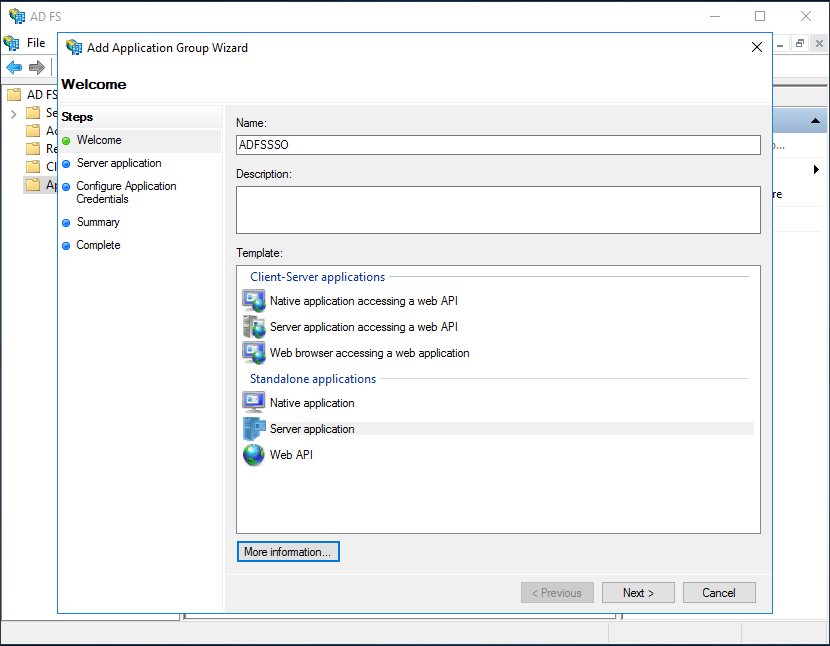
1. Access the AD FS Management configuration page. Right-click the Application Groups option and select Add Application Group. This should start the Add Application Group Wizard.
2. In the Welcome step of the wizard, enter “ADFSSSO” into the Name field. In the Template section, select the Standalone applications > Server application or website option, and click Next.
3. In the Server application step of the wizard, enter “ADFSSSO - Server application” into the Name field. In the Redirect URI field, enter the URL to the appliance that will use the OpenID authentication (http://<appliance hostname>/oidc/callback).
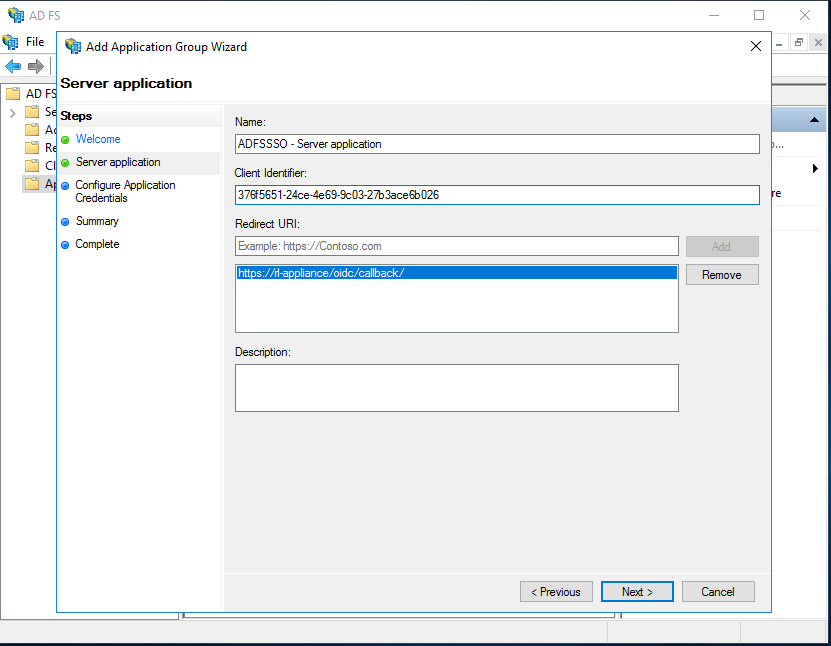
While in this step of the wizard, make sure to copy the value from the Client Identifier field and save it into a text file. This value will have to be provided later in the configuration process.
After copying the value, click Next to proceed with configuration.
4. In the Configure Application Credentials step of the wizard, select the Generate a shared secret checkbox. When the value is generated in the Secret field, copy it and save it to a text file. This value will be required later in the configuration process.
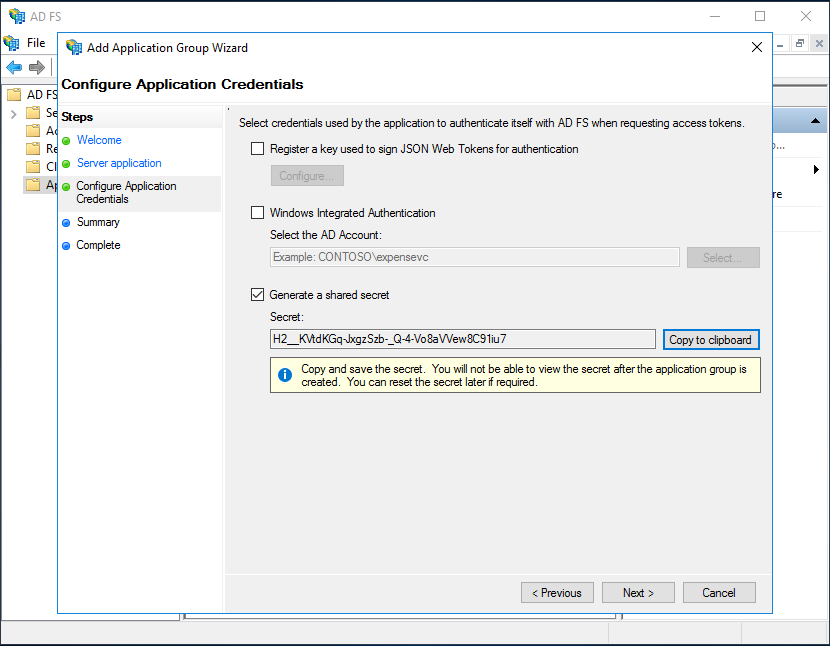
5. After copying the value, click Next to proceed to the Summary step of the wizard. This step only displays an overview of values configured in previous steps, and allows going back to change the values if necessary by clicking the Previous button.
6. If all the values listed in the Summary step are accurate for the customer’s setup, click Next to complete the configuration and exit the wizard.
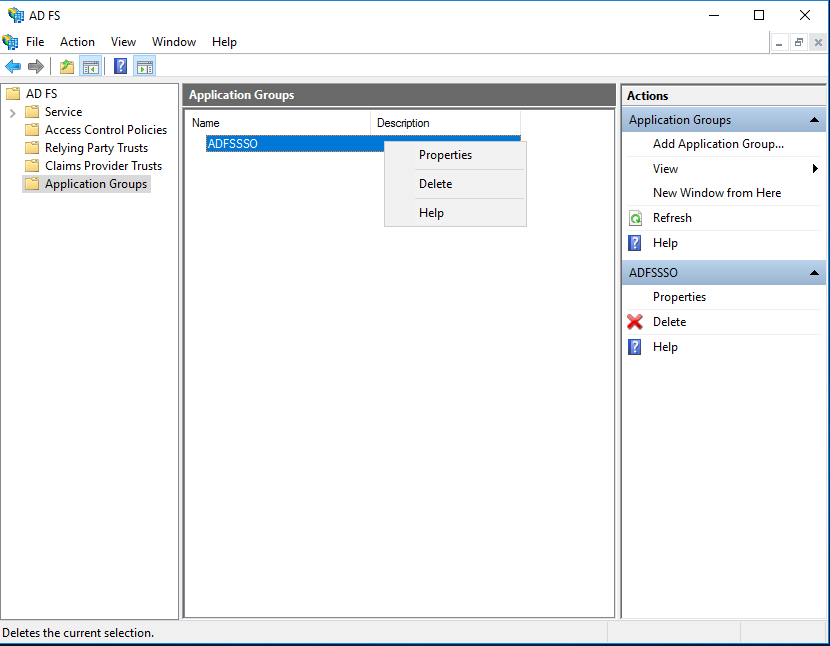
The Application Groups page should now display the newly created “ADFSSSO” group.
Configure the Web API for the Application Group
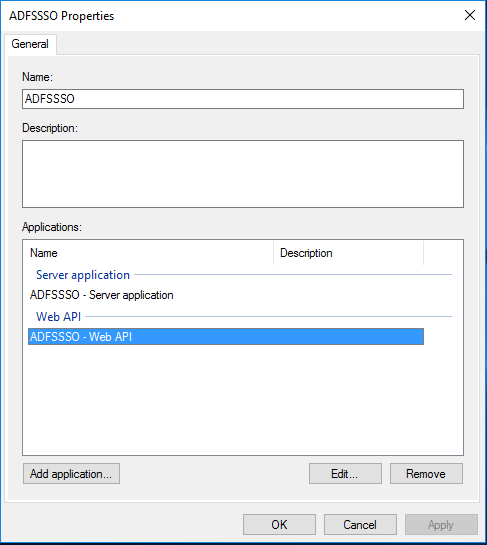
1. On the Application Groups page, right-click the name of the newly created “ADFSSSO” group and select Properties. This will open the properties configuration dialog.
The Applications section of the properties dialog should list the “ADFSSSO - Server application” configured previously.
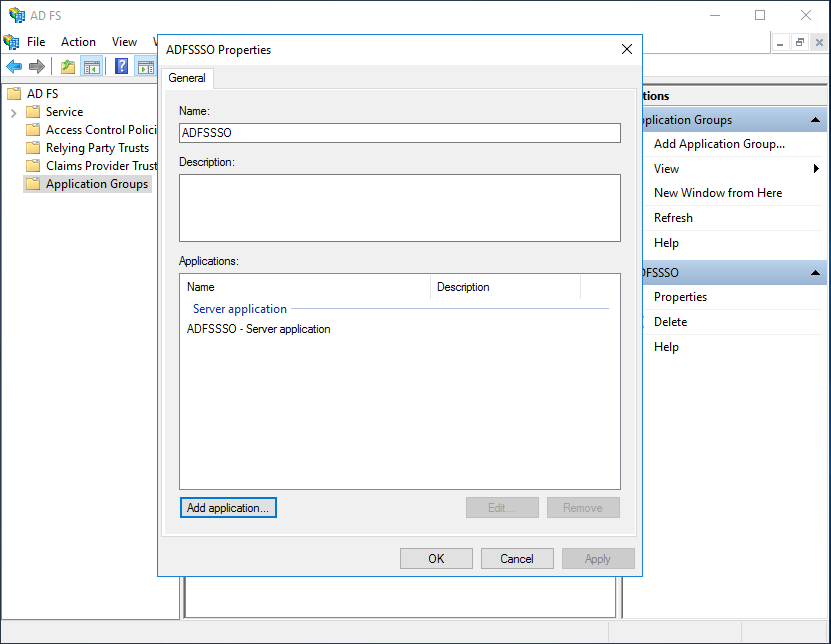
2. In the properties dialog, click the Add application button. This will open the Add a new application to ADFSSSO configuration dialog.
3. In the Welcome step of the dialog, select Web API in the Template section. Click Next to proceed with configuration.
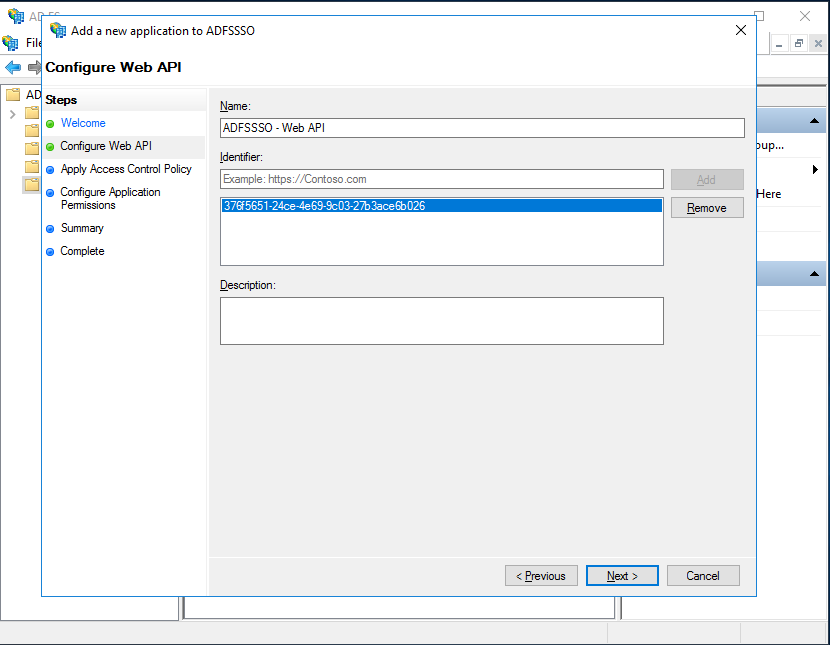
4. In the Configure Web API step of the dialog, enter “ADFSSSO - Web API” into the Name field.
5. Find the Client Identifier value previously saved and copied from the Add Application Group Wizard. Make sure to add the exact Client Identifier value into the Identifier field, and click Add. The added value will be displayed in the list below Identifier.
Click Next to proceed with configuration.
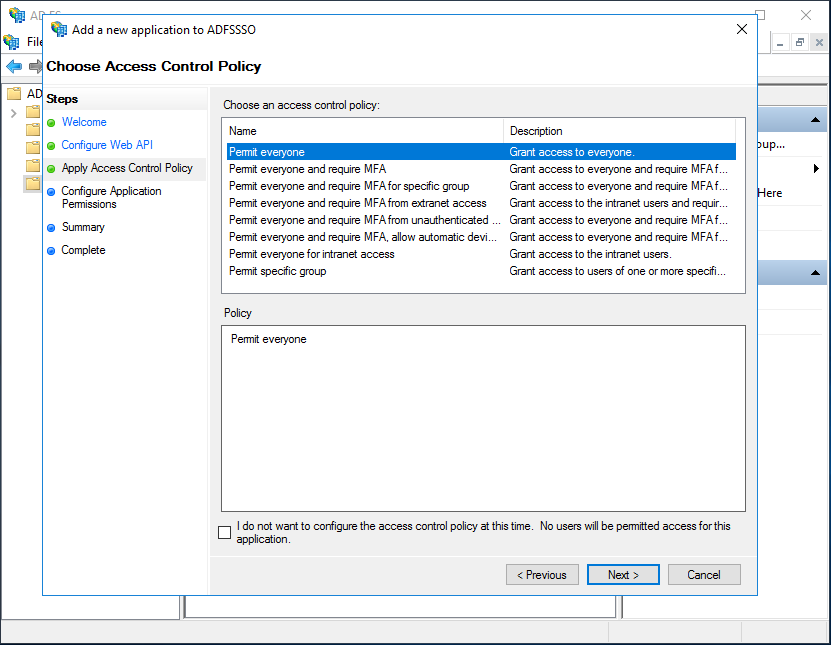
6. The Apply Access Control Policy step of the dialog allows setting permissions for accessing the application. Customers should select the policy that corresponds with their internal organization rules. Note that only one policy can be selected here.
After selecting an appropriate policy in the Choose an access control policy list, click Next to proceed with configuration.
7. In the Configure Application Permissions step of the dialog, the “ADFSSSO - Server application” should be displayed in the Client application (caller) list.
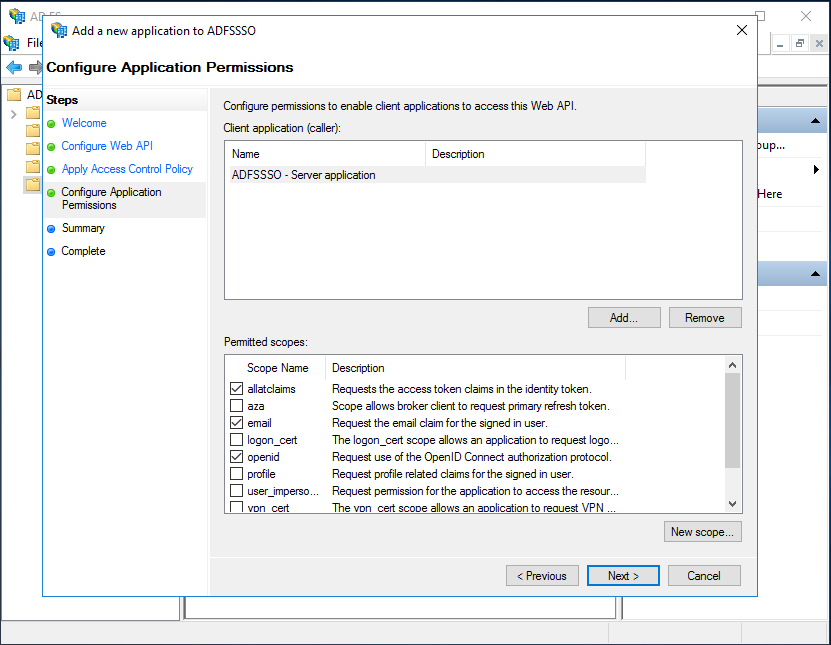
In the Permitted scopes section, the following checkboxes must be selected:
allatclaims (Requests the access token claims in the identity token.)
email (Request the email claim for the signed in user.)
openid (Request use of the OpenID Connect authorization protocol.)
8. After selecting the required scopes, click Next to proceed to the Summary step of the dialog. This step only displays an overview of values configured in previous steps, and allows going back to change the values if necessary by clicking the Previous button.
9. If all the values listed in the Summary step are accurate for the customer’s setup, click Next to complete the configuration and exit the dialog.
Customize ID Token Claims
To allow user accounts to authenticate on the appliance using the OpenID Connect protocol, the OpenID Connect provider must be able to return the following claim values:
unique username (for uniquely identifying the user)
unique email address (the same value can be used for username and email)
first name (optionally)
last name (optionally)
Note: the claim names are configurable and can differ from the values.
User access control for authenticating to the appliance (e.g., which users can authenticate, which ones cannot, and which users are administrators) is controlled by group membership. To control user access, the OpenID Connect provider must be able to return the groups claim, which contains the list of user groups.
Because the AD FS UserInfo endpoint is only able to return the subject claim and not any other requested claims, it is necessary to configure AD FS and customize the ID Token so that it is able to provide additional claims. Access tokens will contain the claims users specify in Issuance Transform Rules (see Configure Transform Rules for Claims).
Prerequisites: the patch KB4019472 for Windows Server 2016 should be installed
Refer to the official Microsoft documentation for the full description of how to customize ID tokens.
Example of a customized ID Token
{
"nonce":"ABkXHQas12vBBlfABvncNIclABRvFZDx",
"upn":"user1@devdomain.local",
"appid":"4b090259-3e43-45c8-b4b2-4f944ba501be",
"unique_name":"example.com\\john.doe",
"email":"john.doe@example.com",
"given_name":"John",
"family_name":"Doe",
"group":[
   "rl-appliance-user",
   "rl-appliance-admin"
],
"aud":"4b090259-3e43-45c8-b4b2-4f944ba501be",
"apptype":"Confidential",
"iss":"https://auth.example.com/adfs",
"sid":"S-1-5-21-bf88fae7-83e9-4202-bdd8-c00875e59a78",
"authmethod":"urn:oasis:names:tc:SAML:2.0:ac:classes:PasswordProtectedTransport",
"scp":"allatclaims openid",
"exp":1550231610,
"auth_time":1550221010,
"iat":1550228010,
"ver":"1.0",
"sub":"8rsysTk+d1Y/o4AsZE03Zub63tttX6OiW1iYqa+W6/0="
}
Configure Transform Rules for Claims
In AD FS Management on the Application Groups page, right-click the name of the “ADFSSSO” group and select Properties. This will open the properties configuration dialog.
Add a Rule for LDAP Claims
1. In the Applications section, open the properties dialog for the “ADFSSSO - Web API” application configured previously.
2. In the “ADFSSSO - Web API Properties” dialog, access the Issuance Transform Rules tab. Click the Add Rule button to create a new transform rule for sending custom claims.
This will open the Add Transform Claim Rule Wizard that allows selecting rule templates.
3. In the Choose Rule Type step of the wizard, select Send LDAP Attributes as Claims in the Claim rule template pull-down menu.
Click Next to proceed with configuration.
4. In the Configure Claim Rule step of the wizard, enter LDAP claims into the Claim rule name field.
In the Attribute store pull-down menu, Active Directory should be selected.
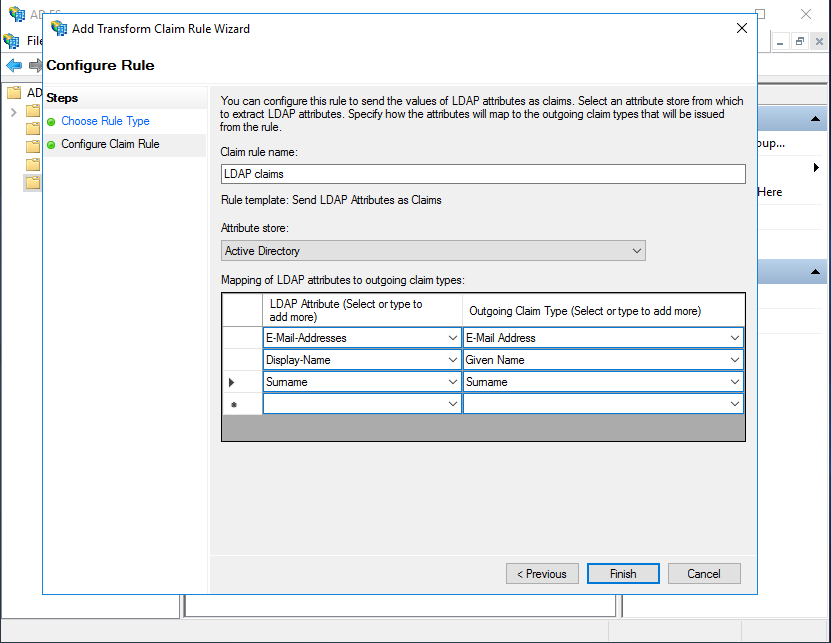
The following LDAP attributes have to be mapped to corresponding outgoing claim types.
LDAP Attribute |
Outgoing Claim Type |
|---|---|
E-Mail-Addresses |
E-Mail Address |
Display-Name |
Given Name |
Surname |
Surname |
Note: if the upn (User-Principal-Name) value corresponds to the email address of each user, the User-Principal-Name LDAP attribute has to be mapped to the E-Mail Address claim.
5. When all the attributes are mapped to the claims correctly, click the Finish button to complete configuration and exit the wizard.
Add Custom Rules
1. In the Applications section, open the properties dialog for the “ADFSSSO - Web API” application configured previously.
2. In the “ADFSSSO - Web API Properties” dialog, access the Issuance Transform Rules tab. Click the Add Rule button to create a new transform rule for sending custom claims.
This will open the Add Transform Claim Rule Wizard that allows selecting rule templates.
3. In the Choose Rule Type step of the wizard, select Send Claims Using a Custom Rule in the Claim rule template pull-down menu.
Click Next to proceed with configuration.
4. In the Configure Claim Rule step of the wizard, enter any name into the Claim rule name field.
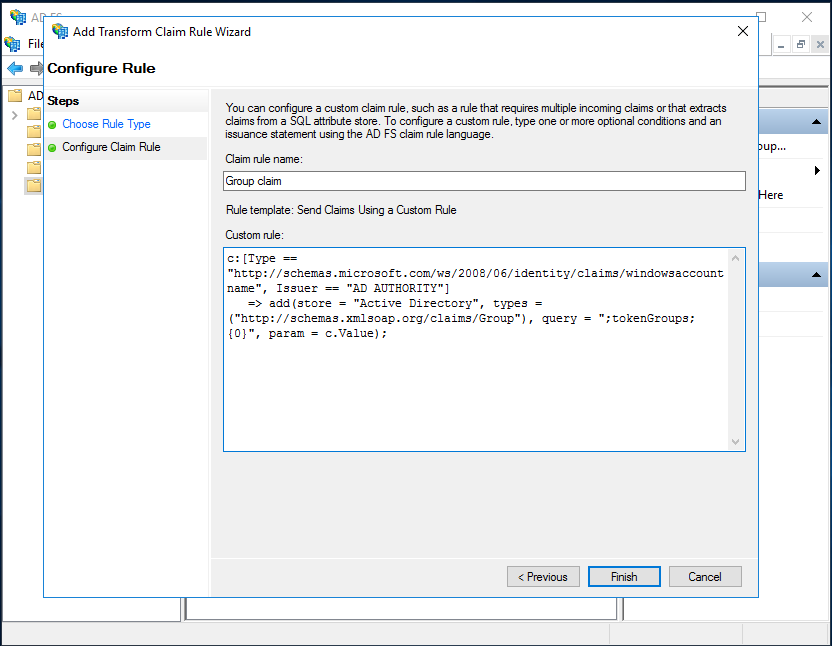
In the Custom rule field, enter the following rule:
c:[Type ==
"http://schemas.microsoft.com/ws/2008/06/identity/claims/windowsaccountname",
Issuer == "AD AUTHORITY"]
      => add(store = "Active Directory", types =
("http://schemas.xmlsoap.org/claims/Group"), query = ";tokenGroups;{0}", param
= c.Value);
5. Click Finish to complete configuration and exit the wizard.
To add another rule, start the wizard again from ADFSSSO - Web API Properties > Issuance Transform Rules > Add Rule as described previously.
In the Choose Rule Type step of the wizard, select Send Claims Using a Custom Rule in the Claim rule template pull-down menu and click Next.
In the Configure Claim Rule step of the wizard, enter any name into the Claim rule name field.
In the Custom rule field, enter the following rule:
c:[Type == "http://schemas.xmlsoap.org/claims/Group", Value =~ "(?i)rl-"]
      => issue(claim = c);
Click Finish to complete configuration and exit the wizard.
Confirm Changes to Transform Rules
After adding the LDAP claims rule and two custom rules, make sure that they are all listed in the ADFSSSO - Web API Properties > Issuance Transform Rules tab.
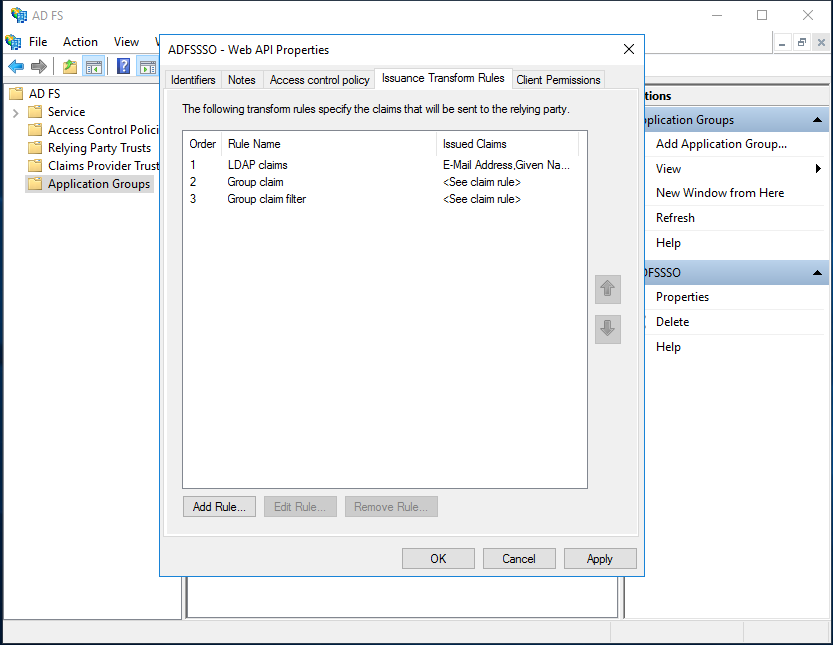
Click OK to confirm and save the newly added rules. This will close the ADFSSSO - Web API Properties dialog.
Access the OpenID Configuration Endpoint
If AD FS has been configured successfully, the openid-configuration endpoint should be accessible in the customer’s network via the web browser. It is represented as a metadata document in JSON that contains information required for authenticating applications.
This information is required for Part 2 of the configuration procedure, which is setting up OpenID Connect on the appliance.
https://<auth-server>/adfs/.well-known/openid-configuration
Example response
{
   "issuer":"https://auth.example.com/adfs",
   "authorization_endpoint":"https://auth.example.com/adfs/oauth2/authorize/",
   "token_endpoint":"https://auth.example.com/adfs/oauth2/token/",
   "jwks_uri":"https://auth.example.com/adfs/discovery/keys",
   "id_token_signing_alg_values_supported":["RS256"],
   "token_endpoint_auth_signing_alg_values_supported":["RS256"],
   "access_token_issuer":"http://auth.example.com/adfs/services/trust",
   "userinfo_endpoint":"https://auth.example.com/adfs/userinfo",
...
}
For full details about the endpoint and how to use it, refer to the official Microsoft documentation (OpenID Connect Metadata Document).
Part 2 - Configuring OpenID Connect on the appliance
To configure OpenID Connect:
on Spectra Detect Manager: go to Settings > Configuration > Authentication
on Spectra Analyze: go to Administration > Configuration > Authentication
In the dialog, select the OpenID Connect option. This will expand the dialog and display additional configuration options divided into sections - OpenID Connect client, OpenID Connect provider, Signature verification, Claim mapping, User access, Miscellaneous.
OpenID Connect client
In this section of the dialog, the values configured in Create an Application Group should be provided.
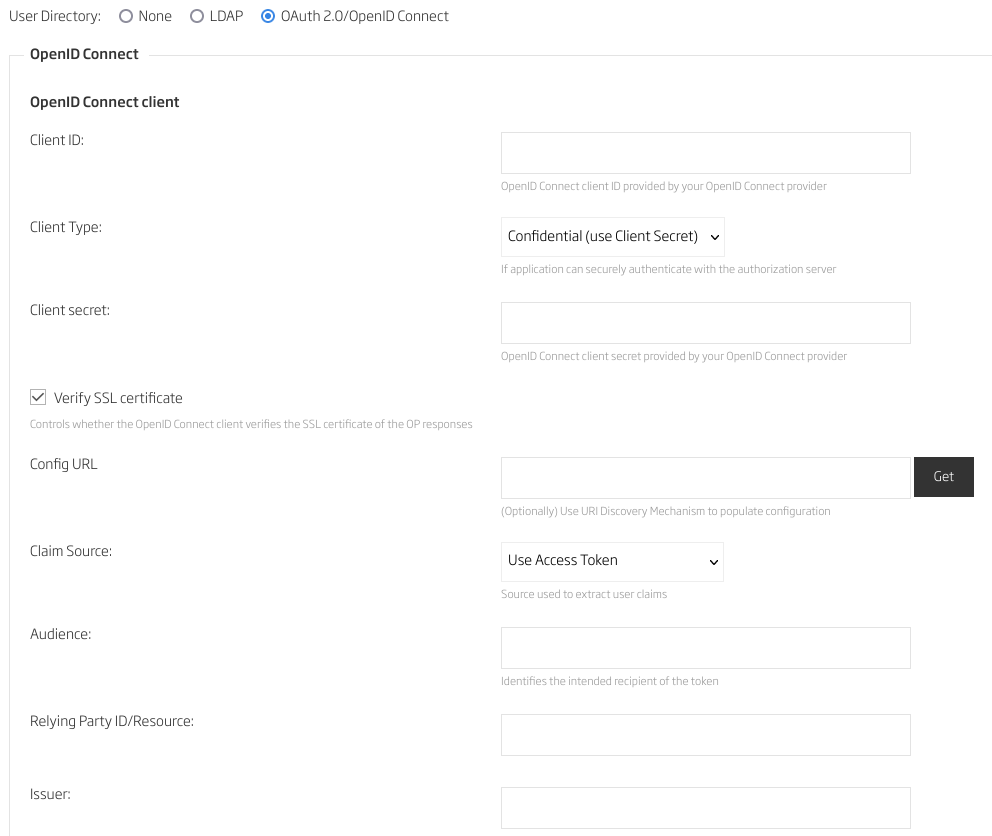
Find the Client Identifier value previously copied and saved, and enter it into the Client ID field.
Select the type of client (public or confidential). If confidential is selected, find the Secret value previously copied and saved, and enter it into the Client secret field.
Configure the remaining options:
Check Verify SSL certificate if the OIDC client needs to verify the SSL certificate of the authorization server
Fill the Config URL field if you have previously configured an OpenID Connect discovery document (using the .well-known/openid-configuration endpoint)
Select the source from which claims about the user will be taken:
ID Token
UserInfo endpoint
Access Token
If Access Token is selected, additional options are available:
Audience: Identifies the intended recipient of the token. This corresponds to the
audvalue in the token.Relying Party ID/Resource: In the AD FS management console, under Trust Relationships, select Relying Party Trusts. Copy the value for Spectra Analyze listed in the Identifier column and paste it here.
Issuer: Corresponds to the
issvalue in the token.
OpenID Connect provider
This section of the dialog requires the endpoint URLs that can be retrieved from the openid-configuration metadata document described in Access the OpenID Configuration Endpoint part of this guide.

Example values
Authorization Endpoint: https://auth.example.com/adfs/oauth2/authorize/
Token Endpoint: https://auth.example.com/adfs/oauth2/token/
UserInfo Endpoint: https://auth.example.com/userinfo
Values listed in the Scopes field refer to the OpenID Connect scopes that will be requested during login. The scopes were previously configured in the Configure the Web API for the Application Group part of this guide. The allatclaims scope should be included to allow access to the claims of the customized ID Token.
Enter the following values into the Scopes field: openid allatclaims
Signature verification
In the Signature algorithm pull-down menu, select the algorithm used to sign the ID token. Supported options are RS256 and HS256.
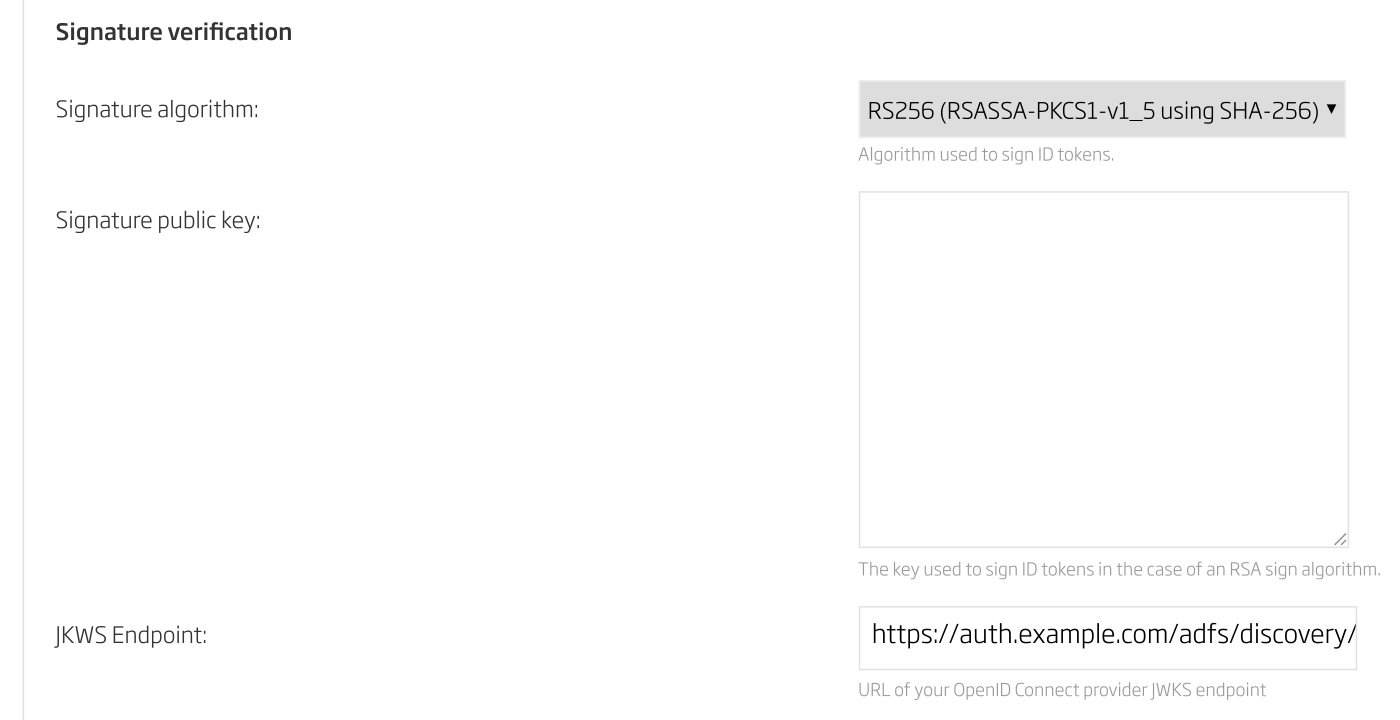
To check which algorithm is supported on AD FS, refer to the openid-configuration metadata document described in Access the OpenID Configuration Endpoint part of this guide. The algorithm is represented as the value assigned to the id_token_signing_alg_values_supported parameter in the metadata document.
If RS256 is selected as the algorithm, the Signature public key or the JKWS Endpoint must also be configured.
If the JKWS Endpoint has to be used, its URL can be found in the openid-configuration metadata document as the value assigned to the jwks_uri parameter. This URL should then be entered into the JKWS Endpoint field in the dialog.
Claim mapping
This section allows mapping OpenID Connect claims to internal user attributes on the appliance.
ID Token or Access Token must be selected in the OpenID Connect client section to retrieve additional claims from customized tokens (as described in Part 1).
Since claim names are configurable and can be modified by AD FS administrators, it is advisable to check and copy the correct claim names from the AD FS Management tool on Windows Server (check the AD FS > Service > Claim Descriptions section).
The short name of each claim should be entered into the corresponding field. In the Username field, it is possible to enter unique_name to use the unique name claim; email to use the email address claim; or any other short name to use a particular claim.
User access
All fields in this section are optional. Each field accepts only one value (the name of just one group). If a field is left blank, it will be ignored (treated as if it is not configured).
The prerequisite for setting up any of the fields in this section is that the groups claim must be configured on AD FS to allow user access control. This is described in the Customize ID Token Claims part of this guide.
The Active flag group field accepts the name of the group containing active users. If a user is not in this group, they will be marked as inactive.
The Superuser flag group field accepts the name of the group containing superusers (administrators). Users will be marked as superusers only if they are in this group.
The Require group field accepts the name of the group containing users who have access to the appliance. Authentication will fail for every user that is not in this group.
The Deny group field accepts the name of the group containing users who are not allowed to access the appliance. Authentication will fail for every user that is in this group.
Miscellaneous
This section can be used to require the authorization server to always re-authenticate the user, even if the user is already authenticated.
To enable this option, select the “Always prompt for login” checkbox.
Important notes:
If this option is enabled, the “prompt=login” parameter will be added to the authentication query as described in the official documentation.
This parameter is not intended and should not be used as a security feature, because it can be removed by users to avoid re-authentication.
If this parameter is used, the “Keep me signed in” checkbox will not be visible in the AD FS login form.