Authentication
General authentication settings
Administration > Configuration > Authentication
Session, cookies and passwords
-
Duration of login session
How long an authenticated user session will remain active on the appliance, set in minutes, hours or days. Minimum: 1 minute; maximum: 90 days. The default is 7 days.
-
Session expire at browser close
When selected, the session for every logged-in user will expire when the user closes their browser, requiring the user to log in every time they start their browser. This setting may be overridden by local web browser settings.
-
Session Inactivity Timeout
When selected, the session for every logged-in user will expire after the configured period of inactivity in minutes, hours or days.
-
Use session-based CSRF cookies
When selected, the CSRF (Cross-site request forgery) cookies will expire when the user closes their browser. By default, persistent CSRF cookies are used, and cookie age is approximately 1 year. This setting may be overridden by local web browser settings.
-
Password requirements
Criteria configured here apply to passwords for all accounts on the appliance. Federated (single sign-on) accounts are not affected by the criteria configured here. All settings are optional and can be used in combination with other password requirements.
Login security
Criteria configured here apply to all accounts on the appliance instance. Requests to the authentication API are also affected by the criteria configured here.
-
Temporarily block user login after certain number of failed login attempts
Select the checkbox to enable temporary account locking for every account that consecutively fails to log into the appliance. If this checkbox is not selected, other login security options cannot be configured and will not apply.
-
Number of failed login attempts
Specify the maximum allowed amount of consecutive failed login attempts. If a user’s login attempts exceed the number configured here, their account will be temporarily locked and prevented from logging in. When an account is locked, appliance administrators cannot unlock it. The user whose account is locked will have to wait until the login delay expires. The login delay is configured in the Block timeout field.
-
Block timeout
Specify how long should a user’s account remain locked after the maximum allowed amount of failed login attempts is exceeded. The time interval can be defined in seconds, or minutes, or hours. When an account is locked, appliance administrators cannot unlock it. The account will be automatically unlocked after the login delay configured here expires.
-
Block login for specific IP address
The appliance tracks IP addresses from which users are attempting to log in. If this checkbox is selected, users who consecutively fail to log in will be blocked by their current IP address. They will be unable to log in from the IP address detected in failed login attempts, but they will still be able to log in from any other IP address. If this checkbox is not selected, users will be blocked based on their account username regardless of the IP address, and they won’t be able to log in from any IP address. The login delay interval (Block timeout) and the allowed number of failed login attempts apply to accounts blocked in this way. If the appliance is behind a reverse proxy, make sure that reverse proxy settings in Administration ‣ Configuration ‣ General are properly configured so that the users’ IP addresses can be identified. When an account is blocked in this way, appliance administrators cannot unblock it. The account will be automatically unblocked after the configured login delay expires.
-
Send notification email to administrator when login block occurs
Select the checkbox to automatically send email notifications when an account is locked based on configured login security criteria. Email Alerting and SMTP must be enabled and configured on the appliance in order to send notification emails. The emails will be sent to the address configured in Administration ‣ Configuration ‣ System Alerting.
The remainder of this section describes federated (single sign-on) login options.
LDAP
Administration > Configuration > Authentication > User Directory: LDAP
Connection
-
LDAP server host
Host name or IP address of the server providing LDAP authentication. Example: ldap.example.com. Click the Test button to verify the connection to the server.
-
LDAP server port
LDAP server host port. Defaults: 389 (LDAP) or 636 (LDAPS).
-
TLS
Select to use a TLS (secure) connection when communicating with the LDAP server.
-
TLS require certificate
Select to require TLS certificate verification when communicating with the LDAP server.
-
Bind DN or user
User to use when logging in to the LDAP server for searches. DN stands for Distinguished Name. Examples: user@example.com or cn=user,dc=example,dc=com
-
Password
Password for the Bind user account.
User Schema
-
Base DN
Root node in LDAP from which to search for users. Example: cn=users,dc=example,dc=com
-
Scope
Scope of the user directory searches (base, one level, subordinate, subtree).
-
User Object Class
The objectClass value used for when searching users. Example: user
-
User Name Attribute
The user name field. Examples: sAMAccountName or cn
Group Schema
The majority of fields in this section are the same as in the User Schema section, except the settings relate to groups.
-
Group Type
LDAP group membership attribute (Member, Unique Member)
User attribute mapping
-
First name
Field to map to a user’s first name. Example: givenName
-
Last name
Field to map to a user’s last name. Example: sn
-
E-mail
Field to map to email. Example: mail
User access
-
Active flag group
Group DN. Users will be marked as active only if they belong to this group. Example: cn=active,ou=users,dc=example,dc=com
-
Superuser flag group
Group DN. Users will be marked as superusers only if they belong to this group. Example: cn=admins,ou=groups,dc=example,dc=com
-
Require group
Group DN. Authentication will fail for any user that does not belong to this group. Example: cn=enabled,ou=groups,dc=example,dc=com
-
Deny group
Group DN. Authentication will fail for any user that belongs to this group. Example: cn=disabled,ou=groups,dc=example,dc=com
Select TLS CA Certificate file
-
Select a file to upload
The dialog that opens when clicking Choose File allows the user to upload their own TLS certificate for verifying the LDAP host identity. The certificate must be in PEM file format. To apply the certificate, the options TLS and TLS require certificate must be enabled. It is also possible to upload certificates through the Central Configuration Management section on Spectra Detect Manager, if the appliance is connected and authorized on the Manager.
OAuth 2.0 / OpenID Connect
Example setup
Prerequisites
The prerequisites for using OpenID authentication with the Spectra Analyze appliance are the following:
- Spectra Analyze appliance version 5.7 or newer
- Configured AD FS (ActiveDirectory Federation Services) on Windows Server 2016 or newer in the customer’s organization. Although AD FS is a free feature on Windows Server, commissioning it requires a Windows Server license and a server to host the AD FS service.
- AD FS servers need to be patched, updated and backed up on a regular basis.
Configuration
The configuration procedure consists of two parts:
- Configuring AD FS on Windows Server 2016 in the customer’s organization
- Configuring OpenID Connect on the Spectra Analyze appliance
Part 1 - Configuring AD FS on Windows Server 2016
This guide describes only the specific configuration options required for setting up OpenID connect to work with the Spectra Analyze appliance.
Customers should consult the official Microsoft documentation for all details regarding the AD FS setup.
1.1 Create an Application Group
The first step is to create an application group on AD FS 2016 in the customer’s organization.
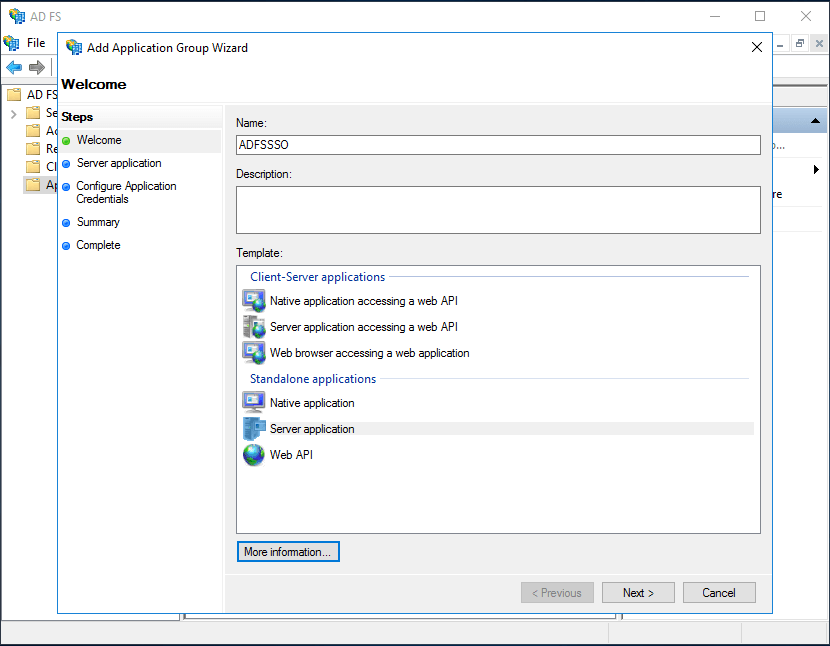
- Access the AD FS Management configuration page. Right-click the Application Groups option and select Add Application Group. This should start the Add Application Group Wizard.
- In the Welcome step of the wizard, enter “ADFSSSO” into the Name field. In the Template section, select the Standalone applications > Server application or website option, and click Next.
- In the Server application step of the wizard, enter “ADFSSSO - Server application” into the Name field. In the Redirect URI field, enter the URL to the Spectra Analyze appliance that will use the OpenID authentication (
http://<a1000-hostname>/oidc/callback).
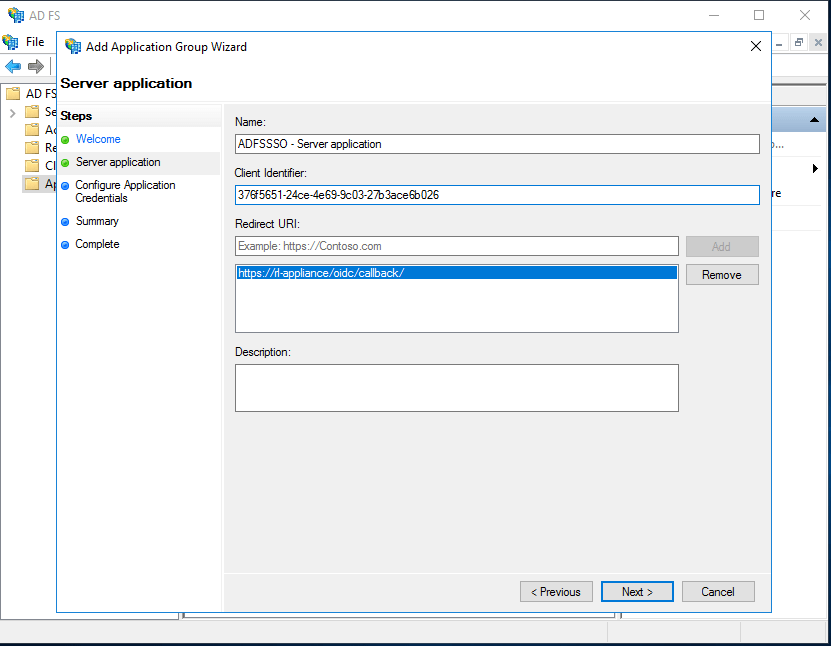
While in this step of the wizard, make sure to copy the value from the Client Identifier field and save it into a text file. This value will have to be provided later in the configuration process.
After copying the value, click Next to proceed with configuration.
- In the Configure Application Credentials step of the wizard, select the Generate a shared secret checkbox. When the value is generated in the Secret field, copy it and save it to a text file. This value will be required later in the configuration process.
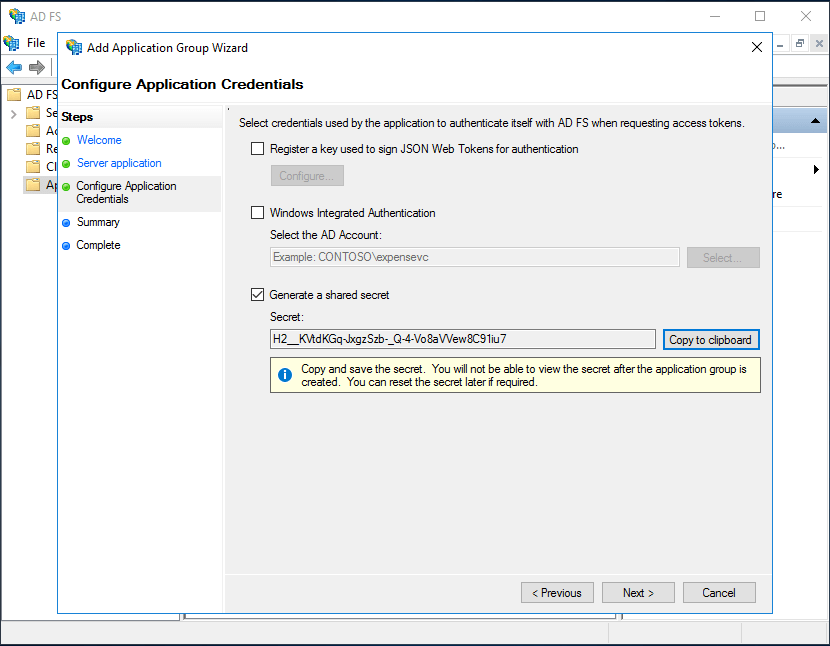
- After copying the value, click Next to proceed to the Summary step of the wizard. This step only displays an overview of values configured in previous steps, and allows going back to change the values if necessary by clicking the Previous button.
- If all the values listed in the Summary step are accurate for the customer’s setup, click Next to complete the configuration and exit the wizard.
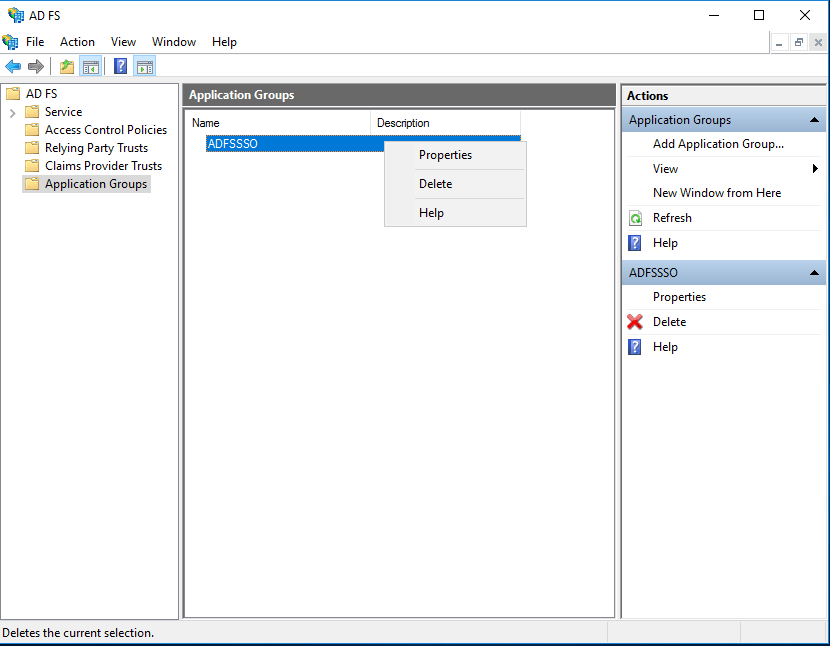
The Application Groups page should now display the newly created “ADFSSSO” group.
1.2 Configure the Web API for the Application Group
- On the Application Groups page, right-click the name of the newly created “ADFSSSO” group and select Properties. This will open the properties configuration dialog.
The Applications section of the properties dialog should list the “ADFSSSO - Server application” configured previously.
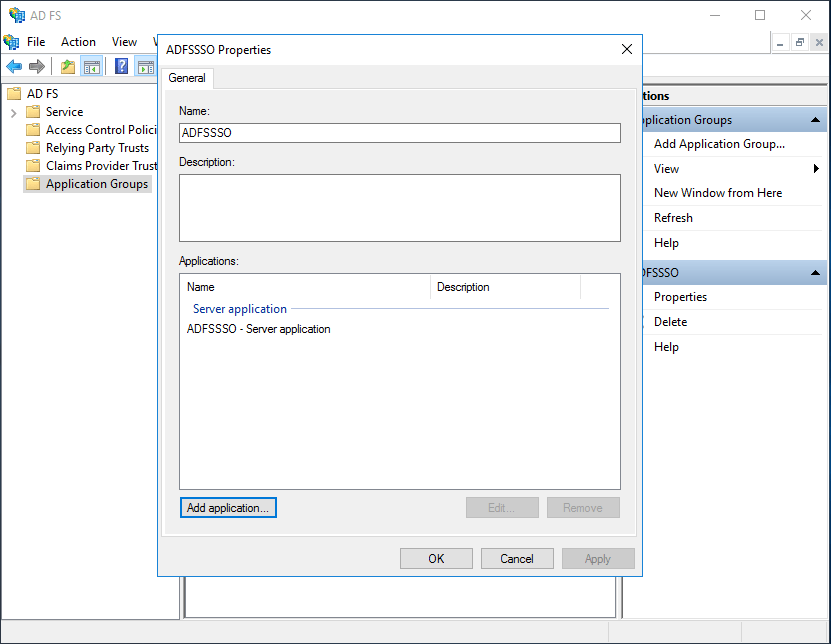
- In the properties dialog, click the Add application button. This will open the Add a new application to ADFSSSO configuration dialog.
- In the Welcome step of the dialog, select Web API in the Template section. Click Next to proceed with configuration.
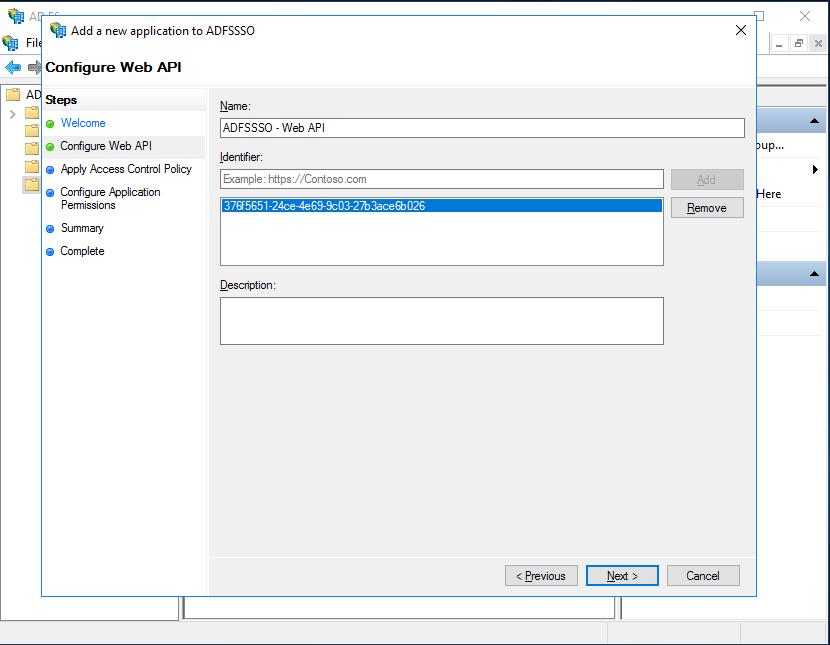
- In the Configure Web API step of the dialog, enter “ADFSSSO - Web API” into the Name field.
- Find the Client Identifier value previously saved and copied from the Add Application Group Wizard. Make sure to add the exact Client Identifier value into the Identifier field, and click Add. The added value will be displayed in the list below Identifier.
Click Next to proceed with configuration.
- The Apply Access Control Policy step of the dialog allows setting permissions for accessing the application. Customers should select the policy that corresponds with their internal organization rules. Only one policy can be selected here.
After selecting an appropriate policy in the Choose an access control policy list, click Next to proceed with configuration.

- In the Configure Application Permissions step of the dialog, the “ADFSSSO - Server application” should be displayed in the Client application (caller) list.
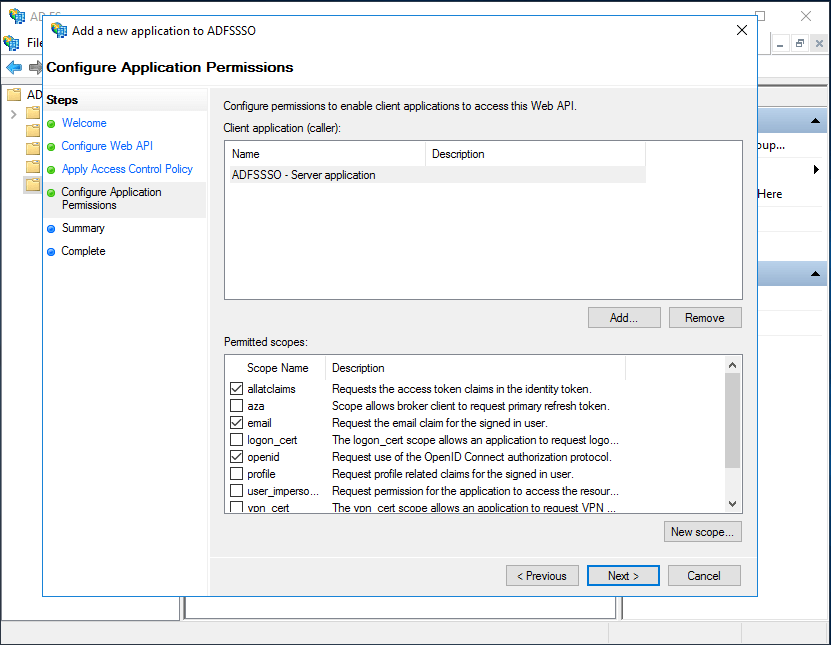
In the Permitted scopes section, the following checkboxes must be selected:
- allatclaims (Requests the access token claims in the identity token.)
- email (Request the email claim for the signed in user.)
- openid (Request use of the OpenID Connect authorization protocol.)
- After selecting the required scopes, click Next to proceed to the Summary step of the dialog. This step only displays an overview of values configured in previous steps, and allows going back to change the values if necessary by clicking the Previous button.
- If all the values listed in the Summary step are accurate for the customer’s setup, click Next to complete the configuration and exit the dialog.
1.3 Customize ID Token Claims
To allow user accounts to authenticate on the Spectra Analyze appliance using the OpenID Connect protocol, the OpenID Connect provider must be able to return the following claim values:
- unique username
- case-insensitive: for example, "john" and "John" cannot coexist
- email address
- the same value can be used for username and email
- the email address doesn't have to be unique (but then it can't be used as the unique username)
- first name (optionally)
- last name (optionally)
Note: the claim names are configurable and can differ from the values.
User access control for authenticating to the appliance (e.g., which users can authenticate, which ones cannot, and which users are administrators) is controlled by group membership. To control user access, the OpenID Connect provider must be able to return the groups claim, which contains the list of user groups.
Because the AD FS UserInfo Endpoint is only able to return the subject claim and not any other requested claims, it is necessary to configure AD FS and customize the ID Token so that it is able to provide additional claims. Access tokens will contain the claims users specify in Issuance Transform Rules (see 1.4 Configure Transform Rules for Claims).
Prerequisites: the patch KB4019472 for Windows Server 2016 should be installed
Refer to the official Microsoft documentation for the full description of how to customize ID tokens.
Example of a customized ID Token
{
"nonce":"ABkXHQas12vBBlfABvncNIclABRvFZDx",
"upn":"user1@devdomain.local",
"appid":"4b090259-3e43-45c8-b4b2-4f944ba501be",
"unique_name":"example.com\\john.doe",
"email":"john.doe@example.com",
"given_name":"John",
"family_name":"Doe",
"group":[
   "rl-appliance-user",
   "rl-appliance-admin"
],
"aud":"4b090259-3e43-45c8-b4b2-4f944ba501be",
"apptype":"Confidential",
"iss":"https://auth.example.com/adfs",
"sid":"S-1-5-21-bf88fae7-83e9-4202-bdd8-c00875e59a78",
"authmethod":"urn:oasis:names:tc:SAML:2.0:ac:classes:PasswordProtectedTransport",
"scp":"allatclaims openid",
"exp":1550231610,
"auth_time":1550221010,
"iat":1550228010,
"ver":"1.0",
"sub":"8rsysTk+d1Y/o4AsZE03Zub63tttX6OiW1iYqa+W6/0="
}
1.4 Configure Transform Rules for Claims
In AD FS Management on the Application Groups page, right-click the name of the “ADFSSSO” group and select Properties. This will open the properties configuration dialog.
1.4.1 Add a Rule for LDAP Claims
- In the Applications section, open the properties dialog for the “ADFSSSO - Web API” application configured previously.

- In the “ADFSSSO - Web API Properties” dialog, access the Issuance Transform Rules tab. Click the Add Rule button to create a new transform rule for sending custom claims.
This will open the Add Transform Claim Rule Wizard that allows selecting rule templates.
- In the Choose Rule Type step of the wizard, select Send LDAP Attributes as Claims in the Claim rule template pull-down menu.
Click Next to proceed with configuration.
- In the Configure Claim Rule step of the wizard, enter LDAP claims into the Claim rule name field.
In the Attribute store pull-down menu, Active Directory should be selected.

The following LDAP attributes have to be mapped to corresponding outgoing claim types.
| LDAP Attribute | Outgoing Claim Type |
|---|---|
| E-Mail-Addresses | E-Mail Address |
| Display-Name | Given Name |
| Surname | Surname |
Note: if the upn (User-Principal-Name) value corresponds to the email address of each user, the User-Principal-Name LDAP attribute has to be mapped to the E-Mail Address claim.
- When all the attributes are mapped to the claims correctly, click the Finish button to complete configuration and exit the wizard.
1.4.2 Add Custom Rules
- In the Applications section, open the properties dialog for the “ADFSSSO - Web API” application configured previously.
- In the “ADFSSSO - Web API Properties” dialog, access the Issuance Transform Rules tab. Click the Add Rule button to create a new transform rule for sending custom claims.
This will open the Add Transform Claim Rule Wizard that allows selecting rule templates.
- In the Choose Rule Type step of the wizard, select Send Claims Using a Custom Rule in the Claim rule template pull-down menu.
Click Next to proceed with configuration.
- In the Configure Claim Rule step of the wizard, enter any name into the Claim rule name field.
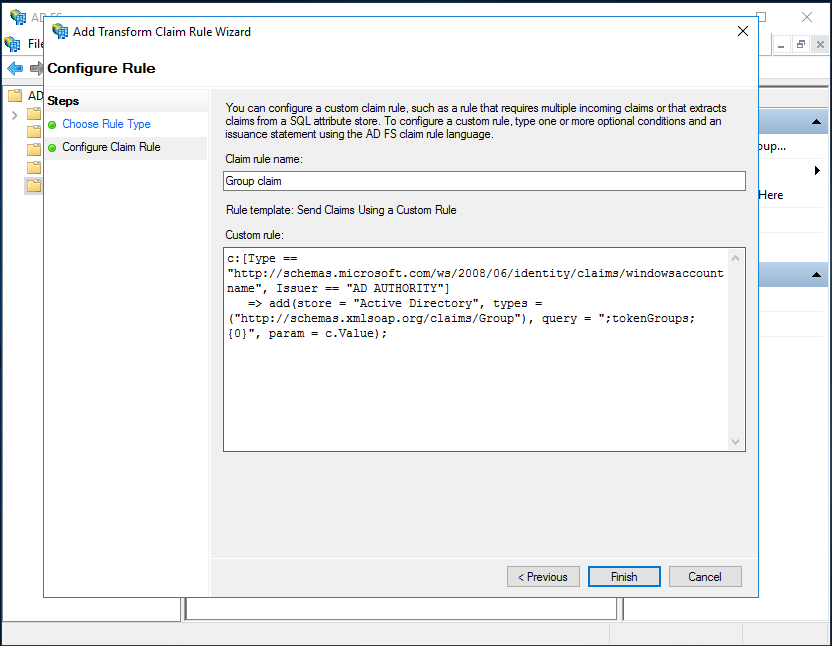
In the Custom rule field, enter the following rule:
c:[Type ==
"http://schemas.microsoft.com/ws/2008/06/identity/claims/windowsaccountname",
Issuer == "AD AUTHORITY"]
      => add(store = "Active Directory", types =
("http://schemas.xmlsoap.org/claims/Group"), query = ";tokenGroups;{0}", param
= c.Value);
- Click Finish to complete configuration and exit the wizard.
To add another rule, start the wizard again from ADFSSSO - Web API Properties > Issuance Transform Rules > Add Rule as described previously.
In the Choose Rule Type step of the wizard, select Send Claims Using a Custom Rule in the Claim rule template pull-down menu and click Next.
In the Configure Claim Rule step of the wizard, enter any name into the Claim rule name field.
In the Custom rule field, enter the following rule:
c:[Type == "http://schemas.xmlsoap.org/claims/Group", Value =~ "(?i)rl-"]
      => issue(claim = c);
Click Finish to complete configuration and exit the wizard.
1.4.3 Confirm Changes to Transform Rules
After adding the LDAP claims rule and two custom rules, make sure that they are all listed in the ADFSSSO - Web API Properties > Issuance Transform Rules tab.
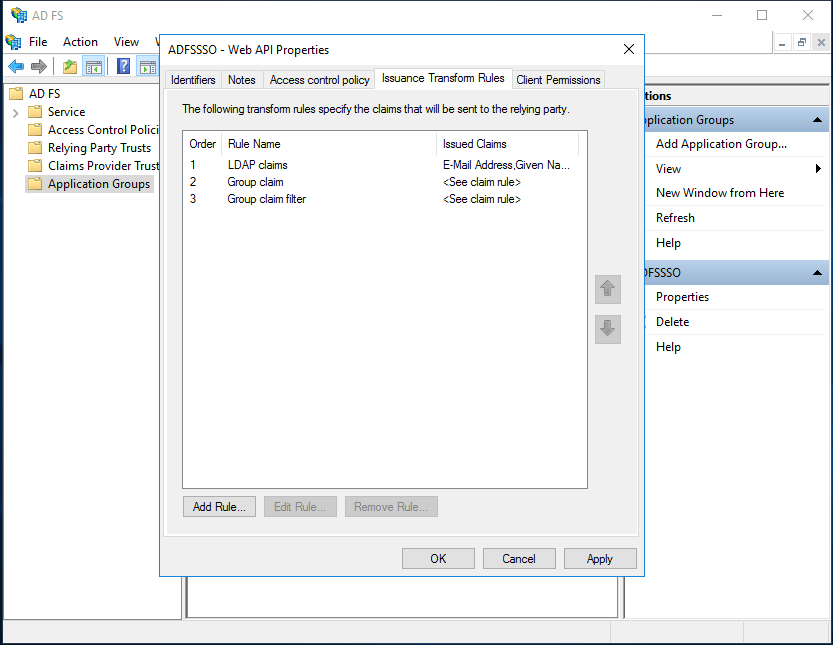
Click OK to confirm and save the newly added rules. This will close the ADFSSSO - Web API Properties dialog.
1.5 Access the OpenID Configuration Endpoint
If AD FS has been configured successfully, the openid-configuration endpoint should be accessible in the customer’s network via the web browser. It is represented as a metadata document in JSON that contains information required for authenticating applications.
This information is required for the Part 2 of the configuration procedure, which is setting up OpenID Connect on the Spectra Analyze appliance.
https://<auth-server>/adfs/.well-known/openid-configuration
Example response
{
   "issuer":"https://auth.example.com/adfs",
   "authorization_endpoint":"https://auth.example.com/adfs/oauth2/authorize/",
   "token_endpoint":"https://auth.example.com/adfs/oauth2/token/",
   "jwks_uri":"https://auth.example.com/adfs/discovery/keys",
   "id_token_signing_alg_values_supported":["RS256"],
   "token_endpoint_auth_signing_alg_values_supported":["RS256"],
   "access_token_issuer":"http://auth.example.com/adfs/services/trust",
   "userinfo_endpoint":"https://auth.example.com/adfs/userinfo",
...
}
For full details about the endpoint and how to use it, refer to the official Microsoft documentation (chapter “Fetch the OpenID Connect Metadata Document”).
Part 2 - Configuring OpenID Connect on the Spectra Analyze appliance
To configure OpenID Connect on the Spectra Analyze appliance, access the Administration > Configuration > Authentication dialog.
In the dialog, select the OAuth 2.0/OpenID Connect option. This will expand the dialog and display additional configuration options divided into sections - OpenID Connect client, OpenID Connect provider, Signature verification, Claim mapping, User access, Miscellaneous.
2.1 OpenID Connect client
In this section of the dialog, the values configured in 1.1 Create an Application Group should be provided.
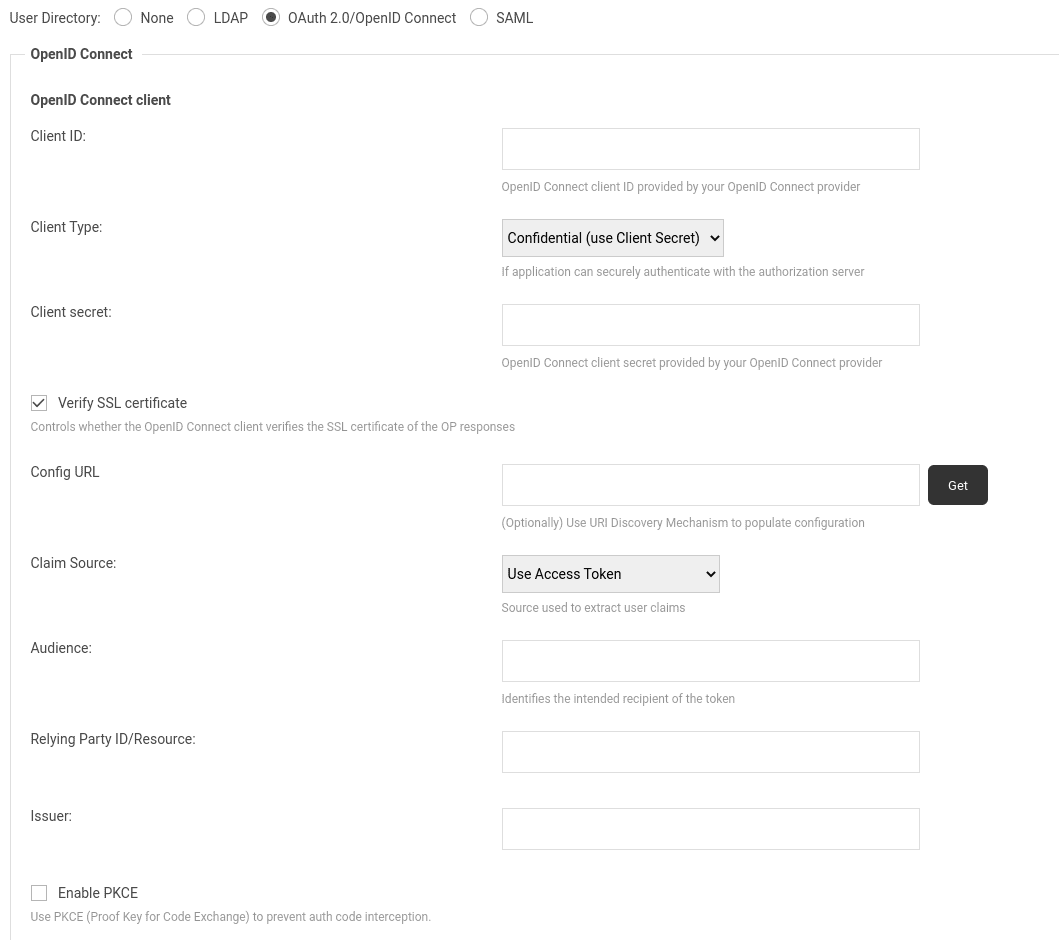
Find the Client Identifier value previously copied and saved, and enter it into the Client ID field.
Select the type of client (public or confidential). If confidential is selected, find the Secret value previously copied and saved, and enter it into the Client secret field.
Configure the remaining options:
- Check Verify SSL certificate if the OIDC client needs to verify the SSL certificate of the authorization server
- Fill the Config URL field if you have previously configured an OpenID Connect discovery document (using the .well-known/openid-configuration endpoint)
- Select the source from which claims about the user will be taken:
- ID Token
- UserInfo endpoint
- Access Token
If Access Token is selected, additional options are available:
- Audience: Identifies the intended recipient of the token. This corresponds to the
audvalue in the token. - Relying Party ID/Resource: In the AD FS management console, under Trust Relationships, select Relying Party Trusts. Copy the value for Spectra Analyze listed in the Identifier column and paste it here.
- Issuer: Corresponds to the
issvalue in the token.
Finally, check Enable PKCE in case your authentication provider requires PKCE as additional verification.
2.2 OpenID Connect provider
This section of the dialog requires the endpoint URLs that can be retrieved from the openid-configuration metadata document described in 1.5 Access the OpenID Configuration Endpoint part of this guide.
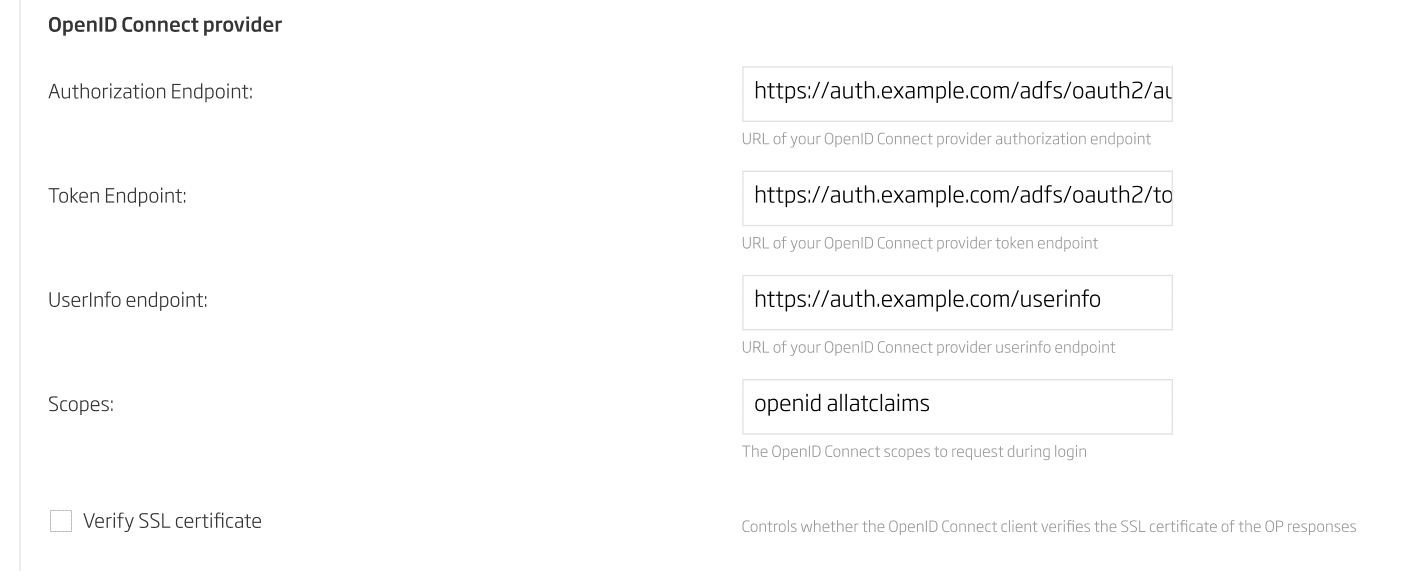
Example values
Authorization Endpoint: https://auth.example.com/adfs/oauth2/authorize/
Token Endpoint: https://auth.example.com/adfs/oauth2/token/
UserInfo Endpoint: https://auth.example.com/userinfo
Values listed in the Scopes field refer to the OpenID Connect scopes that will be requested during login. The scopes were previously configured in the 1.2 Configure the Web API for the Application Group part of this guide. The allatclaims scope should be included to allow access to the claims of the customized ID Token.
Enter the following values into the Scopes field: openid allatclaims
2.3 Signature verification
In the Signature algorithm pull-down menu, select the algorithm used to sign the ID token. Supported options are RS256 and HS256.
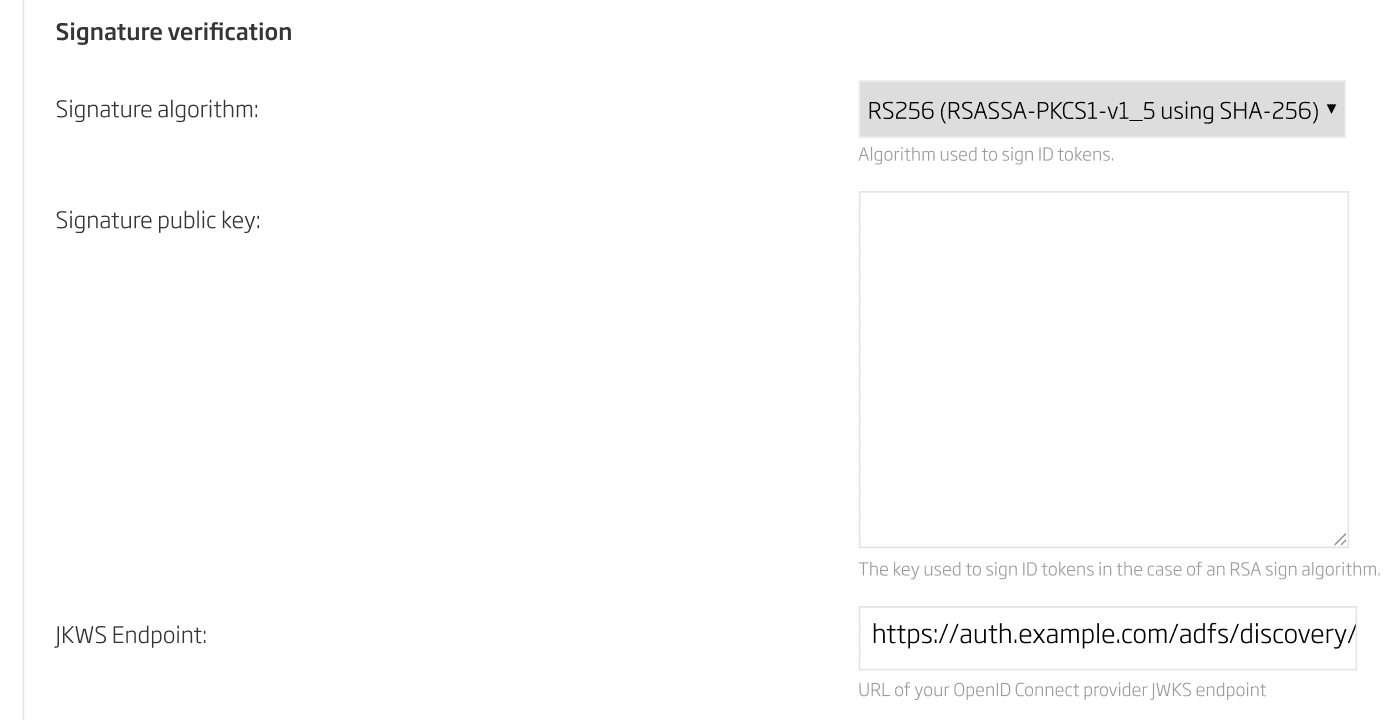
To check which algorithm is supported on AD FS, refer to the openid-configuration metadata document described in 1.5 Access the OpenID Configuration Endpoint part of this guide. The algorithm is represented as the value assigned to the id_token_signing_alg_values_supported parameter in the metadata document.
If RS256 is selected as the algorithm, the Signature public key or the JWKS Endpoint must also be configured.
If the JWKS Endpoint has to be used, its URL can be found in the openid-configuration metadata document as the value assigned to the jwks_uri parameter. This URL should then be entered into the JWKS Endpoint field in the dialog.
2.4 Claim mapping
This section allows mapping OpenID Connect claims to internal user attributes on the appliance.
ID Token or Access Token must be selected in the OpenID Connect client section to retrieve additional claims from customized tokens (as described in Part 1).
Since claim names are configurable and can be modified by AD FS administrators, it is advisable to check and copy the correct claim names from the AD FS Management tool on Windows Server (check the AD FS > Service > Claim Descriptions section).
The short name of each claim should be entered into the corresponding field. In the Username field, it is possible to enter unique_name to use the unique name claim; email to use the email address claim; or any other short name to use a particular claim.
2.5 User access
All fields in this section are optional. Each field accepts only one value (the name of just one group). If a field is left blank, it will be ignored (treated as if it is not configured).
The prerequisite for setting up any of the fields in this section is that the groups claim must be configured on AD FS to allow user access control. This is described in the 1.3 Customize ID Token Claims part of this guide.
The Active flag group field accepts the name of the group containing active users. If a user is not in this group, they will be marked as inactive.
The Superuser flag group field accepts the name of the group containing superusers (administrators). Users will be marked as superusers only if they are in this group.
The Require group field accepts the name of the group containing users who have access to the appliance. Authentication will fail for every user that is not in this group.
The Deny group field accepts the name of the group containing users who are not allowed to access the appliance. Authentication will fail for every user that is in this group.
2.6 Miscellaneous
This section can be used to require the authorization server to always re-authenticate the user, even if the user is already authenticated.
To enable this option, select the “Always prompt for login” checkbox.
Important notes:
- If this option is enabled, the “prompt=login” parameter will be added to the authentication query as described in the official documentation.
- This parameter is not intended and should not be used as a security feature, because it can be removed by users to avoid re-authentication.
- If this parameter is used, the “Keep me signed in” checkbox will not be visible in the AD FS login form.
Configuration reference
Administration > Configuration > Authentication > User Directory: OAuth 2.0/OpenID Connect
| OpenID Connect client | |
|---|---|
| Client ID | Client Identifier value for the application that was previously registered with Active Directory Federation Services (AD FS). This should be provided to the appliance administrator by the OpenID Connect provider. |
| Client Type | Specifies if the appliance will be configured as a public or a confidential application. Possible values are Public (do not use Client Secret) and Confidential (use Client Secret). If set to Confidential, the Client secret must be provided in the next field. |
| Client secret | Visible only if Client Type is set to Confidential (use Client Secret). The value used by the application to authenticate to the authorization server. Generated when configuring application credentials on AD FS. This should be provided to the appliance administrator by the OpenID Connect provider. |
| Verify SSL certificate | If this checkbox is selected, the OpenID Connect client will verify the SSL certificate of the provider responses. |
| Config URL | Can be optionally used to populate configuration fields by providing the URI discovery mechanism URL of the Identity Provider and clicking the Get button. |
| Claim Source | Specifies which source will be used to authenticate and authorize users. Supported values are Use ID Token (OpenID), Use UserInfo endpoint (OpenID) and Use Access Token. |
| Audience | Visible only if Claim Source is set to Use Access Token. Specifies the expected value of the Audience (aud) field in the token to confirm its validity. |
| Relying Party ID/Resource | Visible only if Claim Source is set to Use Access Token. The ID of the application requesting user authentication from the Identity Provider. In this case, it should be set to the identifier assigned to the appliance in the Identity Provider’s configuration. |
| Issuer | Visible only if Claim Source is set to Use Access Token. Specifies the expected value of the Issuer (iss) field in the token to confirm its validity. |
| Enable PKCE | Additional verification method used by some identity providers. The code challenge method used by Spectra Analyze is always S256. |
| OpenID Connect provider | |
| Authorization Endpoint | URL of the OpenID Connect provider authorization endpoint. This endpoint handles authentication and authorization of users. |
| Token Endpoint | URL of the OpenID Connect provider token endpoint. This endpoint can be used by a client application to request and obtain ID, refresh, and access tokens. |
| UserInfo endpoint | Visible only if Claim Source is set to Use UserInfo endpoint (OpenID). URL of the OpenID Connect provider UserInfo endpoint. The UserInfo endpoint is a protected resource from which client applications can retrieve information about claims for the logged-in user. |
| Scopes | Provide one or more scopes that should be requested during login. |
| Signature verification | |
| Signature algorithm | Select which algorithm should be used to sign ID tokens. Supported options are RS265 and HS256. If RS256 is selected as the algorithm, the Signature public key or the JWKS Endpoint must also be configured. |
| Signature public key | The key used to sign ID tokens when using the RS256 signature algorithm. |
| JWKS Endpoint | URL of the JWKS (JSON Web Key Set) endpoint configured by the OpenID Connect provider. |
| Claim mapping | |
| Username | Short name of the claim containing the unique username for identifying the user. Usernames are case-insensitive. For example, "john" and "John" cannot coexist. |
| Short name of the claim containing the email address of the user. The address itself doesn't have to be unique - multiple users can have the same email. | |
| First name | Short name of the claim containing the first name of the user. |
| Last name | Short name of the claim containing the last name of the user. |
| Groups | Name of the claim that contains a list of user groups. |
| Groups Delimiter | (Optional) Character to split the Groups string on. |
| User access | |
| Active flag group | Accepts names of one or more groups containing active users. If a user is not in one of these groups, they will be marked as inactive. |
| Superuser flag group | Accepts names of one or more groups containing superusers (administrators). Users will be marked as superusers only if they are in one of these groups. |
| Require group | Accepts names of one or more groups containing users who have access to the appliance. Authentication will fail for every user that is not in one of these groups. |
| Deny group | Accepts names of one or more groups containing users who are not allowed to access the appliance. Authentication will fail for every user that is in one of these groups. |
| Access Groups Delimiter | Character to split the User Access Groups on. Characters entered in this field must not be used in any access group name. Max length of delimiter is 2 characters. |
| Miscellaneous | |
| Always prompt for login | Select the checkbox to require the authorization server to always re-authenticate the user, even if the user is already authenticated. If this option is enabled, the prompt=login parameter will be added to the authentication query. The “Keep me signed in” checkbox will not be visible in the AD FS login form. This option should not be used as a security measure, because the parameter can be removed by users to bypass re-authentication. |
SAML
Identity Provider setup
With your Identity Provider (IdP), create and configure the Spectra Analyze application. In this setup, the appliance is a Service Provider (SP). Depending on the IdP, different values are required to set up an SP. In addition, the SAML response issued by the IdP when logging in to an SP may have different default values.
Information required by the IdP usually involves the following:
- Entity ID
- This is the unique identifier of the SP, and is usually based on a URL.
- For Spectra Analyze, Entity ID is configurable (see below).
- ACS
- This is the Assertion Consumer Service, or the address where the Identity Provider sends a SAML response.
- In some providers, this is also called a Reply or Single sign-on URL.
- For Spectra Analyze, this is:
<Appliance URL>/saml2/acs/
- Login URL
- This is not a required field in some Identity Providers.
- For Spectra Analyze, this is:
<Appliance URL>/accounts/login/
- Attribute Statements
- These are the claims to be sent back to the Service Provider (SP)
- Required attributes:
emailanduserName(which can also be an email). - Optional attributes
- Group Attribute Statements
- Some IdPs have a separate setting for groups.
- It is common to send all groups using a regex like
.*. The Service Provider (SP) will then match the relevant groups.
Assign the users who need access to Spectra Analyze to one group, and also assign admin users (or Superusers) to an additional group. Then, assign both groups to the Spectra Analyze application.
Note: You can create a third group specifically for users you want to explicitly deny access.
After configuring the application in the IdP, export an XML metadata file.
Service Provider setup
Administration > Configuration > Authentication > User Directory: SAML
Within Spectra Analyze, configure the following fields.
-
Entity ID
Unique identifier for the SP. An example setup would be to use the appliance address + a suffix, such as
/sp. For example,https://spectraanalyze.reversinglabs.com/sp. -
Federation Metadata file
This is the XML file exported from the Identity Provider.
-
Claim mapping
The values provided here are the attributes (fields) in the Identity Provider’s SAML response that are to be used in Spectra Analyze. These can have different values, depending on how you configure them on the IdP.
UsernameandE-mailare required fields.For example, if you have the following attributes in your IdP:
userNameemailgroups
...add them in this section. You can also use a single attribute to populate several fields in Spectra Analyze. For example, if you have an
emailattribute in your IdP, you can listemailtwice here: once for the username, and once for the email. The remainder of the fields can be left blank.Multiple users can share the same email attribute. If that is the case,
emailcan't be used for a username because a username must be unique. Usernames are also case-insensitive: for example, if a user "john" exists, another user "John" can't be added. -
User access
In this section, set one or more group IDs which correspond to specific actions or permissions you wish to enforce. For example, if you set up a Superuser flag group called
spectraanalyze-adminand add certain users to that group within your Identity Provider, then only those users will have superuser (admin) privileges on the appliance. Certain Identity Providers don’t expose the names of groups, and instead use an ID like this one:bcbd79b7-784f-43f2-af70-4dd67cbbc463. In these cases, use that instead of the group name.noteWhen using groups, Superusers must also be included in a regular user group (Active or Require). The Active and Require groups function the same way, so you do not need to use both.
-
Allow unsolicited responses from IdP
There are two ways of logging in using SAML:Going to the appliance login page and clicking Login Using SSO.Opening the Identity Provider’s dashboard and logging in to the appliance from there. If you wish to enable logging in from a dashboard, mark this checkbox.