Alerts
The Alerts feature allows real-time monitoring to track changes in malware classification and analysis results. It automates notifications for specific events, allowing users to utilize their time more efficiently and be informed of malware status changes on-the-go.
Users can receive notifications about changes related to the samples on the appliance and in Spectra Intelligence. The notifications make it easy to monitor and track various malware analysis activities even when the users are away from the appliance. Users can choose how often they want to be notified, and where they want to receive the notifications. Any unresolved alerts are indicated by a red badge on the alerts indicator in the top right of the interface.
The conditions that define when an alert should be generated are called subscriptions. Every subscription can be associated with one or more actions which define how the user should be notified.
Users can create and modify alert subscriptions from the Subscriptions and Actions Management page. It is also possible to create alert subscriptions for individual samples in the GUI.
Every alert subscription can have one or more associated actions. Users can create and modify actions from the Subscriptions and Actions Management page. When an alert is triggered, the notification is delivered to the destination(s) specified in the associated action(s).
If an alert subscription doesn’t have any associated actions, the alert will only be visible on the Alerts page. The Alerts page provides an overview of all events on the appliance, including the ones generated by user-defined subscriptions. Users can filter the Alerts page to display only the alerts related to specific alert subscriptions.
Important notes about the Alerts feature
- Alerts are sent only if there is a new event matching the conditions configured in the subscription. Alerts cannot be sent for events that occurred before a subscription was created.
- Multiple alerts triggered for one subscription in the selected notification period will be aggregated and sent in a single email message.
- The SMTP service must be configured on the appliance in order to receive emails about new alerts.
- The maximum amount of hashes that the user can add to one subscription is 1000.
- Only SHA1 hashes can be added to alert subscriptions.
- The maximum amount of subscriptions a user can create is 10 000. This limit is not user-configurable. When the limit is reached, a notification appears in the GUI, warning the user that some old subscriptions should be removed in order to create new ones.
- Alert subscriptions are private and visible only to the user who created them. When other users are logged into their accounts, they will not be able to see or modify subscriptions created by other users.
- If a Factory Reset is performed by the administrator, all alerts will be removed from the appliance.
Alert Types
The following table lists the currently supported types of alerts (notifications). To set up an alert and get notified when it is triggered, users have to create a new subscription.
| Alert Type | Alert Trigger |
|---|---|
| Classification change | A sample’s threat status has changed (e.g., from “suspicious” to “malicious”). |
| Sample available for download | A previously unavailable sample has become available for download from the Spectra Intelligence cloud. |
| YARA match | A new sample has matched the specified YARA ruleset. YARA Retroactive Hunting matches are also included. |
| Cuckoo analysis complete | A dynamic analysis report for a sample has been processed by Cuckoo and is now available on the appliance. |
| Spectra Intelligence upload complete | A sample has been successfully uploaded to the cloud by a user, and it is queued for analysis. |
| Spectra Intelligence analysis complete | A user-requested analysis of a sample is complete, and the sample record has been updated in the cloud. |
Managing Alert Subscriptions and Actions
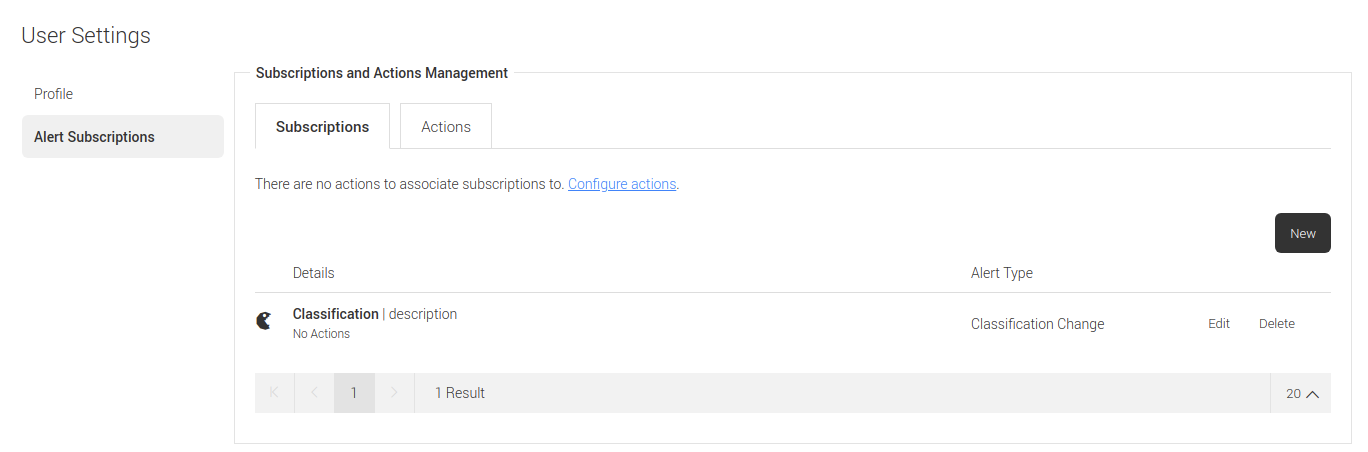
Users can view and manage their alert subscriptions from the Subscriptions and Actions Management page. To access the page, select User menu > User profile in the main menu. This opens the User Settings page with the Alert Subscriptions link in the sidebar.
Alternatively, to open the Subscriptions and Actions Management page, click Configure in the action menu (☰) on the Alerts page.
The Subscriptions and Actions Management page is divided into two tabs: Subscriptions and Actions.
The navigation bar at the bottom of each tab allows browsing the list by moving forward and backward between pages, or by skipping to a specific page number. It also contains the option to control how many items are displayed per each page (20, 100, 200, 500 or 1000), and displays the total amount of subscriptions/actions created by the current user.
All currently active subscriptions are listed in the Subscriptions tab. Users can modify existing subscriptions by clicking Edit, or create new ones by clicking New.
Similarly, all actions that can be associated with alert subscriptions are listed in the Actions tab. Users can modify existing actions by clicking Edit, or create new ones by clicking New.
When an action is associated with a subscription, that means the details configured for the action (where to send alerts and how often) apply to that particular subscription. Any action can be associated with any number of active subscriptions. Likewise, any subscription can have more than one action associated with it.
For example, an action can define that email should be sent to test@user.example every 2 hours. This action can be associated with many different subscriptions to send alerts to that particular address at that particular frequency.
Creating a New Alert Subscription
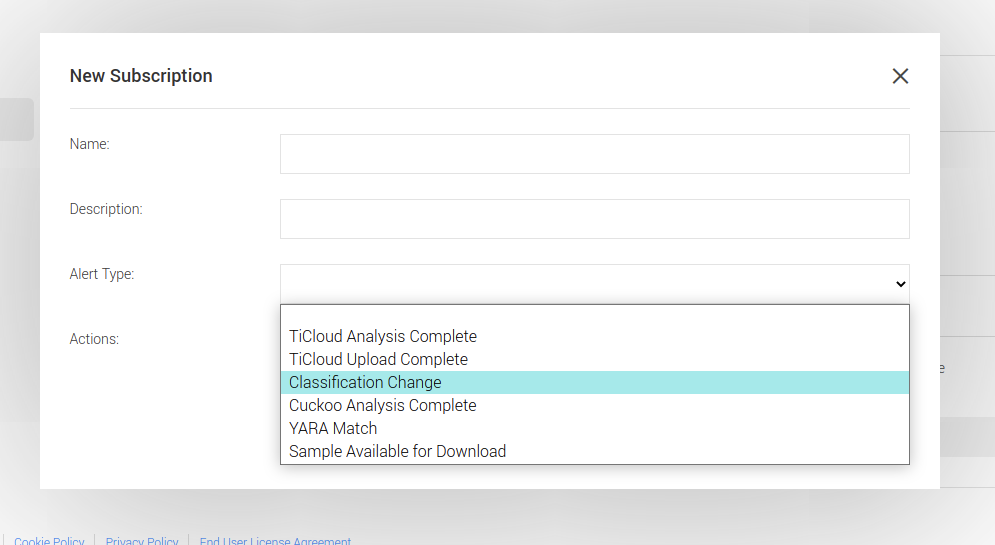
To create a new alert subscription, access the Subscriptions tab on the Subscriptions and Actions Management page, and click New.
The New Subscription dialog allows users to choose the alert type and the associated action(s). Users can also add a custom name and description to every subscription, which makes it easier to distinguish between subscriptions and quickly check their scope.
In order to associate a subscription with an action, users must first create some actions. When actions are created on the appliance, they become available in the Actions pull-down list.
Clicking the Submit button in the New Subscription dialog saves the subscription, and it becomes active on the appliance.
Clicking Cancel or anywhere outside the dialog will close it, and all modifications will be lost.
Depending on the selected alert type, additional options become available in the New Subscription dialog.
Classification change
The “Classification change” alert type allows choosing which changes in sample threat status will trigger an alert (for example, from unknown and suspicious to malicious). It is possible to select multiple threat status values in both configuration fields.
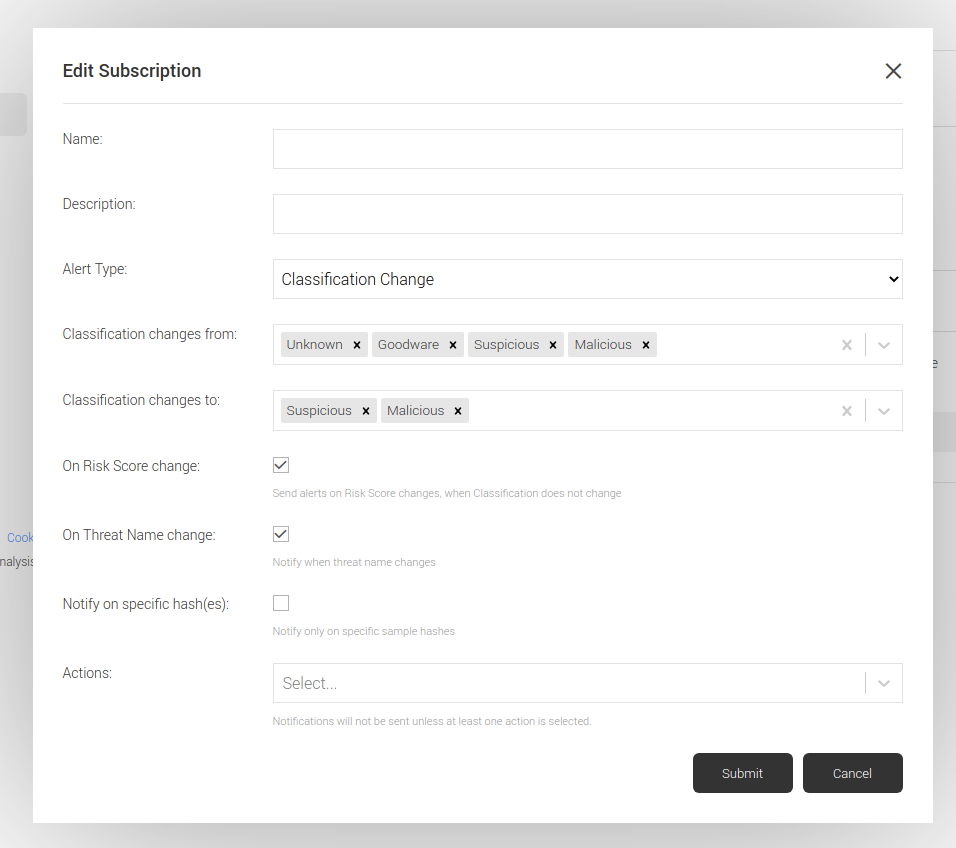
There are several optional checkboxes that allow setting up more fine-grained alerting criteria.
-
On Risk Score change - becomes visible for this alert type when threat status values that support it are selected. Selecting the checkbox sends an alert when there is a transition in the risk score of a sample (for example, from low (6) to medium (7)), even if the threat status does not change.
For example, a sample’s risk score can increase from 6 to 9, but the sample will still be classified as malicious. The alert is not sent when the risk score transition is within the same severity range (for example, medium (8) to medium (7)). Transitions in risk score values for goodware samples do not generate alerts.
-
On threat name change - selecting it will send an alert when the threat name of a sample changes, even if its threat status remains unchanged.
-
Notify on specific hash(es) - when this checkbox is selected, an additional Sample hash values text field becomes available. If any SHA1 hashes are entered into the text field, the alert is sent only for classification changes to those samples. When this checkbox is not selected, and no SHA1 hashes are provided, the alert is sent for classification changes to all samples on the appliance.
Sample available for download
The “Sample available for download” alert type requires users to provide a list of SHA1 hashes to monitor for availability. This alert type also has the Notify on specific hash(es) checkbox, which is selected by default, and cannot be deselected.
Additionally, the Fetch and analyze checkbox allows users to automatically download samples to the appliance when they become available.
YARA match
The “YARA match” alert type lets the user enter the name of a YARA ruleset that a sample should match to trigger the alert. There is an autocomplete pull-down list with names of all YARA rulesets on the appliance.
Creating a New Action
To create a new action, access the Actions tab on the Subscriptions and Actions Management page, and click the New button.
The New Action dialog allows users to choose the delivery method (where to send alerts about triggered events) and set the notification frequency (how often the alerts should be sent). Users can also add a custom name for every action.
Currently supported delivery methods include E-mail and Syslog.
Clicking the Submit button in the New Action dialog saves the action, and it becomes visible in the Actions tab. While creating or modifying a subscription, users can select the new action from the Actions pull-down list.
Clicking Cancel or anywhere outside the dialog will close it, and all modifications will be lost.
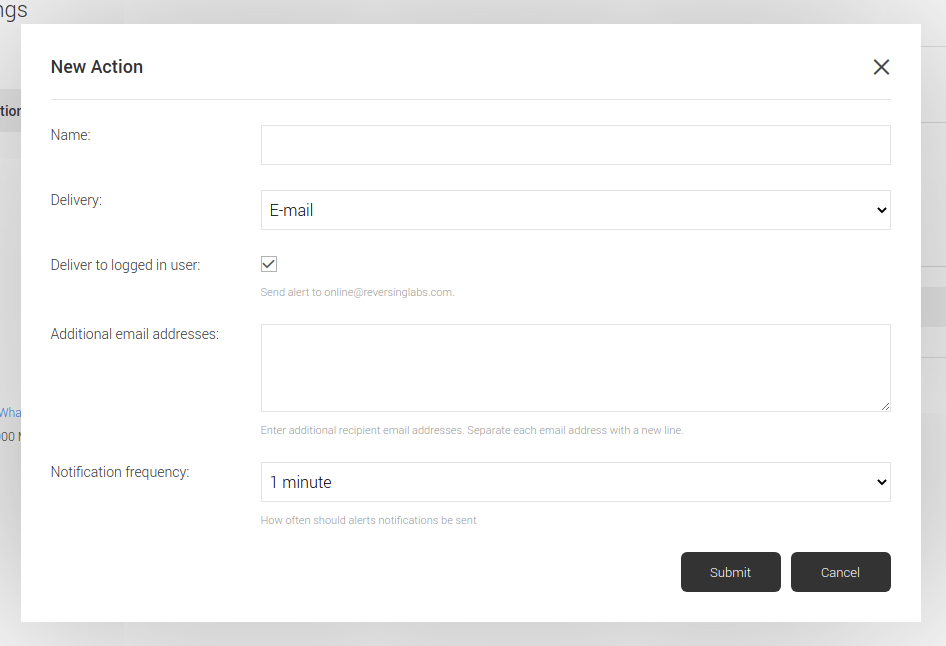
Creating a New Email Action
When the E-mail method is selected, an additional checkbox Deliver to logged in user becomes available. Selecting this checkbox will send alerts to the currently logged-in user, in addition to other email addresses provided in the Additional email addresses field. Each address should be in its own line in the text field.
The SMTP service must be configured on the appliance in order to receive alert emails from it. Appliance administrators should make sure the settings are properly configured in the Administration > Configuration > SMTP dialog.
When delivered to the configured address, the alert email contains information about which subscriptions have new alerts, and how many new alerts were generated for each subscription. The email also contains a link for each subscription. The link leads to the Alerts page on the appliance, filtered to display only alerts for the specified subscription.
Creating a New Syslog Action
When the Syslog method is selected, additional options become available in the dialog.
Host - requires the user to input the host address of the syslog server that should receive alerts
Port - requires the user to configure the port on which the syslog server should listen for alerts.
Transport protocol - allows choosing which communication protocol should be used to send alerts to the syslog server. Supported protocols are TCP and UDP. The protocol selected here affects which port number can be configured in the previous field
The Message format option allows users to customize how the alerts will appear in the logs. Users can combine any number of supported fields with custom text to adjust the contents of each alert. The default format (*{sha1} - {alert_type} - {description}*) is already configured here when creating a new action.
Custom Message Examples
{sha1} - {alert_type} - {description}

b8b3b60c13d3fbb6e1932dab72264410bab0a2ce - classification_change - Threat Status changed from 2 to 1 via Spectra Intelligence
The alert {label} was triggered on sample {sha1}

The alert New Malicious Detection was triggered on sample b8b3b60c13d3fbb6e1932dab72264410bab0a2ce
New {alert_type} alert received on file {sha1} with status {threat_status}

New classification_change alert received on file b8b3b60c13d3fbb6e1932dab72264410bab0a2ce with status 1
Supported Message Fields
| FIELD NAME | DESCRIPTION | TYPE |
|---|---|---|
| uuid | Unique string identifying the triggered alert. | string |
| alert_type | Type of the triggered alert - can be one of the currently supported types: classification_change, sample_available, ticloud_analysis_complete, ticloud_upload_complete, cuckoo_analysis_complete, yara_match | string |
| timestamp | Date and time when the alert was triggered. | UTC timestamp |
| sha1 | SHA1 hash of the sample for which the alert was triggered. | string |
| file_size | Size of the sample for which the alert was triggered, expressed in bytes. | integer |
| category | File category of the sample for which the alert was triggered, expressed as a number. The numbers correspond to the following categories: 0 - Other, 1 - Application, 2 - Mobile, 3 - Document, 4 - Web, 5 - Archive, 6 - Media, 7 - Email | integer |
| file_type | Type of the sample for which the alert was triggered, as detected by ReversingLabs static analysis (for example, Document, Image, PE…). See full list of file types | integer |
| file_subtype | Subtype of the sample for which the alert was triggered, as detected by ReversingLabs static analysis (for example, TIFF, Clojure, HTML…). See full list of file subtypes | string |
| identification_name | Identification of the sample for which the alert was triggered, as detected by ReversingLabs static analysis. Identification is not generated for all file types and subtypes; it is an optional field in the static analysis report that indicates a more detailed (usually signature-based) file detection. | string |
| identification_version | Version of the identified file format for the sample that triggered the alert (for example, Generic, 1.0, Container…). This is an optional field that is not generated for all file types and subtypes. | string |
| classification_result | Detected malware threat name for the sample that triggered the alert (for example, Win32.Trojan.Adams). | string |
| platform | The platform part of the threat name detected for the sample that triggered the alert (for example, Win32, Script-PHP, Linux…). | string |
| subplatform | The subplatform part of the threat name detected for the sample that triggered the alert (for example, HTML, Macro, PDF…). The subplatform part is present in the threat name only for specific platforms (ByteCode, Document, Script). | string |
| malware_type | The malware type part of the threat name detected for the sample that triggered the alert (for example, Trojan, Adware, Rootkit…). | string |
| family_name | The malware family name part of the threat name detected for the sample (for example, Marsdaemon, Orcus, Androrat…). | string |
| classification | Threat status assigned to the sample that triggered the alert, expressed as a number. The numbers correspond to the following threat statuses: 0 - Unknown, 1- Good, 2 - Suspicious, 3 - Malicious | integer |
| factor | The risk score value, expressed as a number from 0 to 10, where 0 indicates the most trusted samples, and 10 indicates the most dangerous threats. | integer |
| classification_source | Source of the classification for the sample that triggered the alert, expressed as a number. The numbers correspond to the following sources: 0 - None, 1 - Spectra Intelligence, 2 - Spectra Core, 4 - User, 257 - Spectra Intelligence from Parent, 258 - Spectra Core from Parent, 260 - User from Parent, 513 - Spectra Intelligence from Child, 514 - Spectra Core from Child, 516 - User from Child | integer |
| classification_reason | Reason for the classification that the sample received, expressed as a number. The numbers correspond to the following classification reasons: 0 - Unknown, 1 - Antivirus, 2 - Signature, 3 - Certificate, 4 - Format, 5 - Exploit, 6 - YARA, 7 - RHA1, 128 - User, 256 - Cloud | integer |
| label | Name of the alert subscription provided in the Name field of the New Subscription dialog. Users can modify the name for all alert subscriptions on the appliance. | string |
| description | The full description of the triggered alert, as displayed on the Alerts page in the Details column (for example, “Spectra Intelligence analysis complete with classification Goodware.”). | string |
| json | Returns all available information about the alert, serialized in JSON format. | string |
Modifying Existing Alert Subscriptions
To modify an existing alert subscription, click the Edit link next to the subscription name in the Subscriptions tab on the Subscriptions and Actions Management page. The dialog that opens is the same as for creating a new subscription.
In this dialog, users can modify any field. For example, it’s possible to add more SHA1 hashes to a subscription, select different threat statuses for classification change alerts, or change the name of the YARA ruleset for YARA match alerts. If a YARA ruleset with an active subscription gets deleted from the appliance, the dialog will warn the user when modifying the subscription for the missing ruleset.
It is also possible to add more actions to a subscription; for example, to send notifications to different email addresses. This is done by modifying the Actions field and selecting additional actions from the pull-down list. The actions have to be created beforehand as described in the Creating a New Action section.
Only the user who created a subscription can modify it. Regardless of what changes are made to a subscription, the user who created it remains its owner.
Deactivating Alert Subscriptions
There are several ways to deactivate an existing alert subscription.
- Click the Edit link next to the subscription name in the Subscriptions tab. In the dialog that opens, modify the Actions field and remove all selected actions from it. The subscription itself remains on the appliance, and can be reactivated at any point by adding new actions.
- Click the Delete link next to the subscription name in the Subscriptions tab. This completely removes the subscription from the appliance. Alerts for the removed subscription will no longer be sent.
Managing Alerts
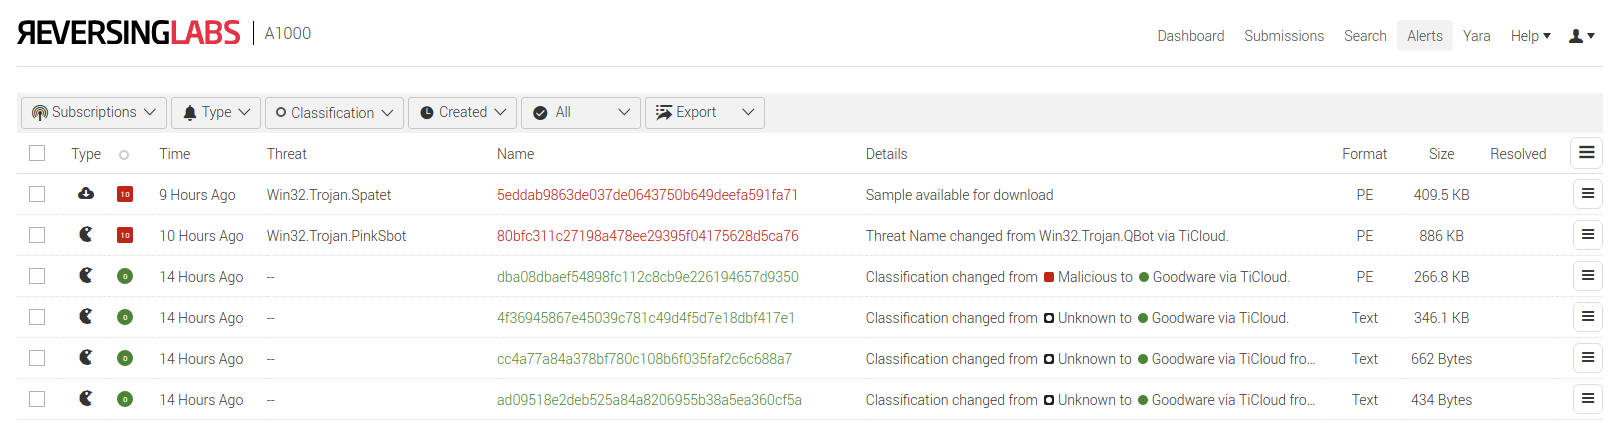
The Alerts page displays all generated events on the appliance. The users receive alert emails only for those events that match the criteria defined in their subscriptions.
The page is similar to all other pages - the alerts are displayed in a list, with detailed information divided into columns. The columns are not manually sortable.
Alerts are recorded and sorted by the time when they occurred (in descending order, with newest alerts at the top). The list contains information about every alert, including:
- type of alert;
- threat status indicator of the sample associated with the alert;
- time when the alert was triggered;
- threat name (if detected);
- sample name;
- details about the event that triggered the alert;
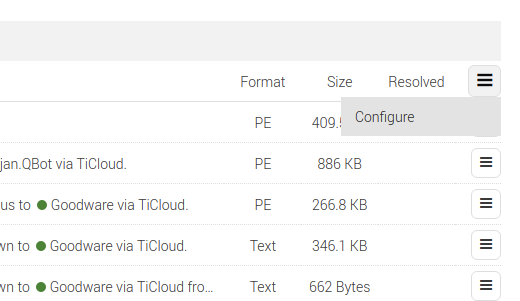
- file format and size;
- alert resolution status (resolved or unresolved).
Clicking the sample name opens the Sample Details page for the selected sample. Clicking any of the sample rows will expand it, showing additional information about a sample like in other pages on the appliance.
The action menu (☰) to the right of the Resolved column contains the Configure item, which opens the Subscriptions and Actions Management page.
The navigation bar at the bottom of the Alerts page allows browsing the list of alerts by moving forward and backward between pages or skipping to a specific page number. It also contains the option to control how many alerts are displayed per each page (20, 100, 200, 500 or 1000), and displays the total amount of triggered alerts on the appliance.
Filtering Alerts
The toolbar above the list of alerts allows the users to filter alerts:
- by type (All, Classification change, Sample available for download, YARA match, Cuckoo analysis complete, Spectra Intelligence upload complete, Spectra Intelligence analysis complete);
- by threat status of the sample associated with an alert (All, Unknown, Goodware, Suspicious, Malicious);
- by the time when the alert was triggered (All, Custom, Today, Last Week…);
- by alert resolution status (All, Resolved, Unresolved)
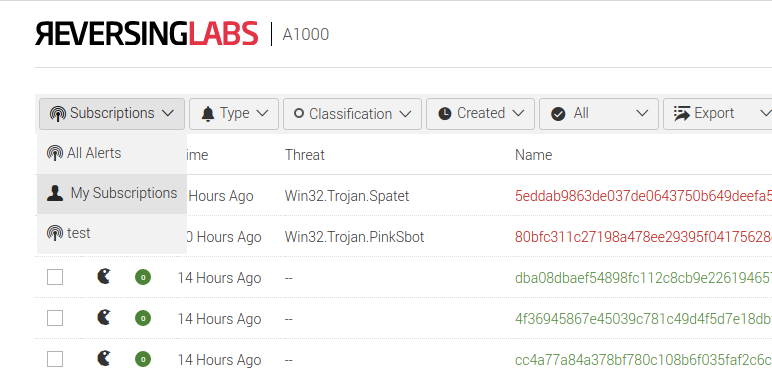
The Subscriptions button on the left side of the toolbar opens the subscription filtering menu that allows users to control which alerts will be displayed on the Alerts page. The My Subscriptions option displays alerts from all subscriptions created by the current user. The All Alerts option displays all alerts generated on the appliance, including those from user’s subscriptions.
Additionally, for every active alert subscription on the appliance, an option becomes available in the Subscriptions filtering menu. Clicking each subscription name in the filtering menu displays only alerts triggered by that specific subscription.
When a subscription is deleted from the appliance, it is no longer visible in the Subscriptions filtering menu. However, alerts triggered by that subscription will still be visible when the My Subscriptions option is selected.
Filters can be combined to get a more precise overview of the triggered alerts (for example, show all YARA match alerts for subscriptions created this week that returned malicious samples).
When the Classification change alert type is selected in the toolbar, there is an additional option to choose which classification changes should be listed (for example, from unknown to malicious or from suspicious to malicious). For this type of alert, the Details column contains information about the source of the classification (via Spectra Intelligence, via Spectra Core, via User, from child…), as well as details about threat name and risk score changes (if any).
For the YARA match alert type, the Details column provides a link to the YARA ruleset on which the alert occurred, and indicates whether the matched sample is local or found in the cloud. When this alert type is selected in the toolbar, an additional field Enter ruleset name becomes available, allowing users to display only the alerts related to a specific YARA ruleset.
Exporting Alerts
The Export pull-down menu in the toolbar allows exporting the list of alerts as a CSV file. Users can select which columns should be included in the exported file.
Only the current page will be exported, not the entire list of all alerts on the appliance. The number of alerts per page - that is, the number of alerts that will be included in each exported file - can be increased or decreased in the navigation bar at the bottom of the Alerts page.
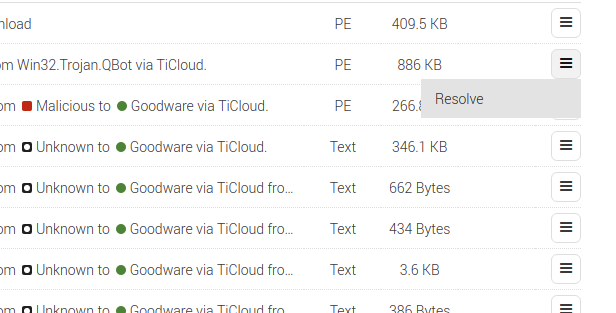
Marking Alerts as Resolved
When an incoming alert has been acknowledged and dealt with, it is possible to mark it as Resolved to keep the Alerts page up-to-date. To mark an alert as Resolved, select it in the list and choose the Resolve option in the action menu on the right.
It is also possible to resolve multiple alerts at once. This is done by selecting several alerts and choosing the Resolve selected option from the action menu (☰) in the Alerts page toolbar.
Only the current page of alerts can be resolved. Up to 1000 alerts can be resolved at once by increasing the amount of alerts per page in the navigation toolbar to 1000, then selecting and resolving all alerts on the page.
When the selected alerts are resolved, a notification appears with the total number of resolved alerts. If some alerts had previously been resolved, the appliance will detect this and will not count them towards the total.
When an alert is resolved, a YES indicator becomes visible in the Resolved column on the Alerts page.
Filtering the Alerts page by resolution status will show only resolved alerts, hide resolved alerts, or show all alerts on the appliance. The filter can also be used to show and export all resolved alerts as described in the Exporting Alerts section.
Users can also undo the alert resolution by clicking Unresolve (for a single alert) or Unresolve Selected (for multiple alerts) in the action menu on the Alerts page. The YES indicator will be removed from the Resolved column, and a notification will appear, indicating the total number of unresolved alerts.
Automatically Removing Alerts
Only appliance administrators can enable this option. Users who would like to enable this option should contact their appliance administrator.
Depending on the number of alert subscriptions configured on the appliance, alerts can quickly accumulate, making it difficult to browse the Alerts page.
To prevent this, appliance administrators can define how long the alerts should be kept on the appliance. When the alerts are older than the configured period, they are automatically removed from the appliance.
The alert retention period can be configured in the Administration > Configuration > Alert Management dialog. By default, alerts are kept for 3 months and automatically deleted after that period. Other supported options are 1 month and 6 months.
Additionally, performing a Factory Reset of the appliance will remove all alerts from it.
Monitoring Samples with Alerts
Apart from creating and editing alert subscriptions on the Subscriptions and Actions Management page, users can quickly modify subscriptions by adding new samples from different sections of the GUI. This is useful for adding interesting samples to an existing alert, or for creating a new alert that will monitor the activity on multiple samples.
The following table lists the interface sections where samples can be added to a subscription using the Subscribe option, or removed from a subscription using the Unsubscribe option. The table also indicates which sections support bulk actions (adding/removing multiple samples to/from a subscription).
| Section | Supported Alert Types | Bulk Actions |
|---|---|---|
| Advanced Search Results - Local | Classification change, Sample available for download | Yes |
| Advanced Search Results - Cloud | Classification change, Sample available for download | Yes |
| YARA ruleset matches | Classification change, Sample available for download | Yes |
| Sample Details | Classification change, Sample available for download | No |
| Sample Details > RHA results | Classification change, Sample available for download | Yes |
| Sample Details > Extracted Files | Classification change, Sample available for download | Yes |
| Tags | Classification change, Sample available for download | Yes |
| Feeds | Classification change, Sample available for download | Yes |
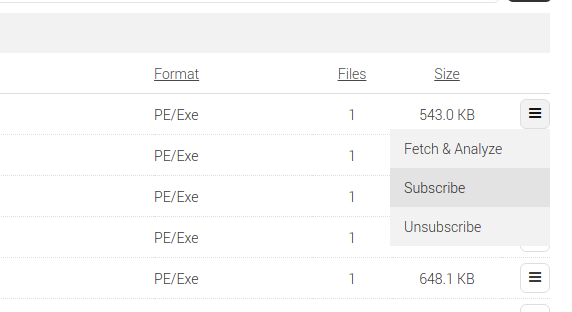
To start monitoring a sample, mark it as selected using the checkbox on the left side of the sample row. When the sample is selected, its row is highlighted in yellow. Open the action menu (☰) on the right side of the sample and select the Subscribe option.
This opens the Subscribe to Hash Alert dialog that allows creating a new alert or selecting an existing alert from the pull-down list.
Supported alert types are Classification change and Sample available for download. The dialog for creating a new alert is the same as in the Creating a New Alert Subscription section.
If an existing alert is chosen in the pull-down list, the SHA1 hash of the selected sample is automatically added to the alert subscription. Users can then modify other fields in the subscription dialog, such as actions, before clicking Submit to save changes.
Subscribing to Samples in Bulk
It is also possible to add more than one sample to an existing subscription, or to create a new subscription that will monitor several samples.
When multiple samples are selected on a page, the bulk actions menu (☰) is highlighted in the header row of the sample list. To add the selected samples to an alert subscription, click the Subscribe item in the bulk actions menu.
Sample hashes can also be added to an existing alert subscription manually. To do that, access the Subscriptions tab on the Subscriptions and Actions Management page and click the Edit link next to the desired subscription.
In the dialog that opens, paste the SHA1 sample hashes into the Sample hash values text field and click Submit. Each hash should be in its own line in the text field.
Removing Samples from Alert Subscriptions
Samples can also be removed from existing subscriptions. To remove one or more samples, use the Unsubscribe item from the sample action menu (or the bulk actions menu, if two or more samples are selected). A dialog appears, prompting the user to confirm the action.
Clicking the Unsubscribe button in the confirmation dialog will remove the selected sample hashes from all subscriptions to which they were added. The subscriptions themselves will not be removed or deactivated, and if they were configured to monitor other samples, the alerts will still be sent out for those samples.
Alternatively, samples can be removed from alert subscriptions manually, by editing the subscription from the Subscriptions tab. Click the Edit link next to a subscription, and in the dialog that opens, remove sample hashes from the Sample hash values text field.
Tracking Unknown Hashes with Alerts
When searching for sample hashes on the appliance, the results can sometimes include unknown hashes. Those are hashes of samples that have not yet been found in the ReversingLabs system, or that are not available locally. (Note: this does not refer to hashes found in the system, but classified as Unknown.)
If the list of search results includes unknown hashes, they will be listed separately and accessible by clicking the Not Found filter/tab on the search results page. Users can subscribe to those hashes and get notified when they appear in the ReversingLabs system for the first time.
Supported alert types for unknown hashes are Classification change and Sample available for download. Unknown hashes can be added to new or existing alert subscriptions in the same way as described in the Monitoring Samples with Alerts section.
Setting Up Alerts for New YARA Ruleset Matches
The list of YARA rulesets on the yara page also integrates with the Alerts feature. Apart from subscribing to individual samples from the list of matches on a YARA ruleset, it is also possible to subscribe to rulesets themselves. This type of alert is triggered when there is a new match for the subscribed ruleset. Only one YARA ruleset can be added to each alert subscription.
To create a YARA ruleset match alert subscription, access the YARA page.
Select a ruleset in the list by clicking the checkbox on the left side of the ruleset name, and choose the Subscribe item in the action menu (☰) on the right side of the list.
The dialog that opens is similar to other New Subscription dialogs. Users can add a custom name and description for the alert, and choose the associated action. The fields for alert type and ruleset name will be automatically filled in.
Alternatively, users can create YARA ruleset match alert subscriptions from the Subscriptions tab on the Subscriptions and Actions Management page.