Getting Started
Overview
This document provides a quick reference for using ReversingLabs apps for Splunk SOAR. Learn how to use the power of ReversingLabs Spectra with Splunk SOAR to add rich context to Splunk SOAR artifacts.
Installation
The first step is to ensure that at least one of the ReversingLabs apps for Splunk SOAR is installed. See the following documents for install instructions:
Common Actions
ReversingLabs has developed apps for Splunk SOAR that connect with a variety of Spectra products, including Spectra Intelligence and Spectra Analyze. This section provides an overview of the most common actions used with ReversingLabs apps for Splunk SOAR.
File Hash Reputation
One of the core features of ReversingLabs apps for Splunk SOAR is quickly getting the reputation of a file hash. This section will walk you through the process step-by-step, providing detailed instructions and additional context.
💡 Click a platform to see the corresponding instructions.
Spectra Intelligence
1. Initiating the Investigation
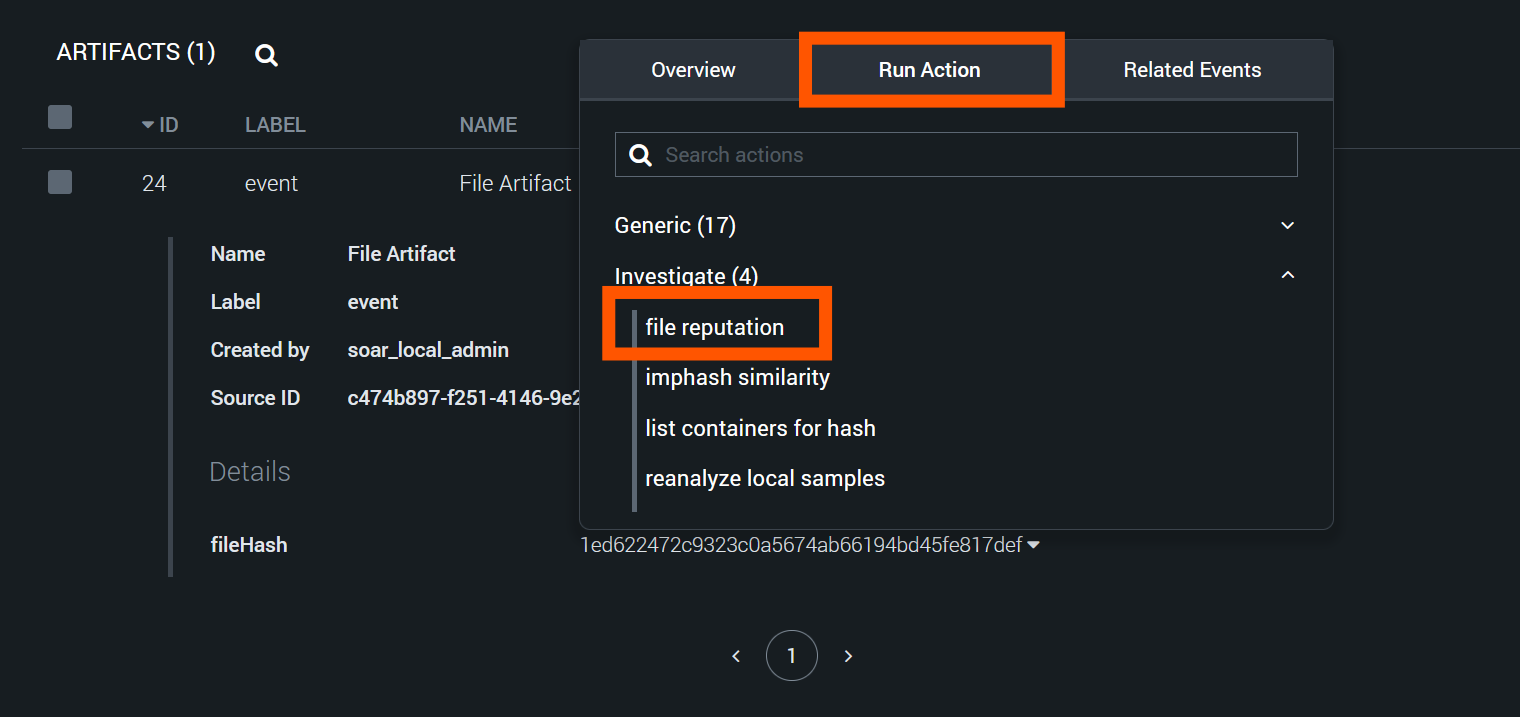
- Locate the file hash you want to investigate in the container artifacts tab.
- Select the file hash value.
2. Accessing the "Run Action" Feature
- After selecting the hash, select the "Run Action" tab.
- Use this tab to perform various automated actions on the selected data.
3. Choosing the Appropriate Action
- In the "Run Action" menu, select the "Investigate" category.
- Within this category, locate and select the "file reputation" action.
- This action is specifically designed to query file reputation services.
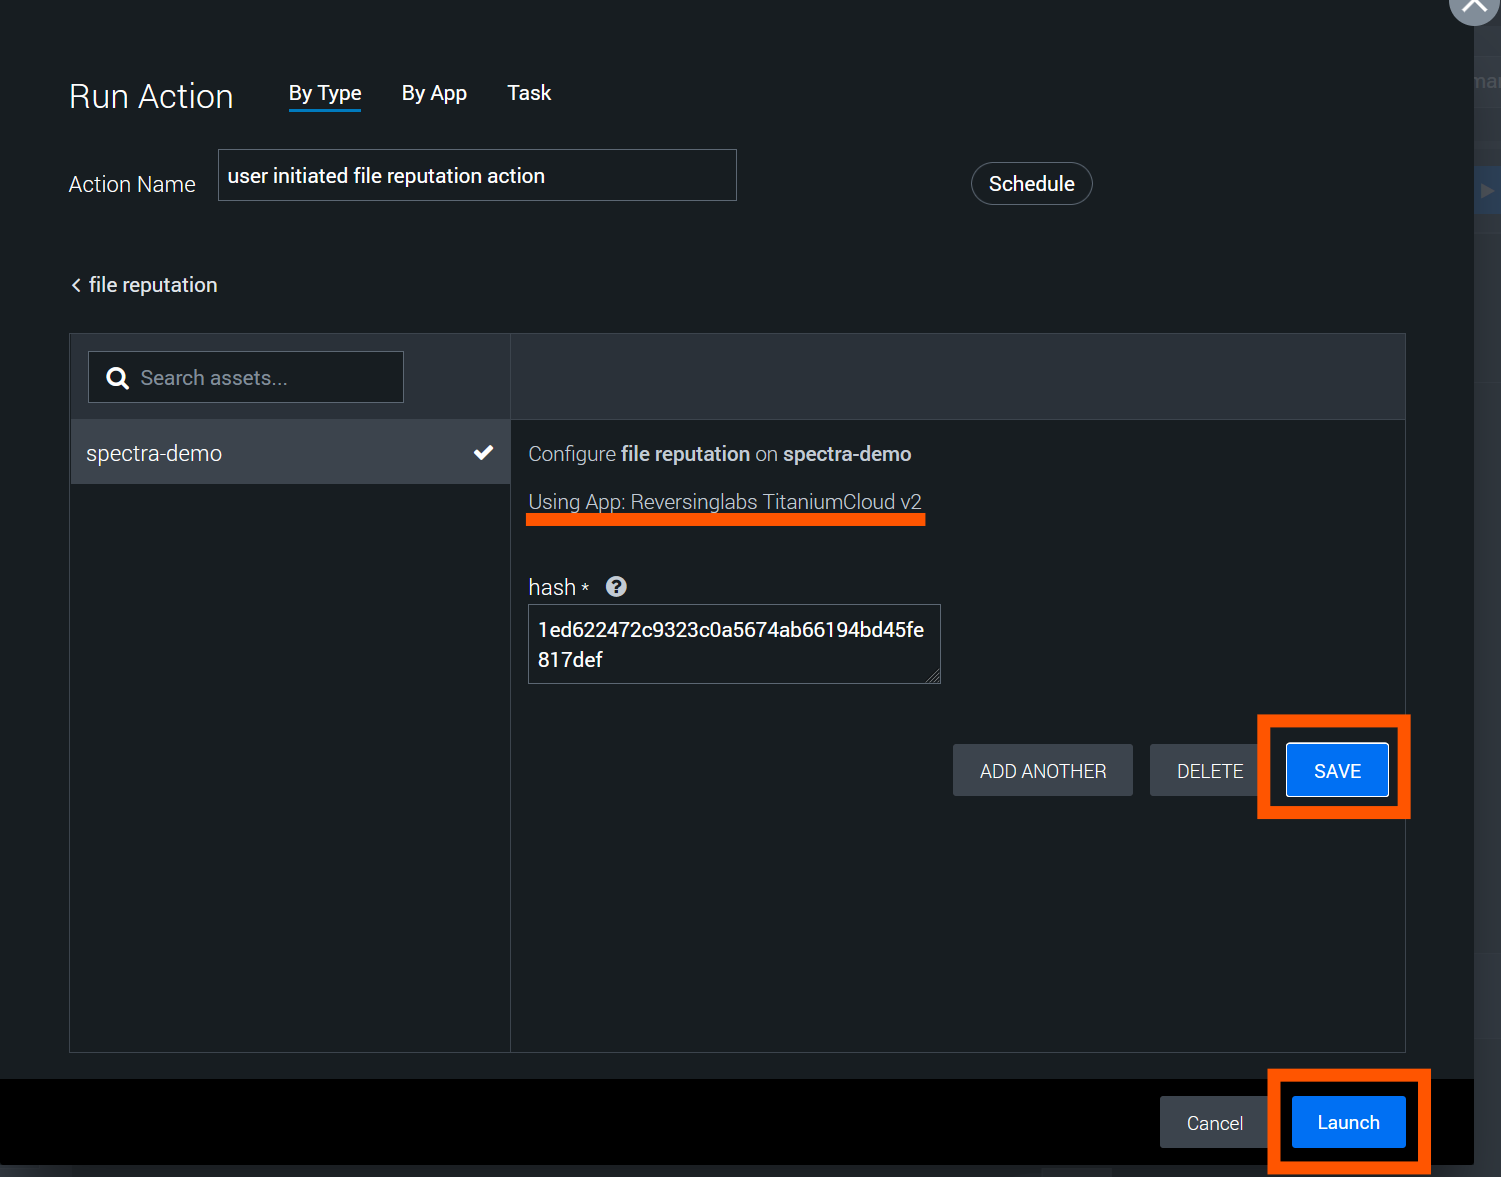
4. Configuring the Action
- A new window will appear, prompting you to select the app and asset to use.
- From the list of available apps, choose "ReversingLabs TitaniumCloud V2".
- If you have multiple assets configured, select the appropriate one for your investigation.
5. Launching the Action
- Notice that the hash value you selected earlier is automatically populated in the relevant text field.
- Double-check that the correct hash is entered.
- Click the "Save" button to confirm your settings.
- Finally, click the "Launch" button to initiate the file reputation check.
Use the following example hashes to test the action:
Malicious: 79eb18dfb91249275fa122e88eb9eafb
Suspicious: 976d0e97e13966501098cb4556ba9974b080c1f4
Goodware: 9DA5380AA08C96BED1A5971DD490B2F8B20CB8FA
Unknown: be07661cdd44baf1abf50ff2caa7c107ce1ff6e9
6. Viewing Results
- After launching the action, you'll be returned to the analyst view.
- Look for the "Widgets" section in the interface.
- The results of your file reputation check will be populated here.
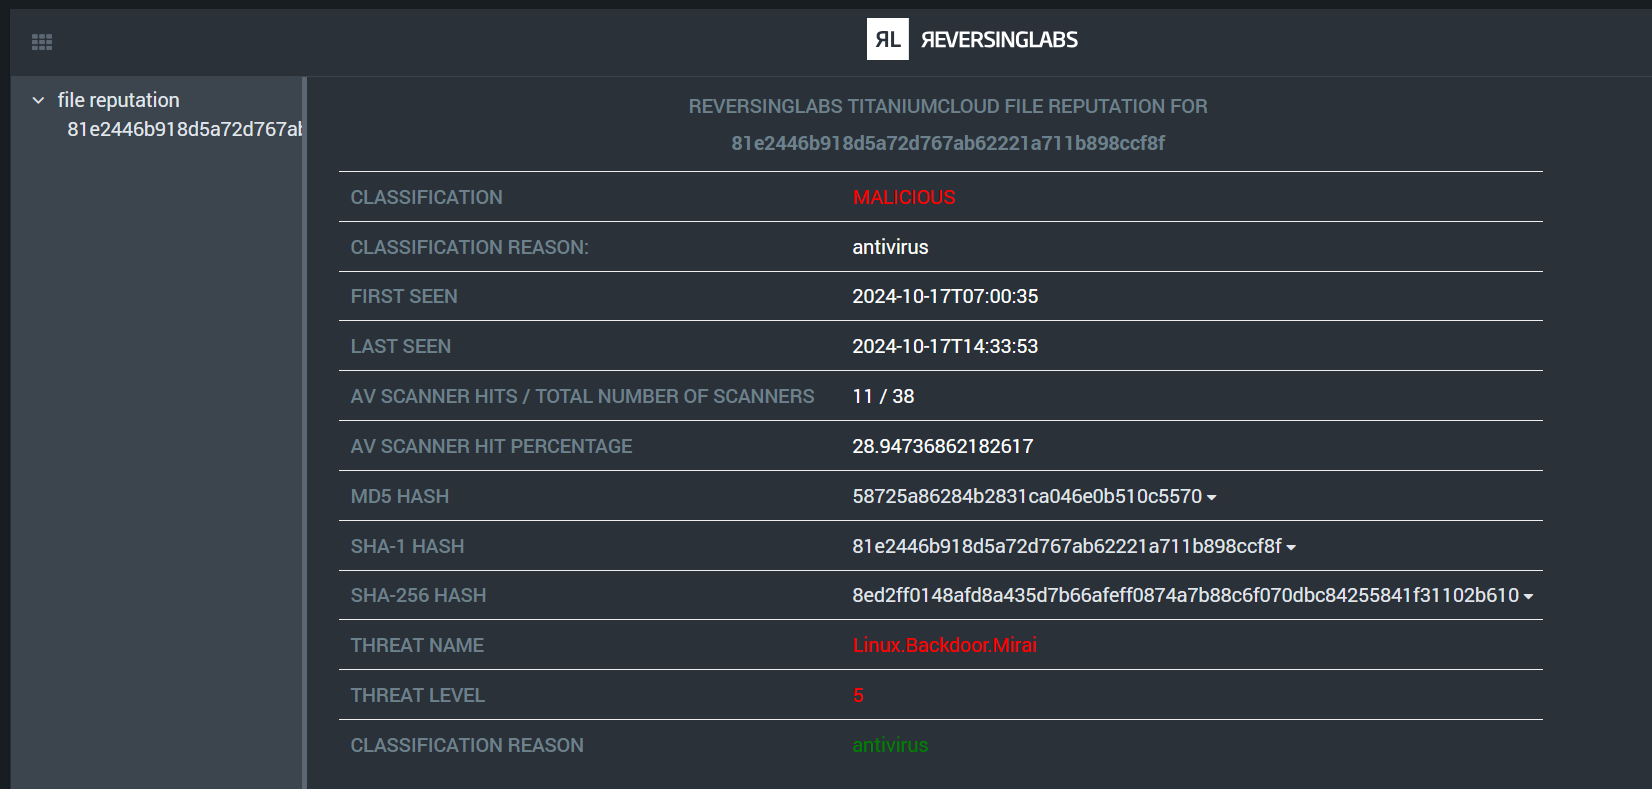
7. Interpreting the Results
The Widgets section will display various pieces of information about the file hash:
- Reputation score (if available)
- First seen date
- Last seen date
- File type
- Associated malware families (if any)
- AV Scanner Detection Rates
Pay close attention to any risk indicators or warnings in the results.
8. Further Actions
Based on the reputation results, you may want to take additional actions:
- If the file is deemed malicious, consider quarantine or deletion actions.
- For suspicious files, you might want to run deeper analysis.
- Clean files can be whitelisted or marked as safe in your environment.
Spectra Analyze
1. Initiating the Investigation
- Locate the file hash you want to investigate in the container artifacts tab.
- Select the file hash value.
2. Accessing the "Run Action" Feature
- After selecting the hash, select the "Run Action" tab.
- Use this tab to perform various automated actions on the selected data.
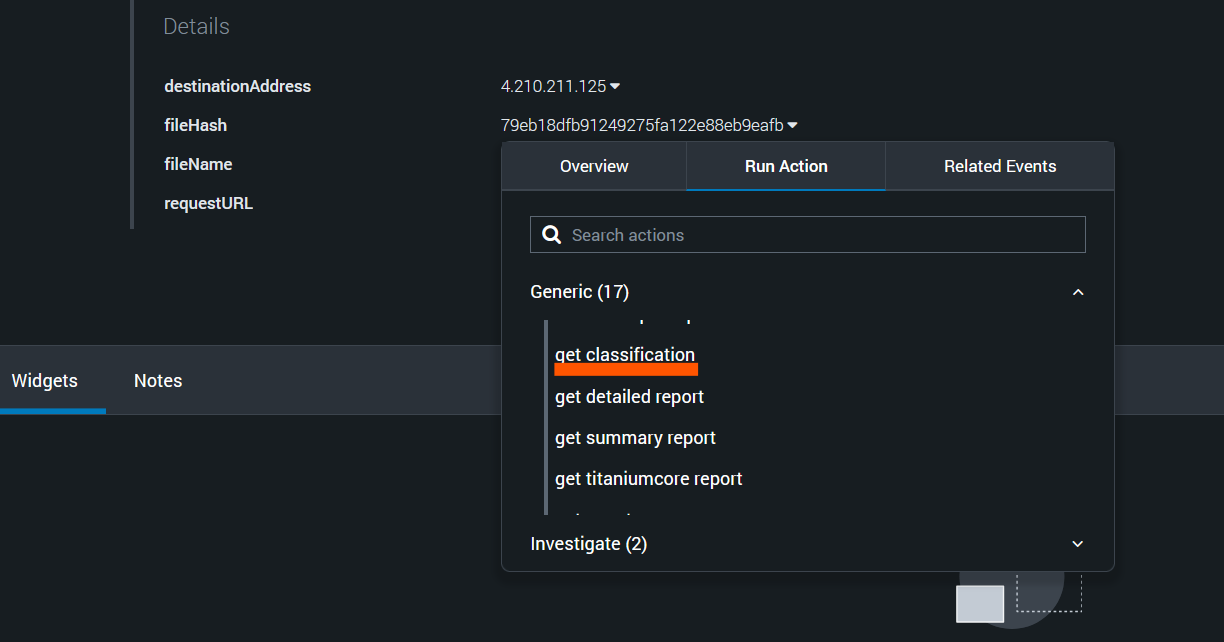
3. Choosing the Appropriate Action
- In the "Run Action" menu, select the "Generic" category.
- Within this category, locate and select the "get classification" action.
- This action is specifically designed to retrieve the classification from a Spectra Analyze appliance.
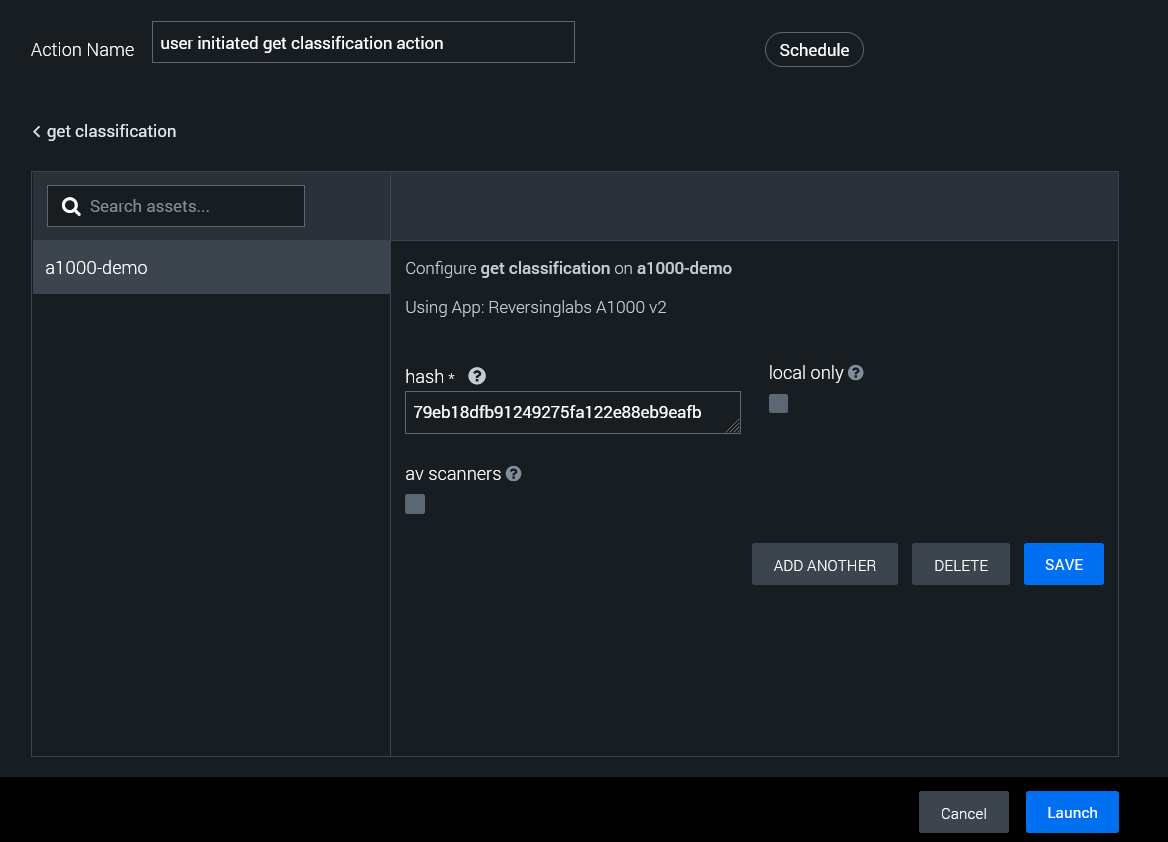
4. Configuring the Action
- A new window will appear, prompting you to select the app and asset to use.
- From the list of available apps, choose "ReversingLabs A1000 V2".
- If you have multiple assets configured, select the appropriate one for your investigation.
5. Launching the Action
- Notice that the hash value you selected earlier is automatically populated in the relevant text field.
- Double-check that the correct hash is entered.
- If you wish to only see local sample results from your Spectra Analyze appliance, check the "local only" box.
- If you want to include AV scanner results, check the "av scanners" box.
- Click the "Save" button to confirm your settings.
- Finally, click the "Launch" button to initiate the file reputation check.
Use the following example hashes to test the action:
Malicious: 79eb18dfb91249275fa122e88eb9eafb
Suspicious: 976d0e97e13966501098cb4556ba9974b080c1f4
Goodware: 9DA5380AA08C96BED1A5971DD490B2F8B20CB8FA
Unknown: be07661cdd44baf1abf50ff2caa7c107ce1ff6e9
6. Viewing Results
- After launching the action, you'll be returned to the analyst view.
- Look for the "Widgets" section in the interface.
- The results of your file reputation check will be populated here.
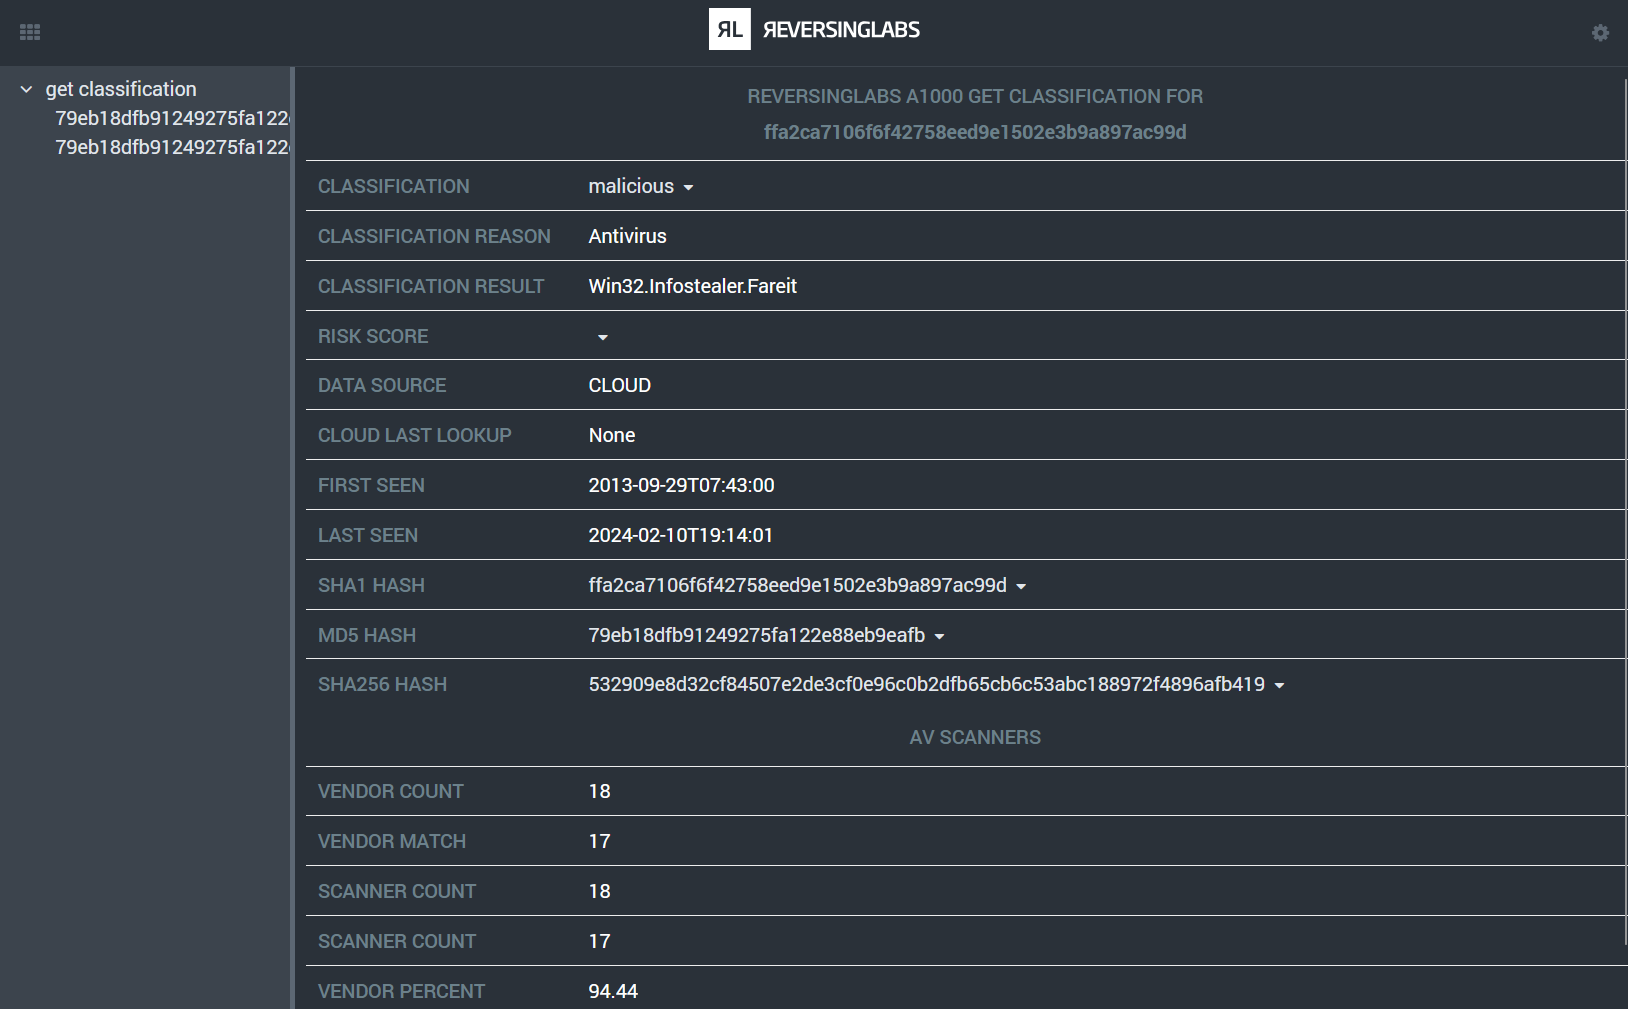
7. Interpreting the Results
The Widgets section will display various pieces of information about the file hash:
- Reputation score (if available)
- First seen date
- Last seen date
- File type
- Associated malware families (if any)
- AV Scanner Detection Rates (if selected)
Pay close attention to any risk indicators or warnings in the results.
8. Further Actions
Based on the reputation results, you may want to take additional actions:
- If the file is deemed malicious, consider quarantine or deletion actions.
- For suspicious files, you might want to run deeper analysis.
- Clean files can be whitelisted or marked as safe in your environment.
File Upload and Analysis
Splunk SOAR allows for easy upload of binary files for deep analysis. This section will walk you through the process of uploading files for both Spectra Intelligence and Spectra Analyze, two powerful analysis tools offered by ReversingLabs.
💡 Click a platform to see the corresponding instructions.
Spectra Intelligence
1. Locating the File
- Navigate to the container where your file is stored.
- Ensure that the file you want to analyze exists in the container's File Vault.
- Locate the Vault ID for the file you wish to analyze.
2. Initiating the File Upload
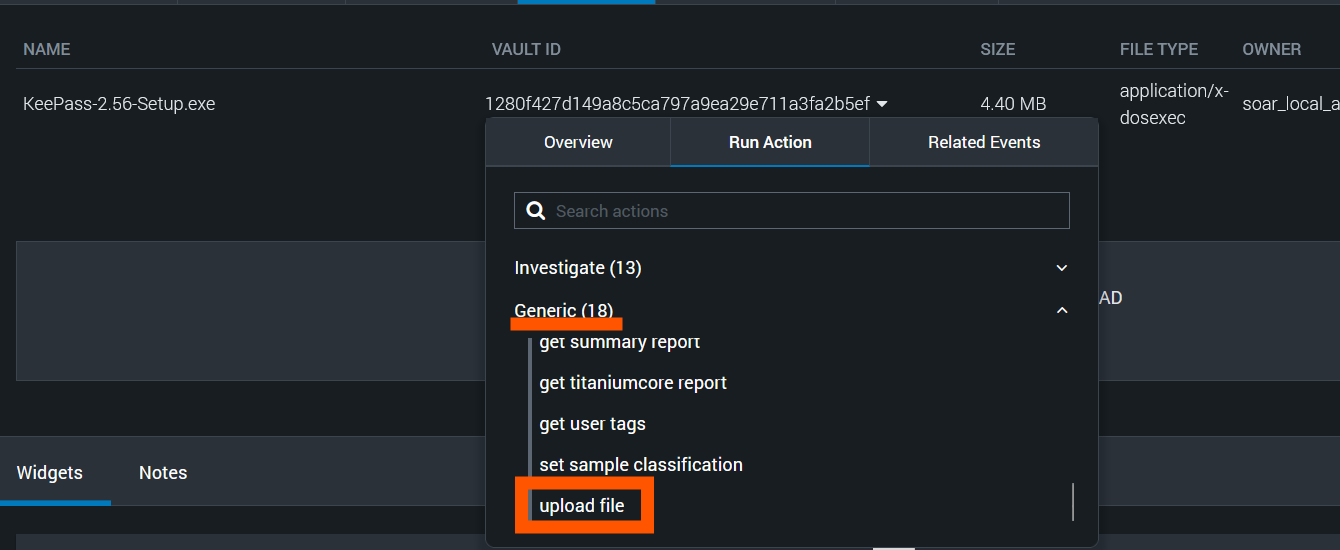
- Select the Vault ID value of the file you want to analyze.
- Select the "Run Action" tab.
- In the action categories, select the "Generic" category.
- From the list of actions, select "upload file".
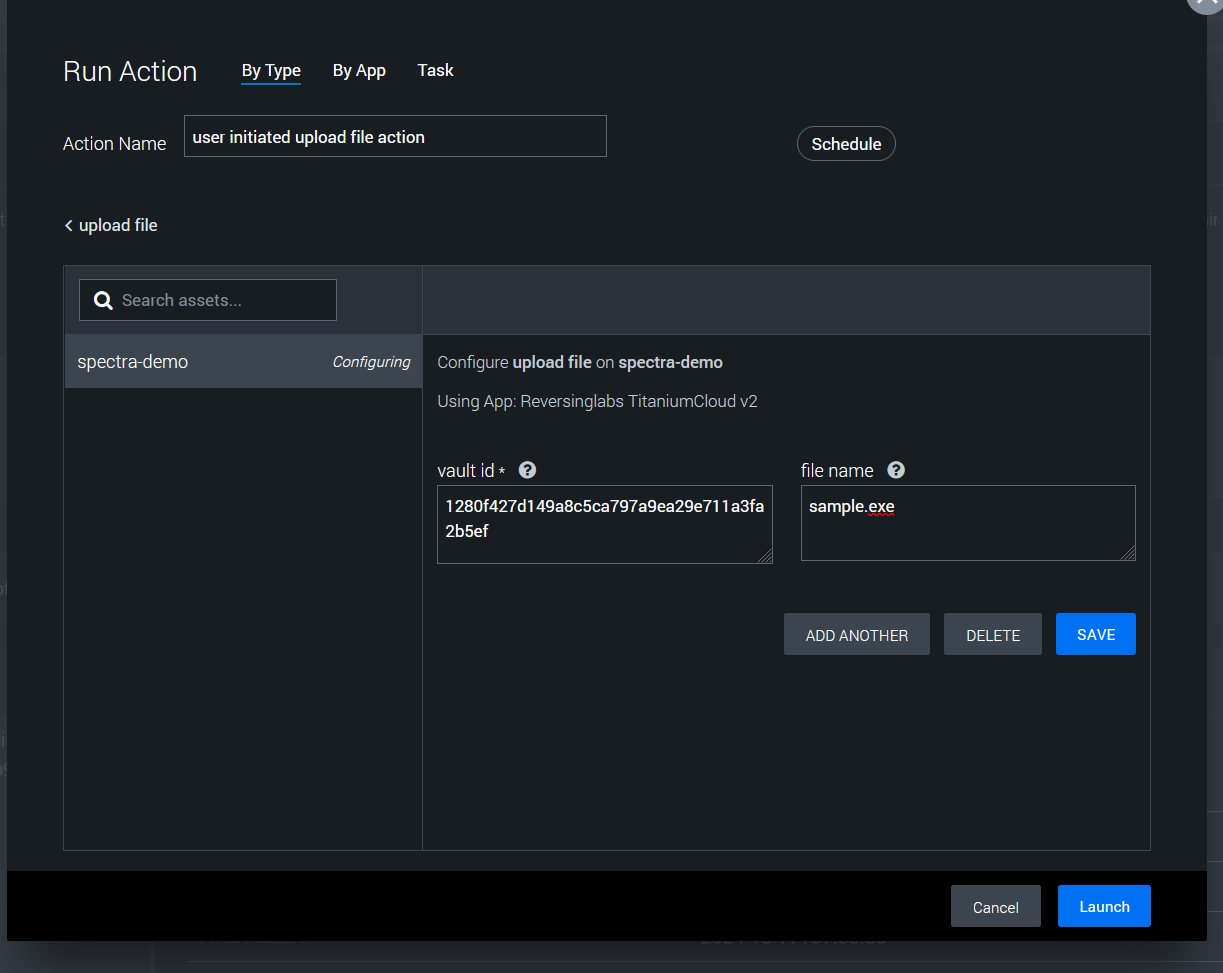
3. Configuring the Upload
You'll notice that most parameter values are automatically populated based on the selected file. It's recommended to change the file name to something descriptive and relevant to your investigation.
4. Launching the Upload
- After reviewing and adjusting the parameters, click the "Save" button.
- Then, click the "Launch" button to start the upload process.
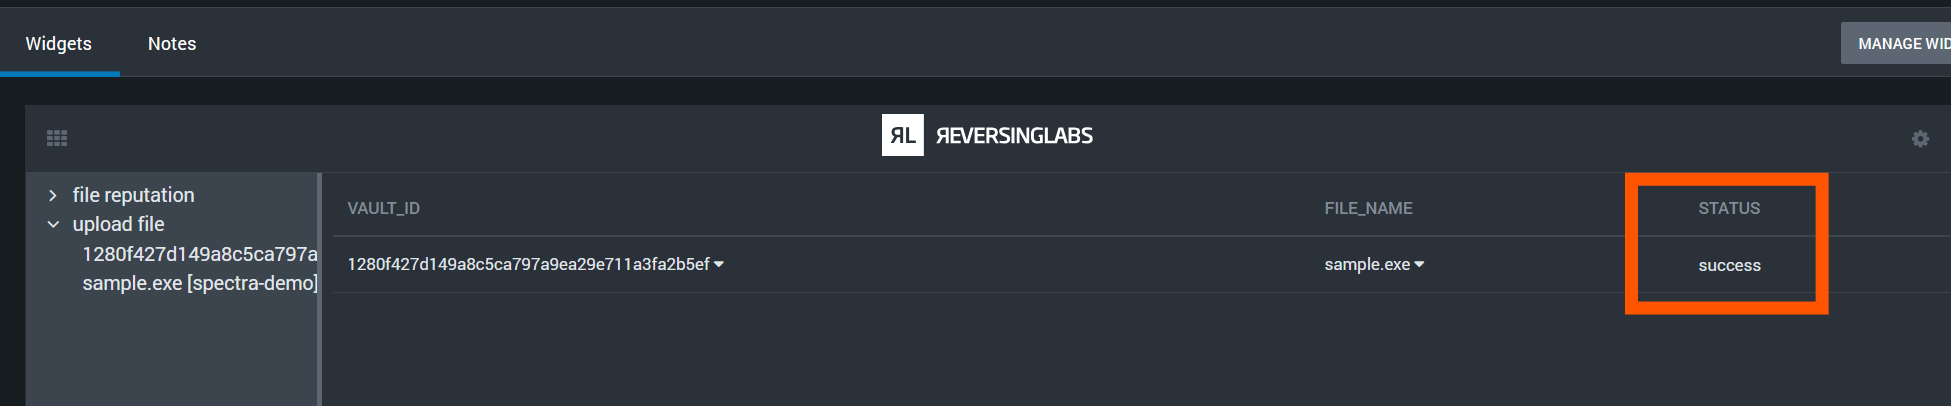
5. Confirming Upload Success
- Return to the container analyst view and check the Widgets section.
- Look for the upload status indicator.
- Ensure that the status shows a "success" value.
6. Initiating File Analysis
- Once the upload is confirmed successful, return to the File Vault.
- Select the Vault ID of the uploaded file again.
- Select the "Run Action" tab.
- This time, select the "file analysis" action.

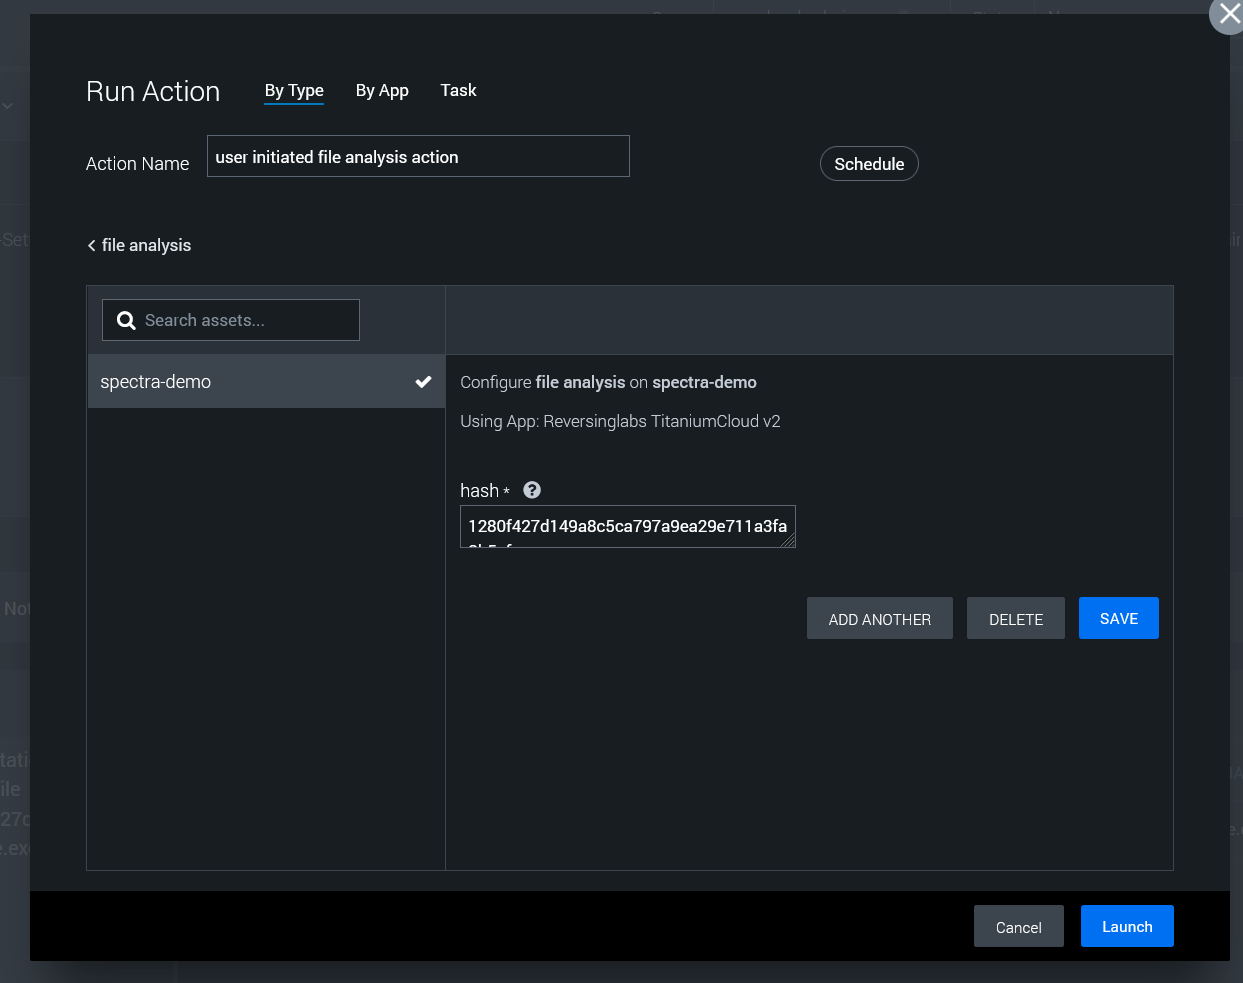
7. Launching the Analysis
- Review the pre-populated parameters for the analysis.
- Click "Save" to confirm the settings.
- Click "Launch" to start the file analysis process.
Use the following example hashes to test the action:
Malicious: 79eb18dfb91249275fa122e88eb9eafb
Suspicious: 976d0e97e13966501098cb4556ba9974b080c1f4
Goodware: 9DA5380AA08C96BED1A5971DD490B2F8B20CB8FA
Unknown: be07661cdd44baf1abf50ff2caa7c107ce1ff6e9
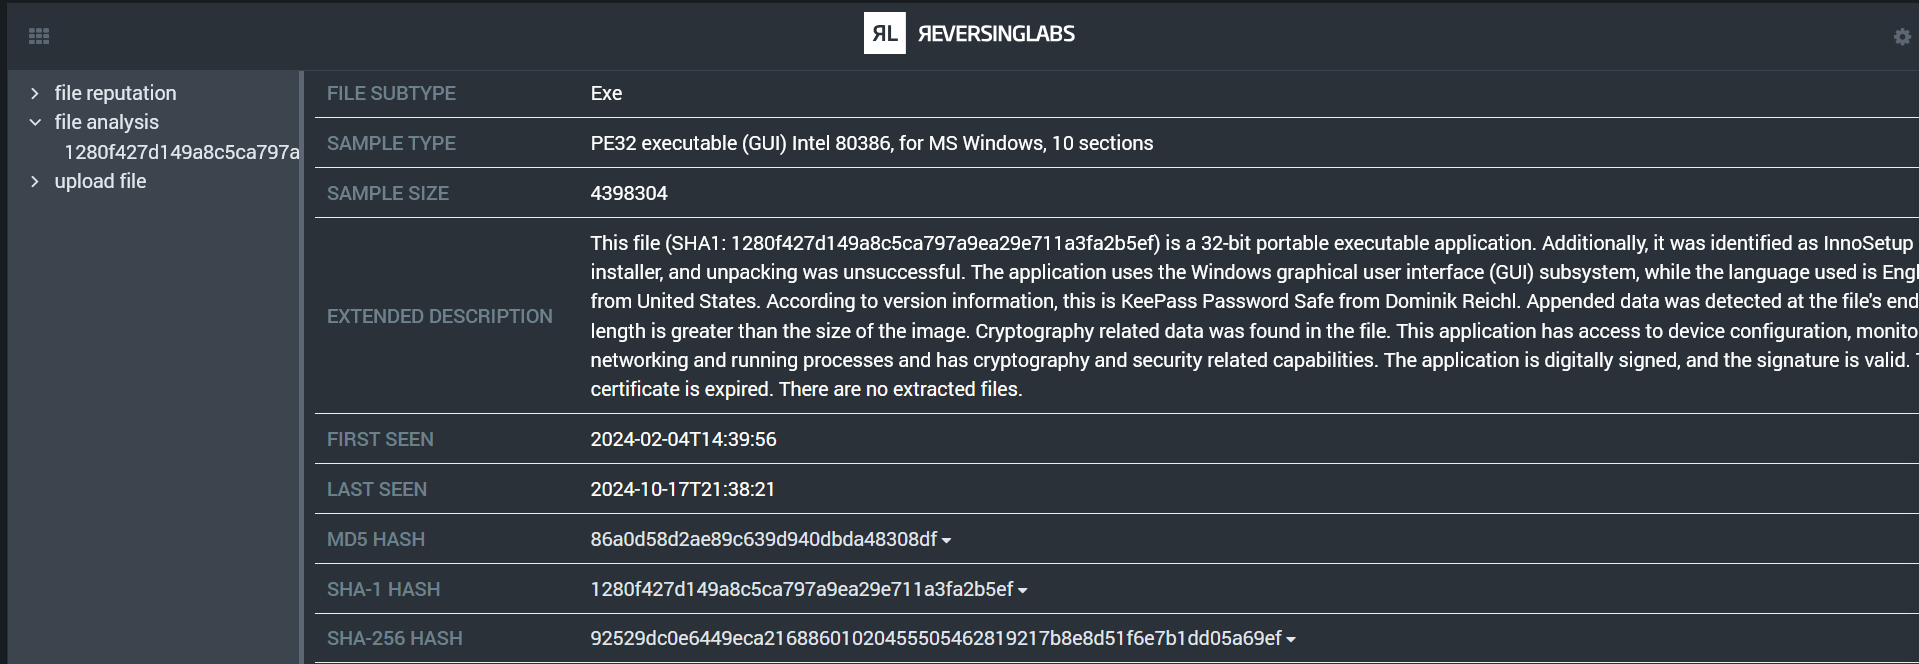
8. Reviewing Analysis Results
After the analysis is complete, navigate back to the Widgets section. Here, you'll find the results from the static analysis performed by Spectra Intelligence.
The results may include:
- File type confirmation
- Detection ratios
- Threat classification
- Malware family identification (if applicable)
- YARA rule matches
- And other relevant threat intelligence data
Spectra Analyze
1. Locating the File
- Navigate to the container where your file is stored.
- Ensure that the file you want to analyze exists in the container's File Vault.
- Locate the Vault ID for the file you wish to analyze.
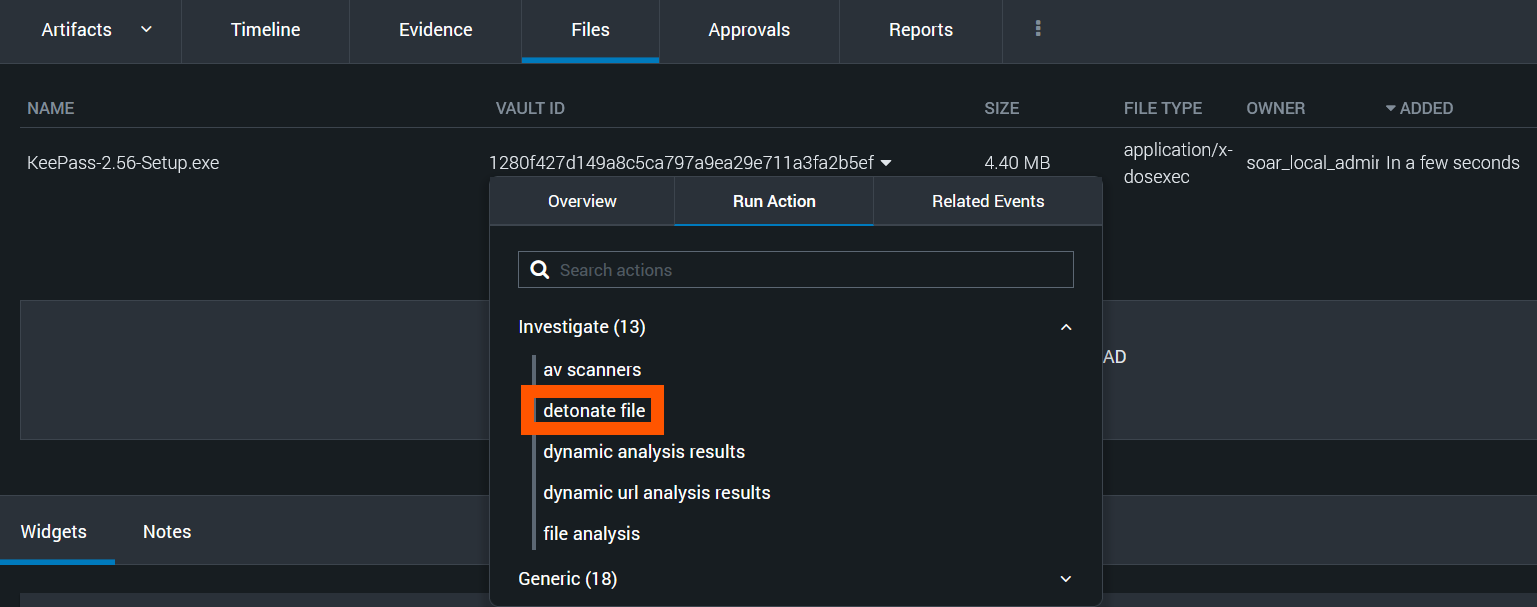
2. Initiating the File Upload
- Select the Vault ID value of the file you want to analyze.
- Select the "Run Action" tab.
- In the action categories, select the "Investigate" category.
- From the list of actions, select "detonate file".
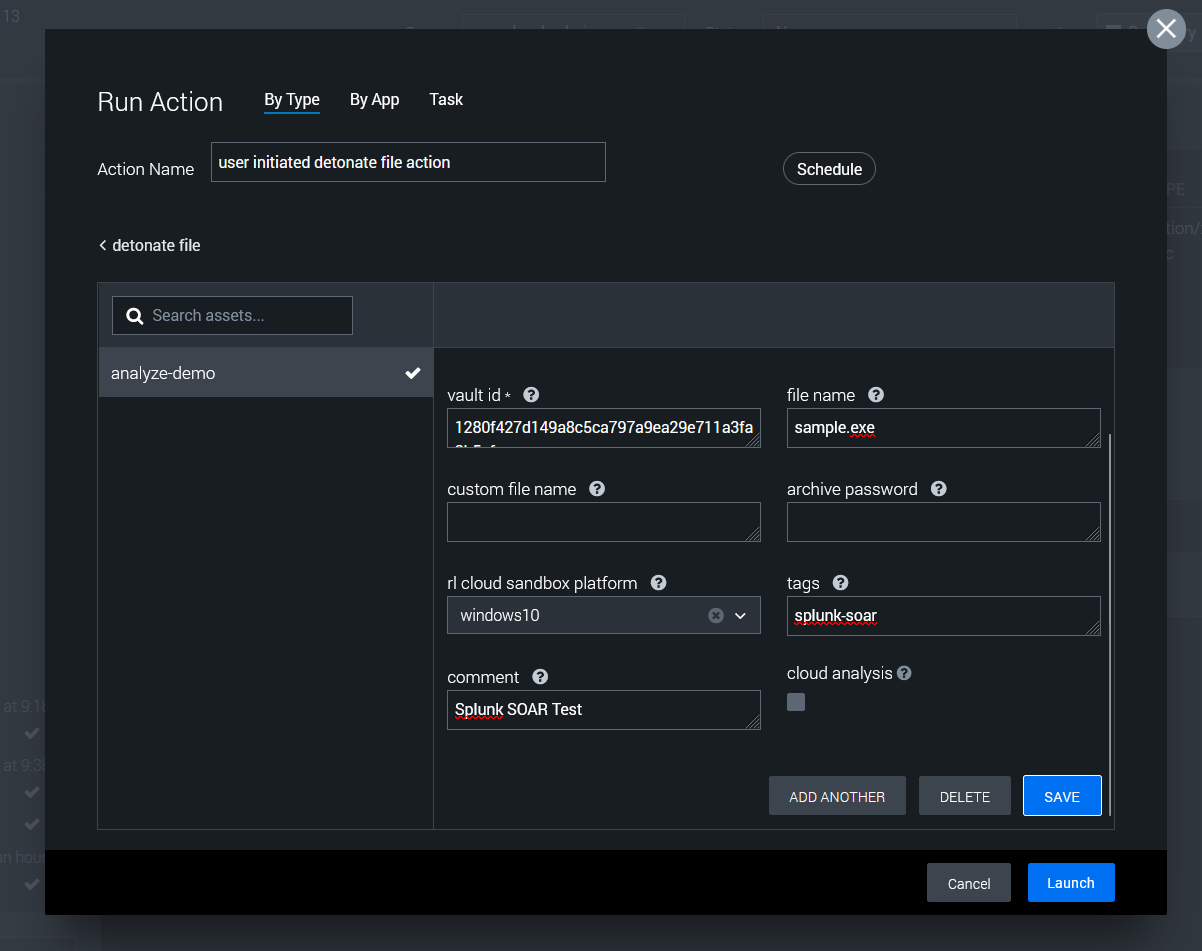
3. Configuring the Upload
You'll notice that most parameter values are automatically populated based on the selected file. There are a few parameters that can be customized:
- It's recommended to change the file name to something descriptive and relevant to your investigation.
- If the file is a password-protected archive, enter the password in the "archive password" field
- Select a sandbox platform if dynamic analysis is necessary
- Consider a comment and tags with relevant details
- Check the box for "cloud analysis" if the file should be also analyzed with Spectra Intelligence
4. Launching the Upload
- After reviewing and adjusting the parameters, click the "Save" button.
- Then, click the "Launch" button to start the upload process.
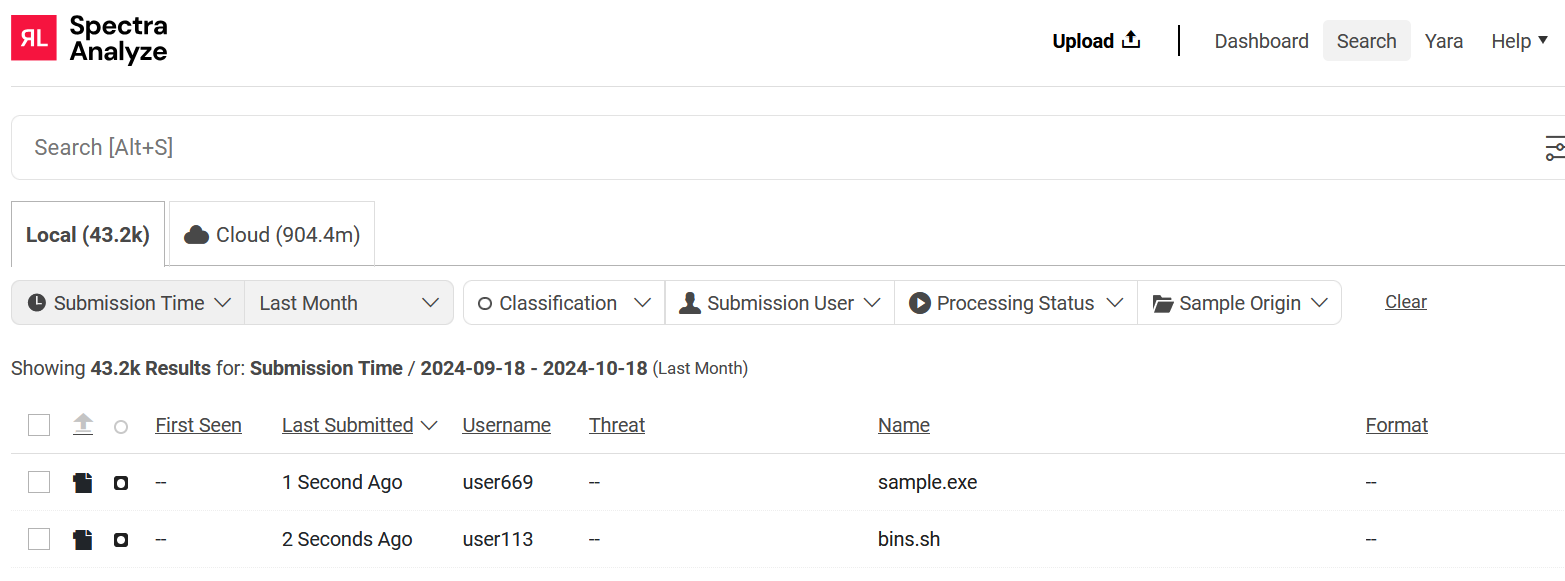
5. Confirming Upload Success
- Return to the container analyst view and check the Widgets section.
- Look for the upload status indicator.
- Ensure that the status shows a "success" value.
- Validate the file appears in the Spectra Analyze console.
- Once the upload is confirmed successful, analysis should automatically begin.
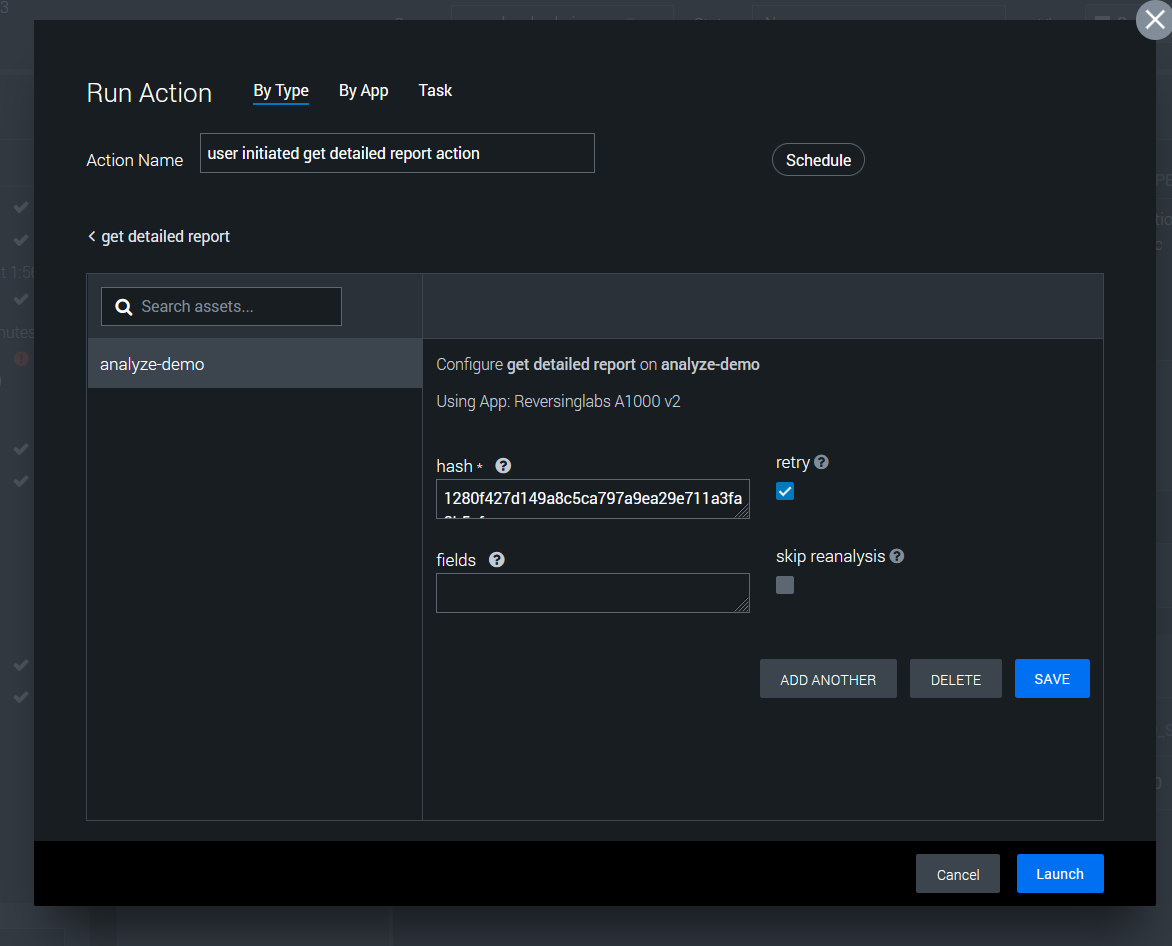
7. Retrieving Analysis Results
After a minute or two, the analysis should be finalized and ready for review.
- Click the Vault ID value of the file
- Click the "Run Actions" tab in the context menu
- Click the "Generic" category, then the "get detailed report" action
- Save and Launch the action
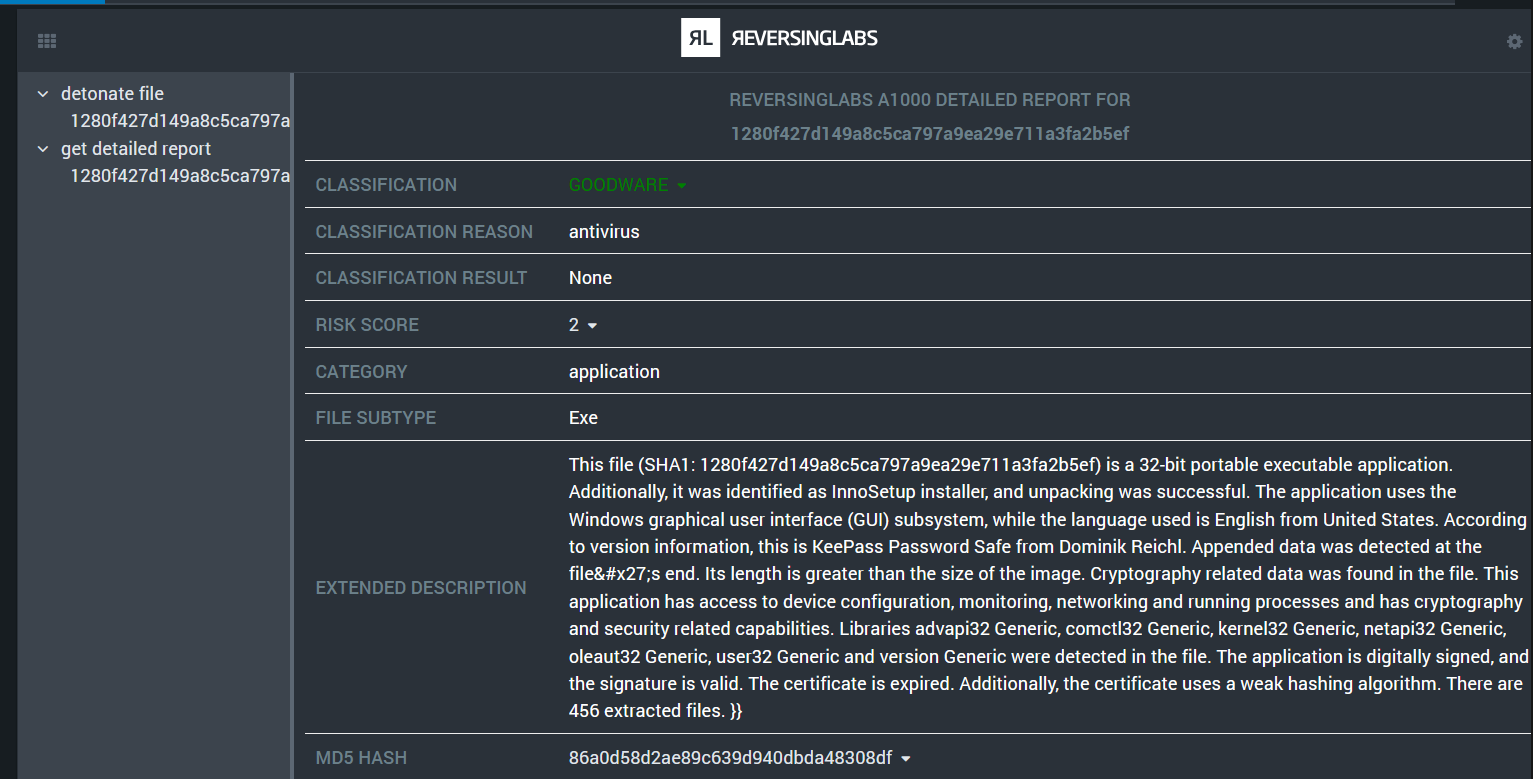
8. Review Analysis Report
Detailed report results should now be available in the activity log and Widgets section. The results may include:
- File type confirmation
- Detection ratios
- Threat classification
- Malware family identification (if applicable)
- Behavior Indicators
- Interesting strings such as URLs or domains
Next steps
Check out our useful guides on using ReversingLabs apps for Splunk SOAR: