F5 BIG-IP LTM Integration — ICAP Connector Setup
This integration guide describes how to configure the ReversingLabs Spectra Detect ICAP Server Connector with F5 BIG-IP Local Traffic Manager (LTM).
Requirements
- a back-end server, hosting an upload page
- ReversingLabs appliance:
- Spectra Analyze 9.6.0 with Spectra Core 5.3.1-61 standalone appliance, or
- Spectra Detect 5.6.0 Manager, Hub and Worker appliances
- F5 BIG-IP Local Traffic Manager (LTM) Virtual Edition (VE); tested with
BIG-IP 17.5.1 Build 0.0.7 Final - Virtualization platform, e.g. VMware vSphere/ESXi (vCenter
8.0.3.00600)
Hardware requirements
| Component | Version | CPU | Memory | Storage |
|---|---|---|---|---|
| F5 BIG-IP Local Traffic Manager (LTM) Virtual Edition (VE) | BIG-IP 17.5.1 Build 0.0.7 Final | 8x | 16GB | 83GB |
| Component | Version | CPU | Memory | Storage |
|---|---|---|---|---|
| ReversingLabs Spectra Analyze | Spectra Analyze 9.6.0 w/ Spectra Core 5.3.1-61 | 8x | 32GB | 512GB |
| Component | Version | CPU | Memory | Storage |
|---|---|---|---|---|
| ReversingLabs Spectra Detect | Spectra Detect 5.6.0 | 8x | 32GB | 512GB |
| Spectra Detect Manager | Spectra Detect 5.6.0 | 8x | 32GB | 512GB |
| Spectra Detect Hub | Spectra Detect 5.6.0 | 4x | 32GB | 200GB |
| Spectra Detect Worker | Spectra Detect 5.6.0 | 4x | 32GB | 200GB |
Common configurations
REQMOD
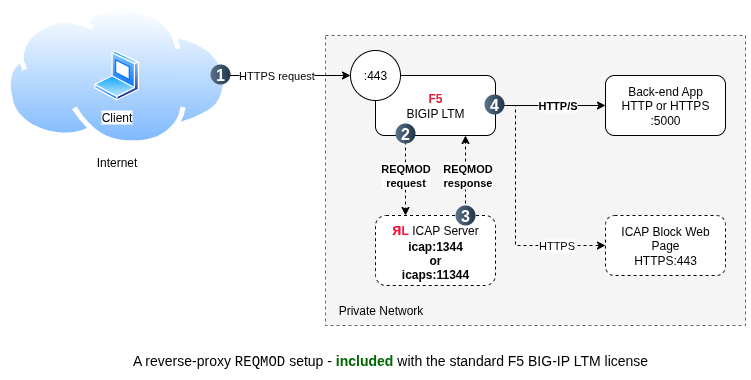
ICAP REQMOD method is used to adapt HTTP requests passing through a security device.
Typical use case: a reverse-proxy setup, such as a TLS-terminating application delivery controller.
For example, the back-end servers host an upload form, or otherwise receive a file upload via a HTTP request. ReversingLabs ICAP Server Connector prevents malicious uploads from reaching back-end servers.
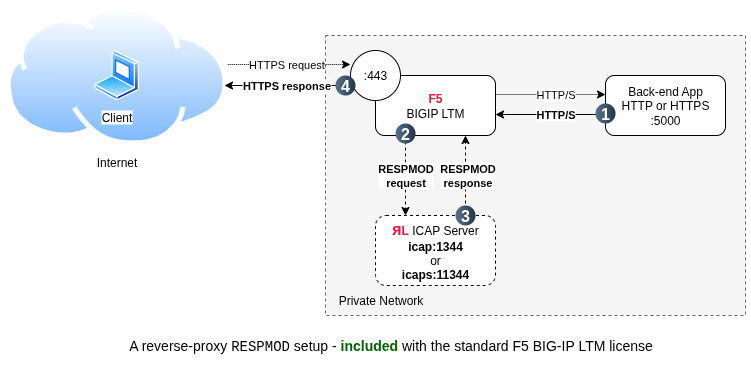
RESPMOD
ICAP RESPMOD method is used to adapt HTTP responses passing through a security device.
Typical use case: a forward-proxy setup, where internal clients use the proxy to download content from the internet.
For example, an internal client downloads a file from the internet through a secure proxy. The proxy forwards the HTTP response, i.e, the download, to ReversingLabs ICAP Server Connector for analysis. Malicious downloads are prevented from reaching internal clients.
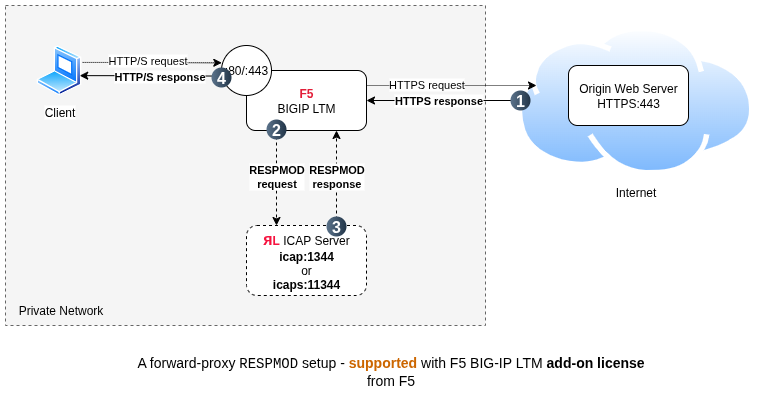
The full forward TLS proxy use case is best covered by F5 BIG-IP products:
- SSL Orchestrator
- Access Policy Manager
- Secure Web Gateway
Although F5 BIG-IP LTM supports all of the required functionality, it is not well suited to the full forward TLS proxy use case, as the stock F5 BIG-IP LTM license does not cover the use of SSL forward proxy. An add-on SSL Forward Proxy license is required, and should be available from the F5 Account team, or a third party vendor.
An unlicensed SSL Forward Proxy is indicated in the LTM log by these two messages:
01260000:2: Profile /Common/XXXXX-clientssl: Forward Proxy is enabled without a license.
Connection error: hud_ssl_handler:1211: alert(40) invalid profile unknown on VIP /Common/domain.com_443
In our testing we will use a reverse-proxy setup where RESPMOD adaptation is applied to the back-end server responses. This is much like the REQMOD use case, but instead of scanning the POST request, we scan the response to a GET request.
Concurrent REQMOD and RESPMOD adaptation is supported by both F5 BIG-IP LTM and ReversingLabs ICAP Server Connector included with the Spectra line of products.
ICAP and TLS
Regardless of the ICAP mode used (REQMOD or RESPMOD), ICAP Server Connector is available as either unencrypted ICAP, or ICAP over TLS, also know as ICAPS, Secure ICAP, and ICAP/S.
Setup instructions below cover both use cases.
Setup instructions
Follow these step-by-step instructions to configure the F5 BIG-IP LTM for use with ReversingLabs ICAP Server connector.
This guide is based on the following IP address assignment:
- Node
backend: back-end web server at10.200.186.60 - Node
icap: a ReversingLabs Spectra Analyze, or Spectra Detect, instance at10.200.187.32 - Node
proxy: an F5 BIG-IP LTM VE instance at10.200.186.128
Replace the IP addresses in the configuration sections below with actual values that match your setup.
ReversingLabs Spectra Analyze configuration
Deploy, log into, and optionally register your ReversingLabs Spectra Analyze instance, as the admin user. Then, configure the appliance:
-
👤 > Administration > Configuration > General
- Appliance Domain:
10.200.187.32 - Allowed Hosts:
10.200.187.32
- Appliance Domain:
-
👤 > Administration > Connectors > ICAP Server
- Max File Size:
0 - Allow Classifications:
unknown,goodware - Timeout:
300 - REQMOD Block Page URL:
https://10.200.187.32/icap-block-page(replace10.200.187.32with your appliance's actual IP or hostname) - RESPMOD Block Page: leave unset
- Use TLS: leave unset
- ICAP server listen port:
1344 - Scan raw data: leave unset
- Max File Size:
-
Save changes
ReversingLabs Spectra Detect configuration
10.200.187.246: Spectra Detect Manager10.200.187.32: Spectra Detect Hub (replace10.200.187.32)10.200.185.250: Spectra Detect Worker
Deploy, log into, and optionally register your ReversingLabs Spectra Detect Manager instance, as the admin user. Then, configure the appliances:
-
Administration > Spectra Detect Manager > General
- Application URL:
https://10.200.187.246/ - Allowed Hosts:
10.200.187.246 - Select Save
- Application URL:
-
Dashboard > Add New Appliance
- Type:
Spectra Detect Hub - Name:
SDHub - URL:
https://10.200.187.32/(replace10.200.187.32) - Select Add
- Type:
-
Select Dashboard > Add New Appliance
- Type:
Spectra Detect Worker - Name:
SDWorker - URL:
https://10.200.185.250/ - Select Add
noteA couple of seconds later, both the Hub and the Worker should be connected, and their status should be: Online.
- Type:
-
Central Configuration > Appliances
- Select Add New Group
- Name:
hub-group - Group Type:
Hub Group - Primary Host:
SDHub - Router ID for Primary Hub:
SDHub - Select Add
- Name:
- Select Add New Group
-
Central Configuration > Appliances
- Appliances
- Appliances in hub-group:
AllSDWorker in group hub-group
- Select Save
- Appliances in hub-group:
- Select
Recheck Statusin Apply Configuration pane
noteConfiguration Status for both the hub and the worker should be: Applied.
- Appliances
-
Dashboard > Appliance Management
- Select
SDHub- Select
Connectorsfrom the Actions drop-down menu on the top right.- Select
ICAP Server- Select
Enable Connector- Max File Size:
0 - Allow Classifications:
unknown,goodware - Timeout:
300 - REQMOD Block Page URL:
https://10.200.187.32/icap-block-page(replace10.200.187.32) - RESPMOD Block Page: leave unset
- Use TLS: leave unset
- ICAP server listen port:
1344 - Scan raw data: leave unset
- Select Start Connector, and select Yes to confirm configuration changes.
- Max File Size:
- Browsing
https://10.200.187.32/icap-block-pageshould open the ICAP Block Page.
- Select
- Select
- Select
- Select
F5 BIG-IP Local Traffic Manager Configuration
Follow F5 documentation to deploy, register, and log into your F5 BIG-IP LTM instance Web Administration Interface as the admin user.
If you are deploying F5 BIG-IP LTM VE for the first time:
- Download and verify the OVA template from myF5
- Group:
BIG-IP - Product Line:
BIG-IP v17.x / Virtual Edition with TMOS® - Product Version:
17.5.1(choose the latest version)
- Group:
- Deploy to ESXi via vCenter Deploy OVF Template
- If you want to create a VM for a quick test, you can create a configuration with just one NIC. In this case, BIG-IP VE creates basic networking objects for you. When BIG-IP VE first boots, it determines the number of active NICs. Do NOT set the Automatically power on deployed VM option during OVF Template Deployment. Set the Management NIC to a different network from other NICs. Once the template is deployed, remove the three redundant NICs.
- Browse to
https://management_IP_address/and log in withadmin/admin- For single-NIC deployments, browse to
https://management_IP_address:8443/
- For single-NIC deployments, browse to
- Start the Setup Utility, and activate a license
- Next, Next, Next
- Set the FQDN, and the root password
- Select Next / Finished
Then, configure the appliance:
Create an ICAP Health Monitor
Main tab > Local Traffic > Monitors
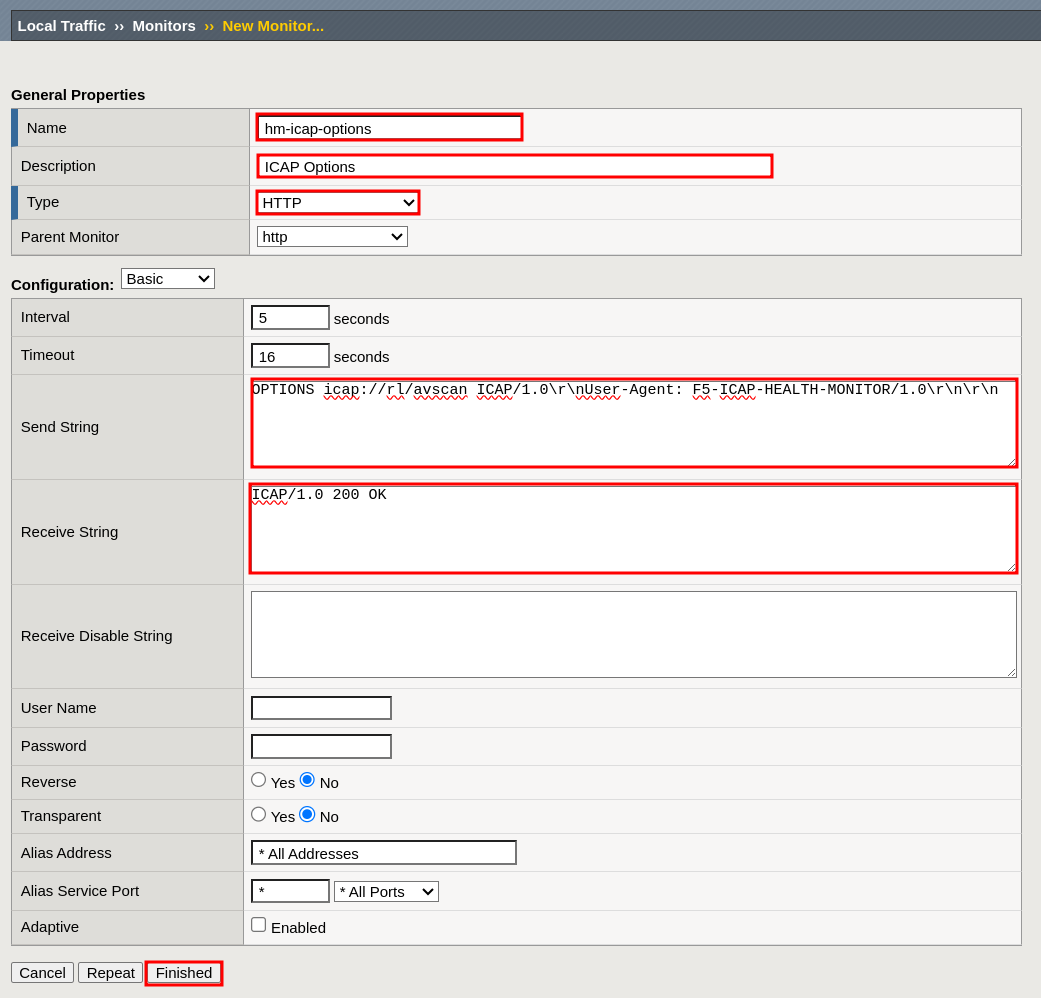
- Name:
hm-icap-options - Description:
ICAP Options - Type:
HTTP - Send String:
OPTIONS /spectraconnector ICAP/1.0\r\nUser-Agent: F5-ICAP-HEALTH-MONITOR/1.0\r\n\r\n - Receive String:
ICAP/1.0 200 OK - Select Finished
Create an ICAPS Health Monitor
Main tab > Local Traffic > Monitors
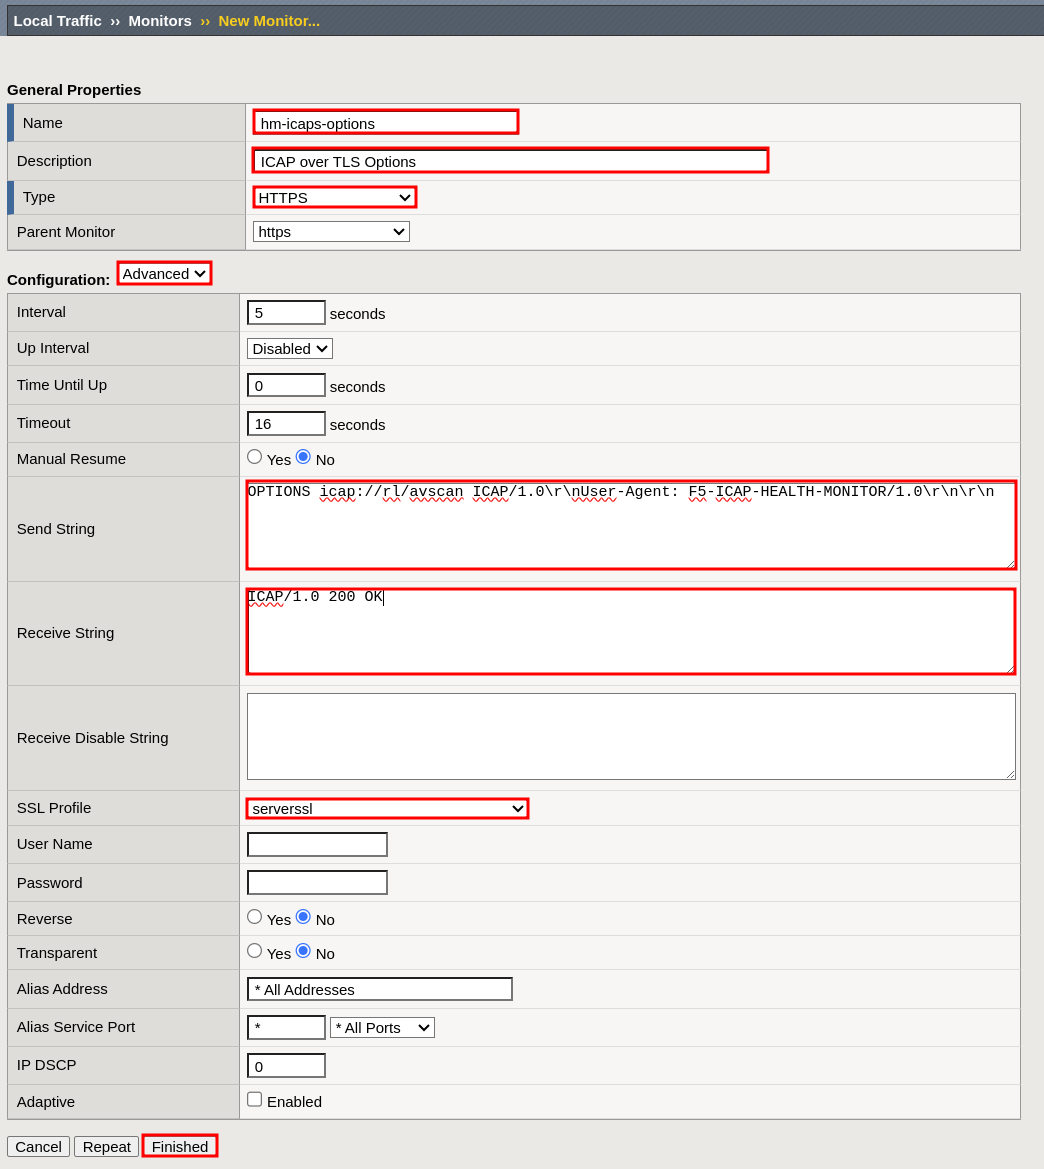
- Name:
hm-icaps-options - Description:
ICAP over TLS Options - Type:
HTTPS - Send String:
OPTIONS /spectraconnector ICAP/1.0\r\nUser-Agent: F5-ICAP-HEALTH-MONITOR/1.0\r\n\r\n - Receive String:
ICAP/1.0 200 OK - SSL Profile:
serverssl - Select Finished
Create an ICAP Block Page HTTPS Health Monitor
Main tab > Local Traffic > Monitors
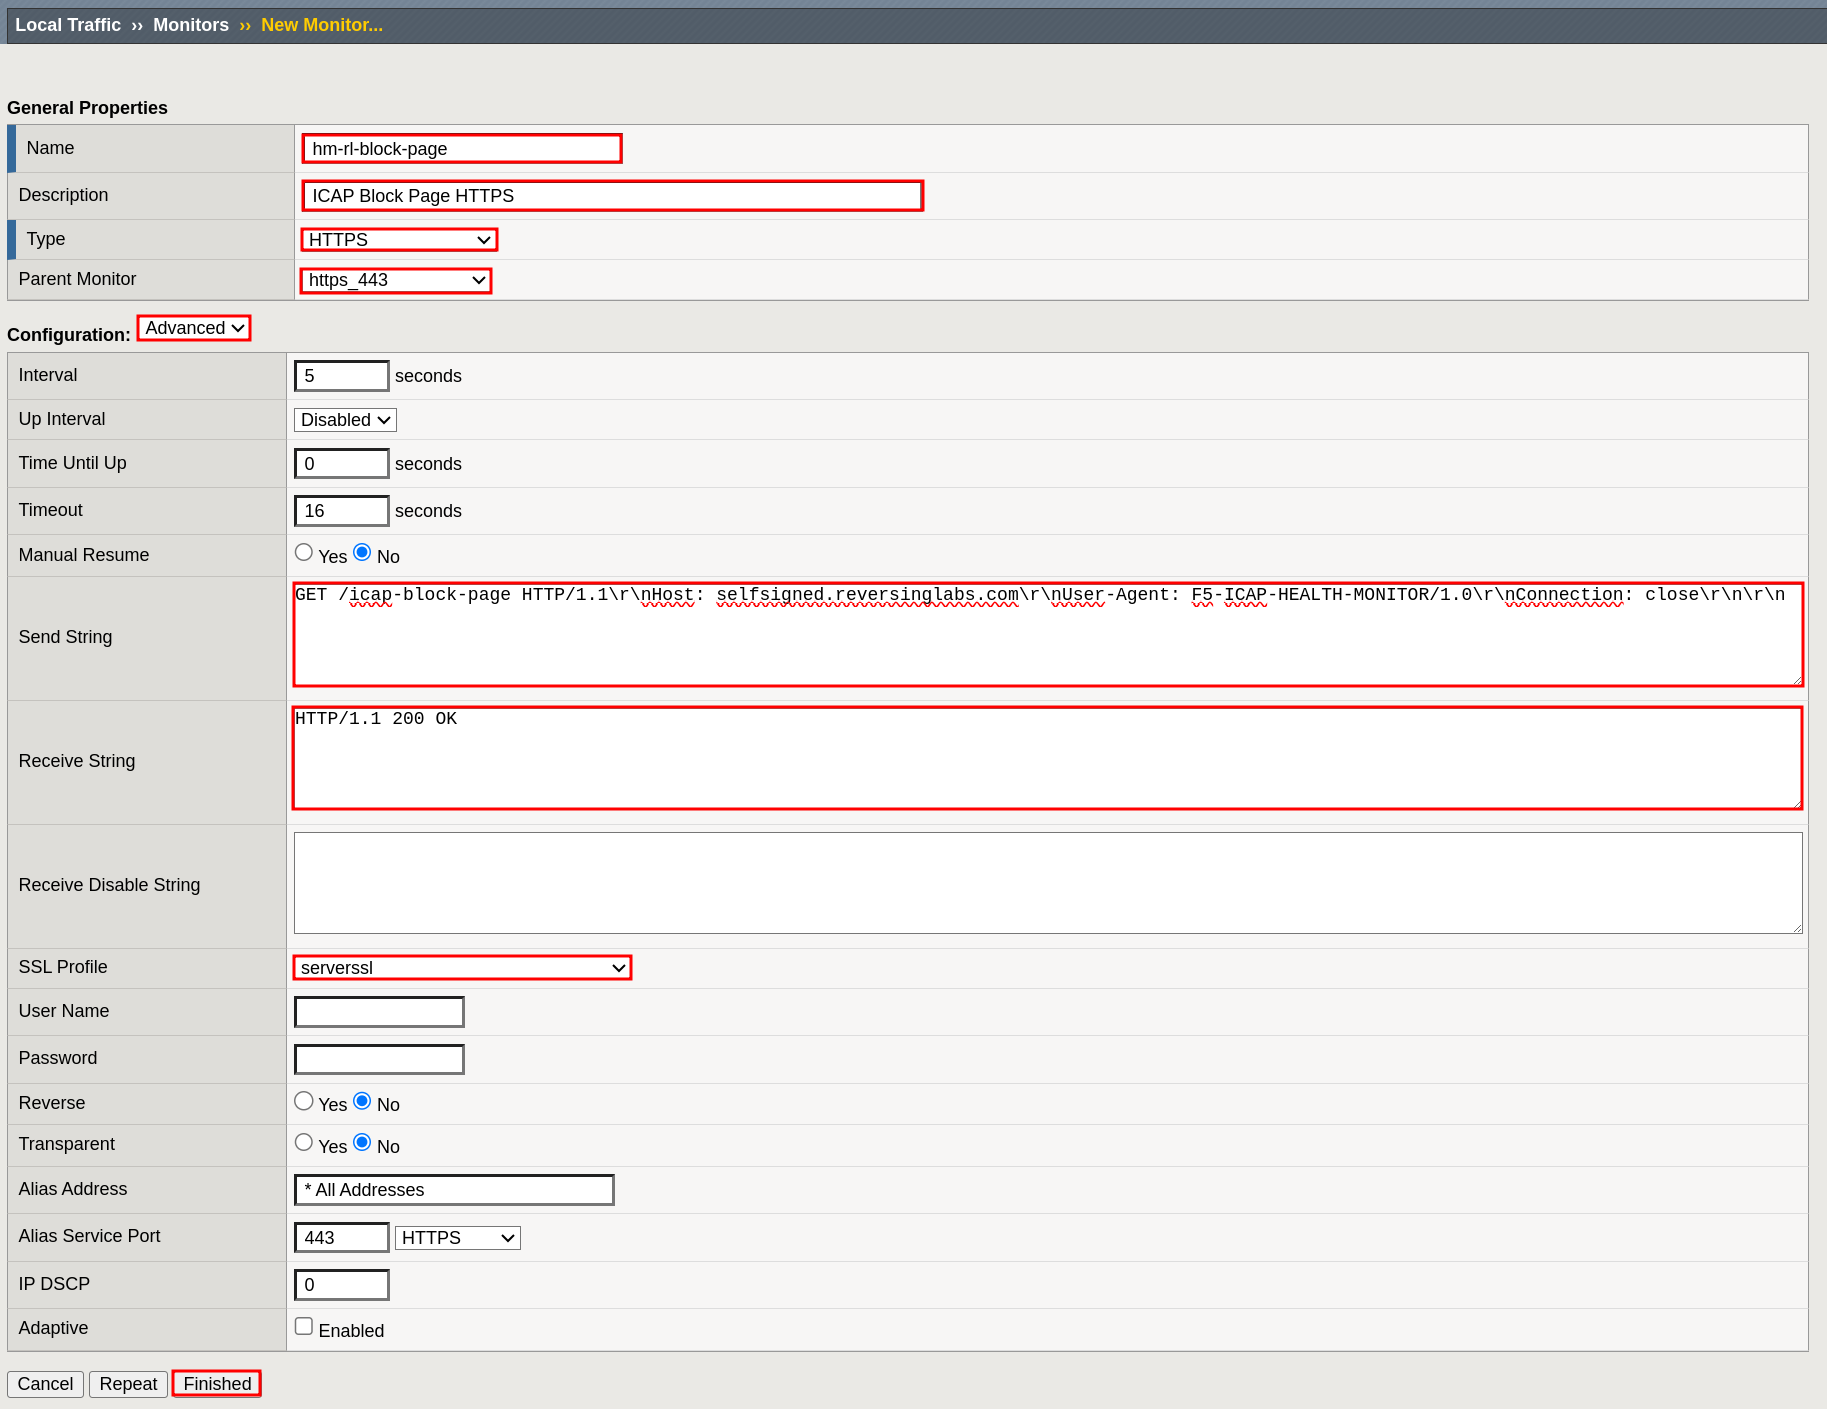
- Name:
hm-rl-block-page - Description:
ICAP Block Page HTTPS - Type:
HTTPS - Parent Monitor:
https_443 - Configuration:
Advanced - Send String:
GET /icap-block-page HTTP/1.1\r\nHost: selfsigned.reversinglabs.com\r\nUser-Agent: F5-ICAP-HEALTH-MONITOR/1.0\r\nConnection: close\r\n\r\n - Receive String:
HTTP/1.1 200 OK - SSL Profile:
serverssl - Select Finished
Create a pool for ICAP REQMOD Block Page requests
Main tab > Local Traffic > Pools
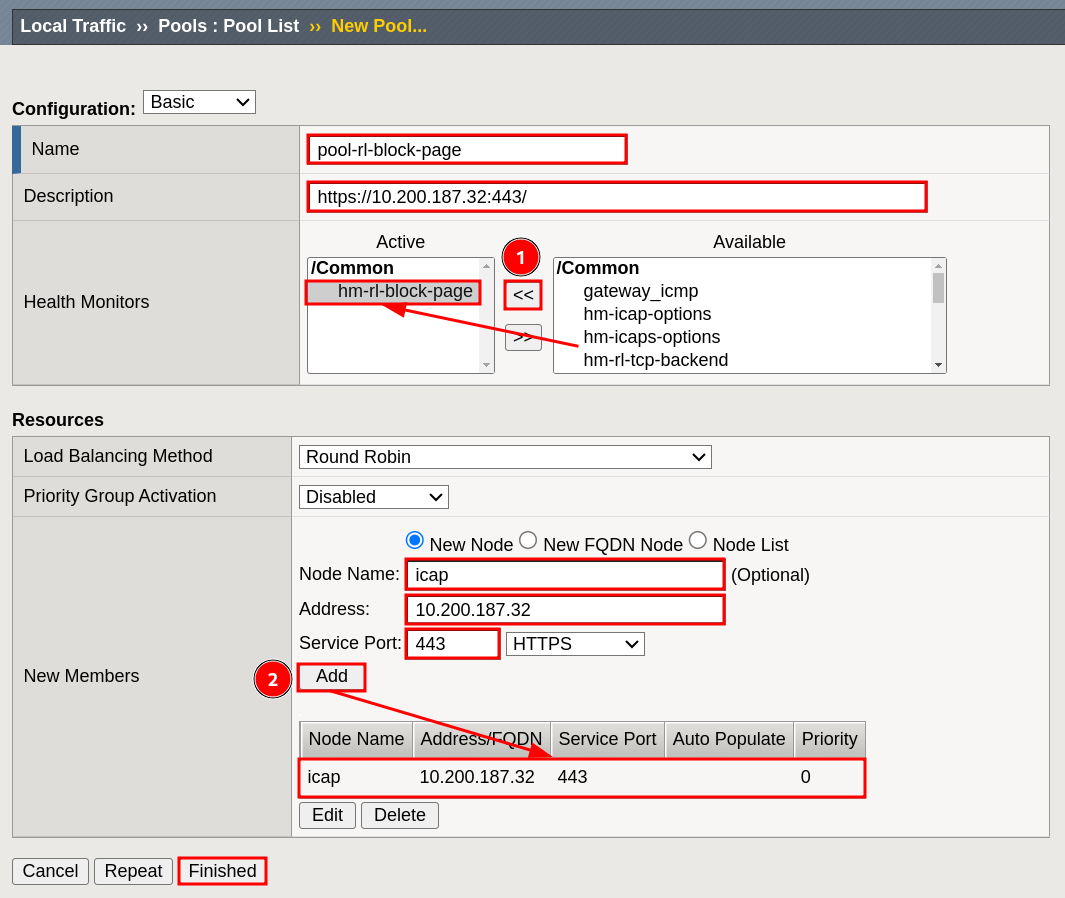
- Name:
pool-rl-block-page - Description:
https://10.200.187.32:443/(replace10.200.187.32) - Health Monitors
- move
hm-rl-block-pagefromAvailabletoActive
- move
- New Members
- Node Name:
icap 0.200.187.32- Service Port:
443 - Select Add to create an entry in the table.
- Node Name:
- Select Finished
Create an ICAP server pool
Main tab > Local Traffic > Pools
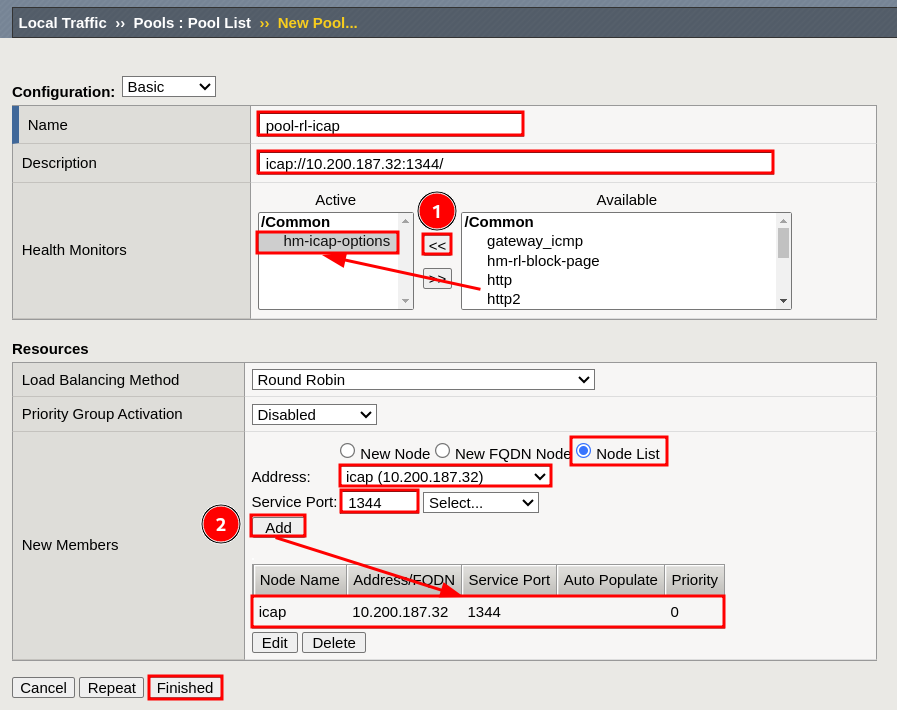
- Name:
pool-rl-icap - Description:
icap://10.200.187.32:1344/(replace10.200.187.32) - Health Monitors
- move
hm-icap-optionsfromAvailabletoActive
- move
- New Members
- Select:
Node List - Address:
icap (10.200.187.32) - Service Port:
1344 - Select Add to create an entry in the table.
- Select:
- Select Finished
Create an ICAPS server pool
Main tab > Local Traffic > Pools
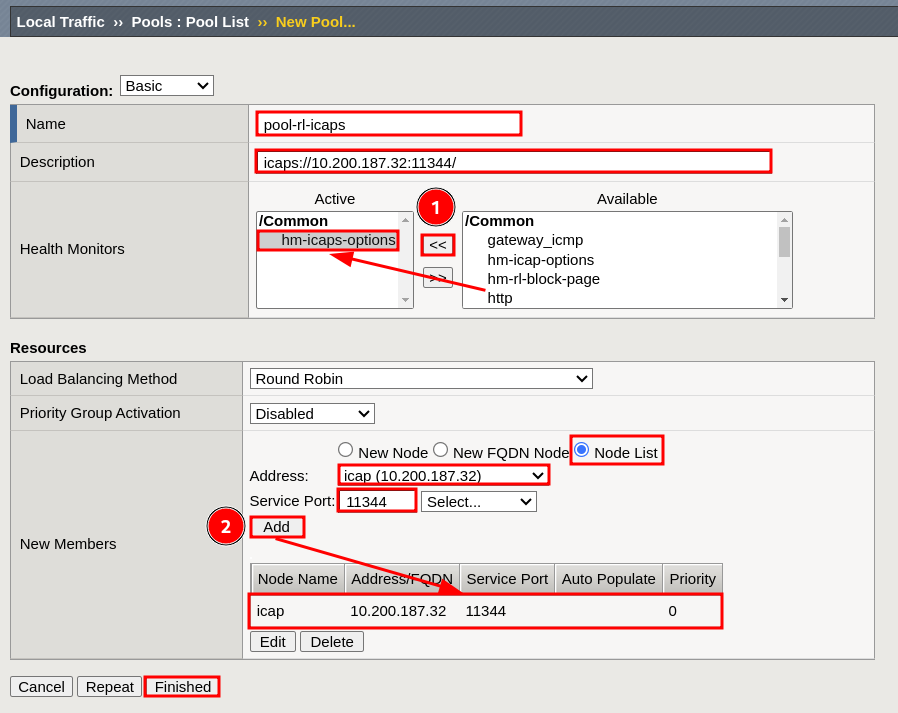
- Name:
pool-rl-icaps - Description:
icaps://10.200.187.32:11344/(replace10.200.187.32) - Health Monitors
- move
hm-icaps-optionsfromAvailabletoActive
- move
- New Members
- Select:
Node List - Address:
icap (10.200.187.32) - Service Port:
11344 - Select Add to create an entry in the table.
- Select:
- Select Finished
Create iRules
Add each iRule by selecting Main tab > Local Traffic > iRules, then Create:
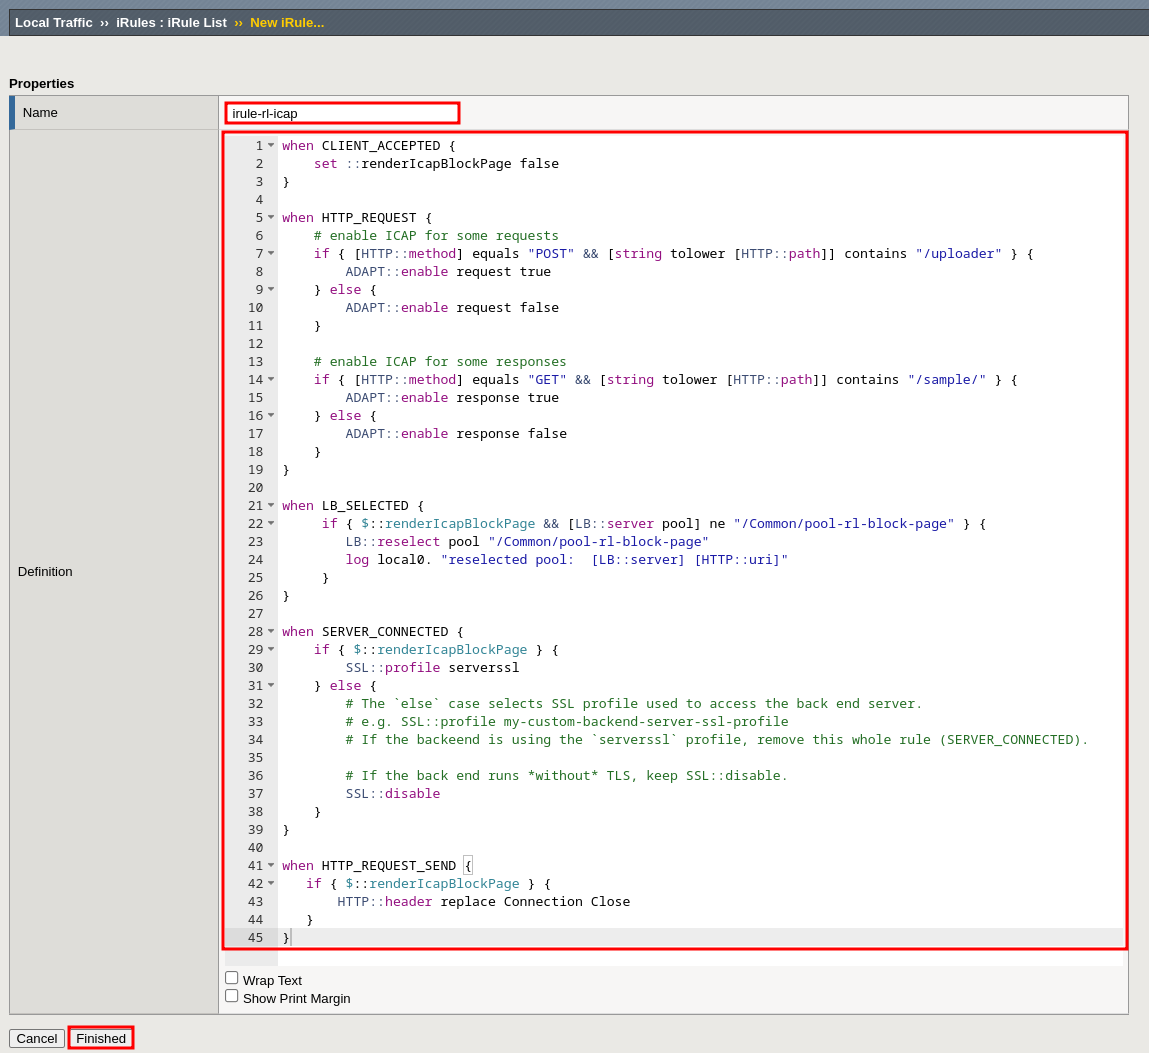
- Name:
irule-rl-icap
iRules code
when CLIENT_ACCEPTED {
    set ::renderIcapBlockPage false
}

when HTTP_REQUEST {
    # enable ICAP for some requests
    ome requests
    if { [HTTP::method] equals "POST" && [string tolower [HTTP::path]] contains "/uploader" } {
        ADAPT::enable request true
    } else {
        ADAPT::enable request false
    }

    # enable ICAP for some responses
    if { [HTTP::method] equals "GET" && [string tolower [HTTP::path]] contains "/sample/" } {
        ADAPT::enable response true
    } else {
        ADAPT::enable response false
    }
}

when LB_SELECTED {
     if { $::renderIcapBlockPage && [LB::server pool] ne "/Common/pool-rl-block-page" } {
        LB::reselect pool "/Common/pool-rl-block-page"
        log local0. "reselected pool:  [LB::server] [HTTP::uri]"
     }
}

when SERVER_CONNECTED {
    if { $::renderIcapBlockPage } {
        SSL::profile serverssl
    } else {
        # The `else` case selects SSL profile used to access the back end server.
        # e.g. SSL::profile my-custom-backend-server-ssl-profile
        # If the backeend is using the `serverssl` profile, remove this whole rule (SERVER_CONNECTED).

        # If the back end runs *without* TLS, keep SSL::disable.
        SSL::disable
    }
}

when HTTP_REQUEST_SEND {
   if { $::renderIcapBlockPage } {
       HTTP::header replace Connection Close
   }
}
As is, the irule-rl-icap HTTP_REQUEST rule will apply ICAP processing to POST /downloader requests, and GET /sample/* responses, only. This configuration is provided as an example, for your convenience. Adjust the configuration to fit your specific requirements.
The irule-rl-icap SERVER_CONNECTED rule expects the back-end server running HTTP, i.e. not using SSL/TLS. When the back-end server runs HTTPS that is compatible with the stock serverssl profile, the entire SERVER_CONNECTED rule should be removed. Otherwise, if a custom SSL profile is required, replace the SSL::disable with, e.g; SSL::profile your-custom-server-ssl-profile.
- Name:
irule-rl-block-page
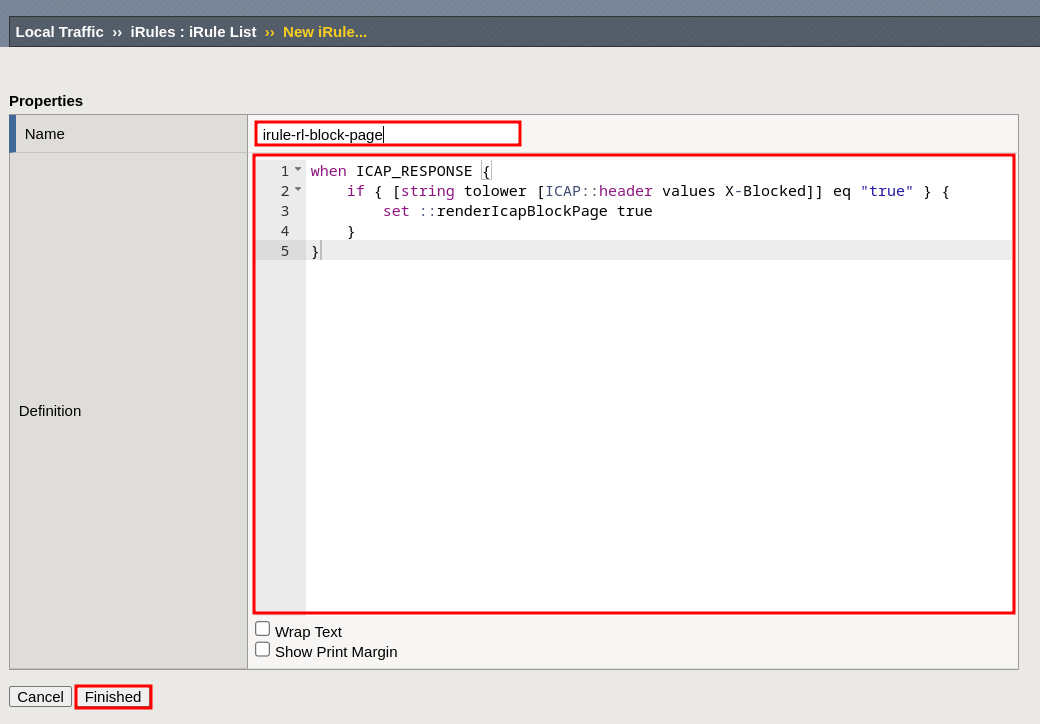
iRules code
when ICAP_RESPONSE {
    if { [string tolower [ICAP::header values X-Blocked]] eq "true" } {
        set ::renderIcapBlockPage true
    }
}
The next two trace rules are optional. They are useful for improving visibility and understanding of ICAP and HTTP events.
- Name:
irule-rl-trace-icap
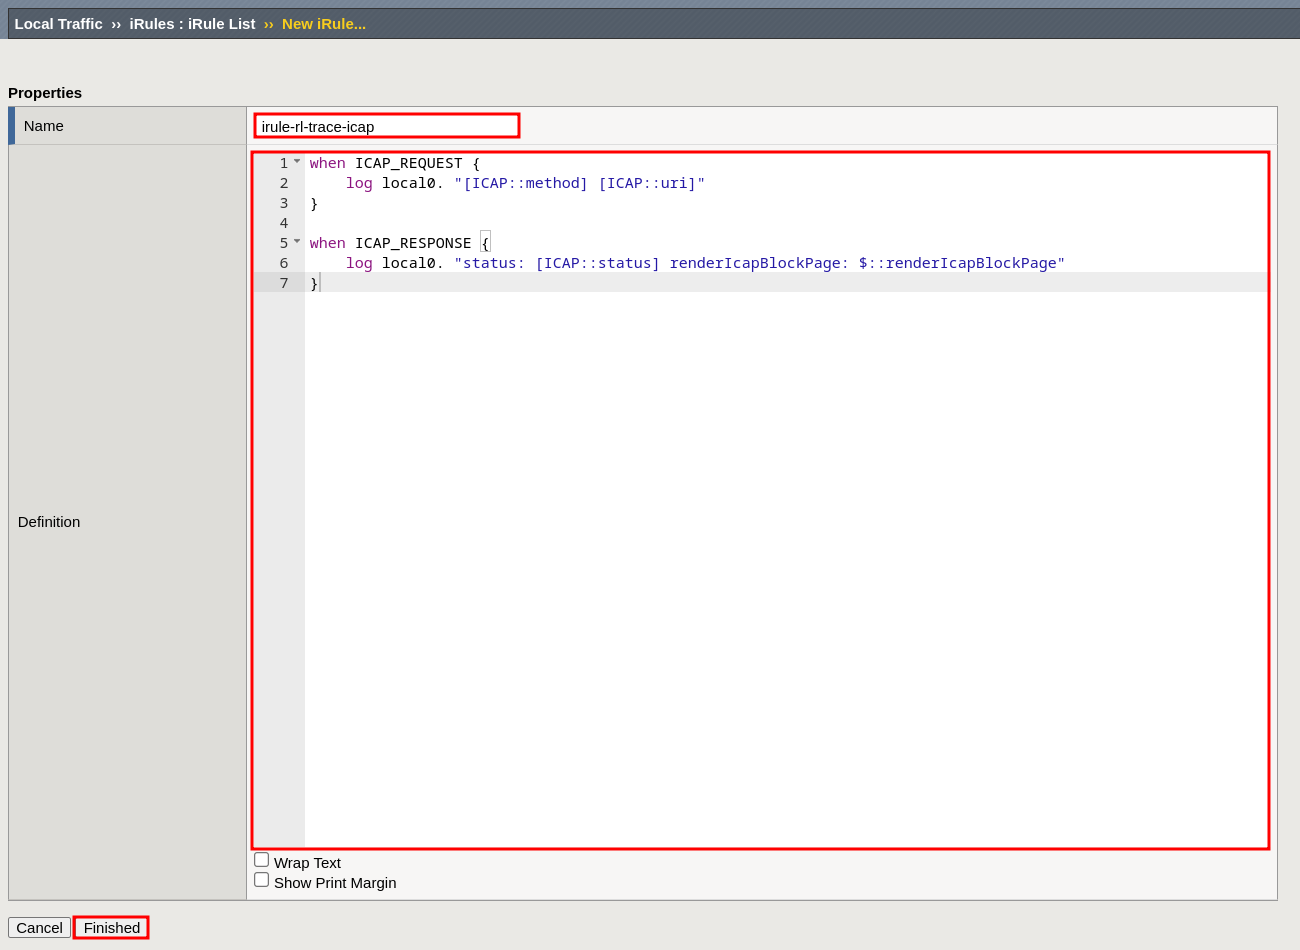
iRules code
when ICAP_REQUEST {
    log local0. "[ICAP::method] [ICAP::uri]"
}

when ICAP_RESPONSE {
    log local0. "status: [ICAP::status] renderIcapBlockPage: $::renderIcapBlockPage"
}
- Name:
irule-rl-trace-http
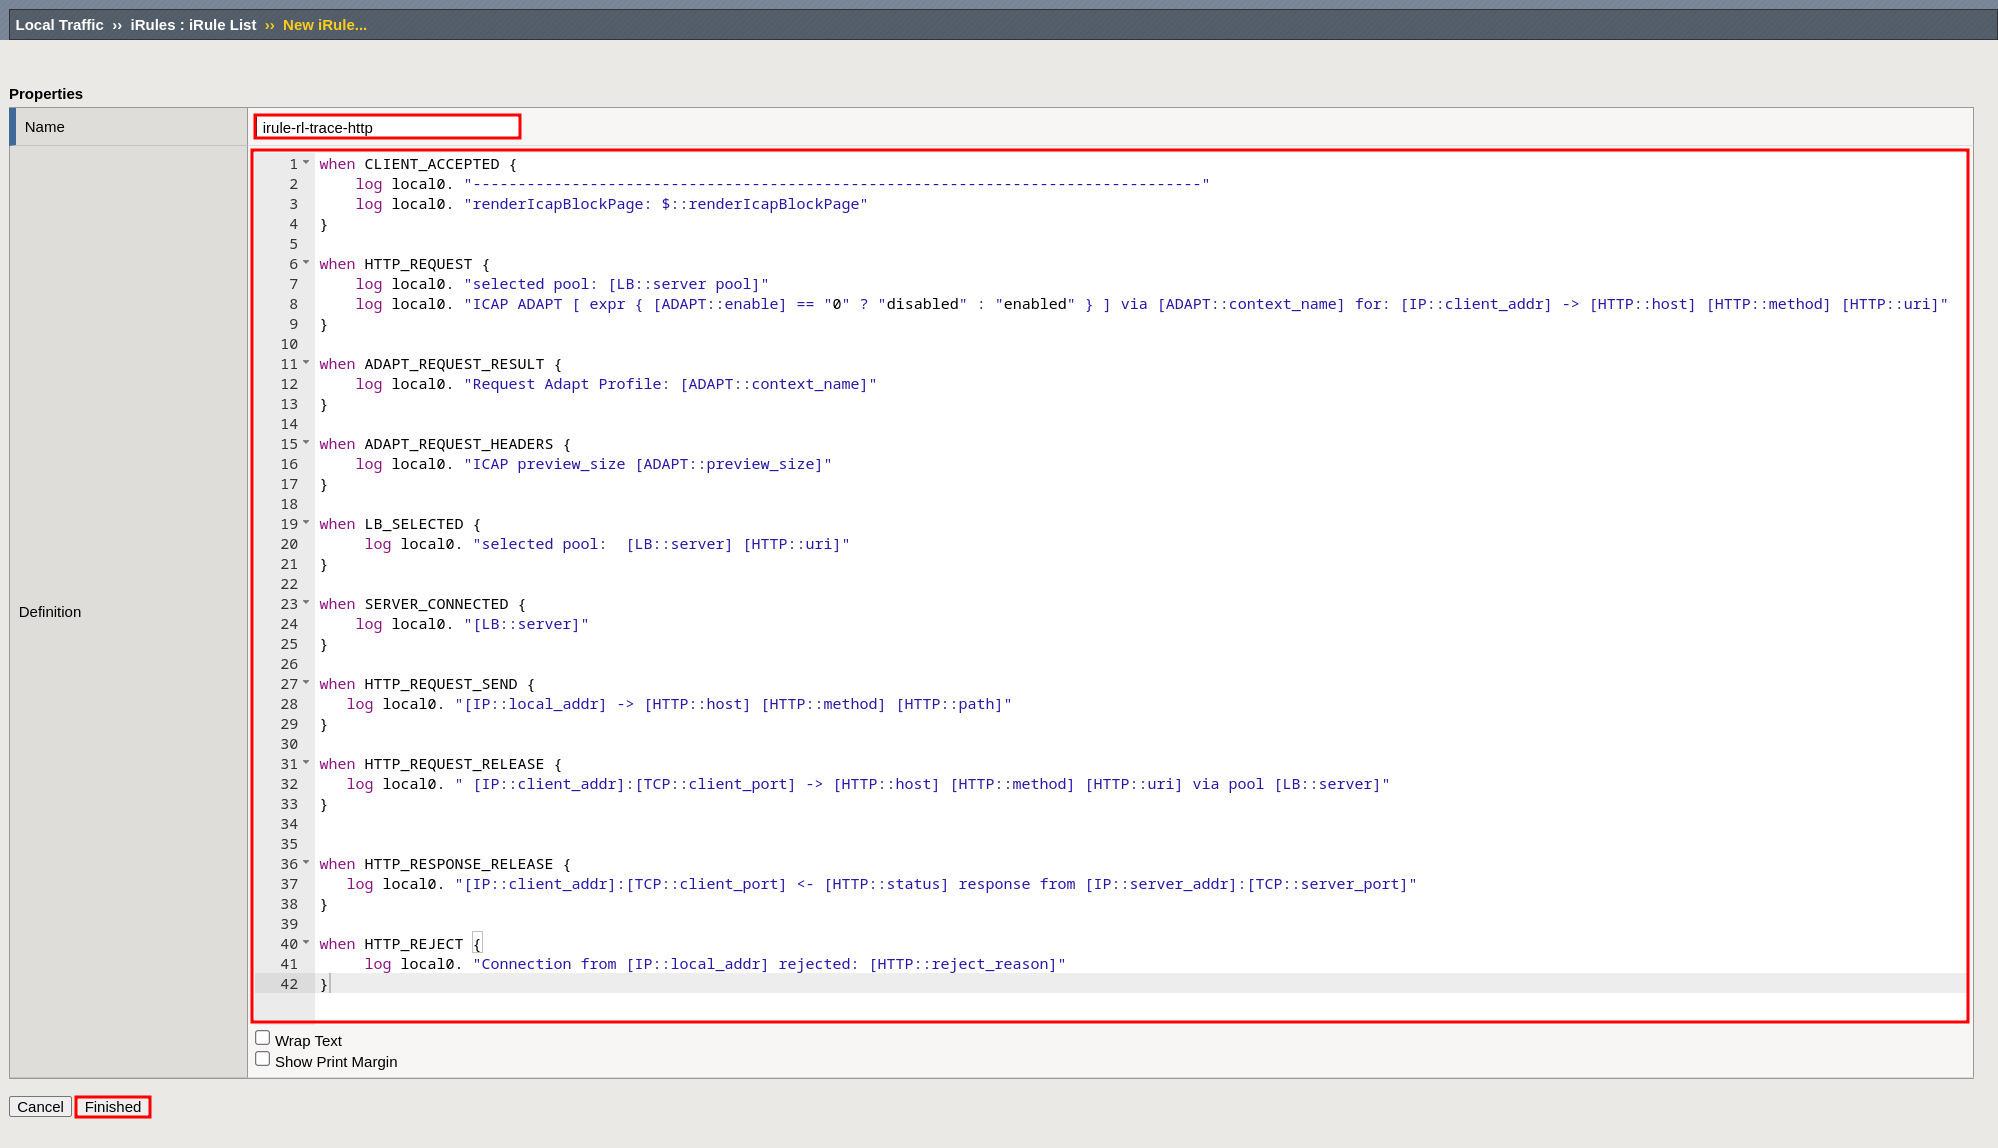
iRules code
when CLIENT_ACCEPTED {
    log local0. "---------------------------------------------------------------------------------"
    log local0. "renderIcapBlockPage: $::renderIcapBlockPage"
}

when HTTP_REQUEST {
    log local0. "selected pool: [LB::server pool]"
    set ctx [ADAPT::context_current]
    log local0. "ICAP ADAPT req [ expr { [ADAPT::enable request] == "0" ? "disabled" : "enabled" } ] / resp [ expr { [ADAPT::enable response] == "0" ? "disabled" : "enabled" } ] via [ADAPT::context_name $ctx] for: [IP::client_addr] -> [HTTP::host] [HTTP::method] [HTTP::uri]"
}

when ADAPT_REQUEST_RESULT {
    set ctx [ADAPT::context_current]
    log local0. "Request Adapt Profile: [ADAPT::context_name $ctx]"
}

when ADAPT_REQUEST_HEADERS {
    log local0. "ICAP preview_size [ADAPT::preview_size]"
}

when LB_SELECTED {
     log local0. "selected pool:  [LB::server] [HTTP::uri]"
}

when SERVER_CONNECTED {
    log local0. "[LB::server]"
}

when HTTP_REQUEST_SEND {
   log local0. "[IP::local_addr] -> [HTTP::host] [HTTP::method] [HTTP::path]"
}

when HTTP_REQUEST_RELEASE {
   log local0. " [IP::client_addr]:[TCP::client_port] -> [HTTP::host] [HTTP::method] [HTTP::uri] via pool [LB::server]"
}


when HTTP_RESPONSE_RELEASE {
   log local0. "[IP::client_addr]:[TCP::client_port] <- [HTTP::status] response from [IP::server_addr]:[TCP::server_port]"
}

when HTTP_REJECT {
     log local0. "Connection from [IP::local_addr] rejected: [HTTP::reject_reason]"
}
Create a client-side ICAP profile
Main tab > Local Traffic > Profiles > Services > ICAP
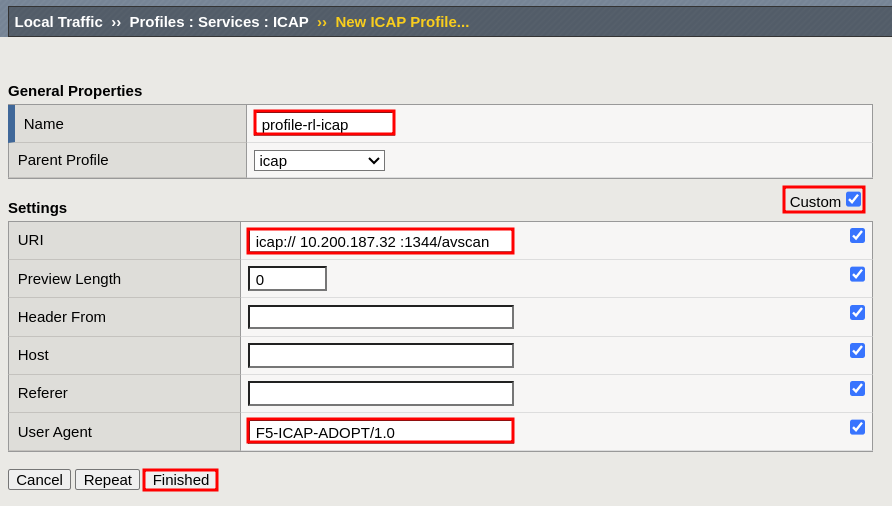
- Name:
profile-rl-icap - Set
Custom - URI:
icap://10.200.187.32:1344/avscan(replace10.200.187.32) - User Agent:
F5-ICAP-ADAPT/1.0 - Select Finished
Create a client-side ICAPS profile
Main tab > Local Traffic > Profiles > Services > ICAP
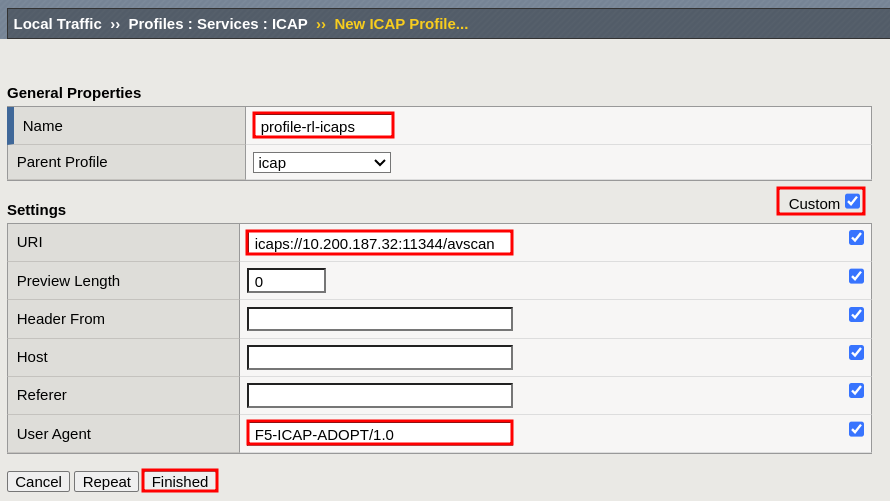
- Name:
profile-rl-icaps - Set
Custom - URI:
icaps://10.200.187.32:11344/avscan(replace10.200.187.32) - User Agent: F5-ICAP-ADAPT/1.0
- Select Finished
Create an Internal Virtual Server for forwarding requests to an ICAP server
Main tab > Local Traffic > Virtual Servers
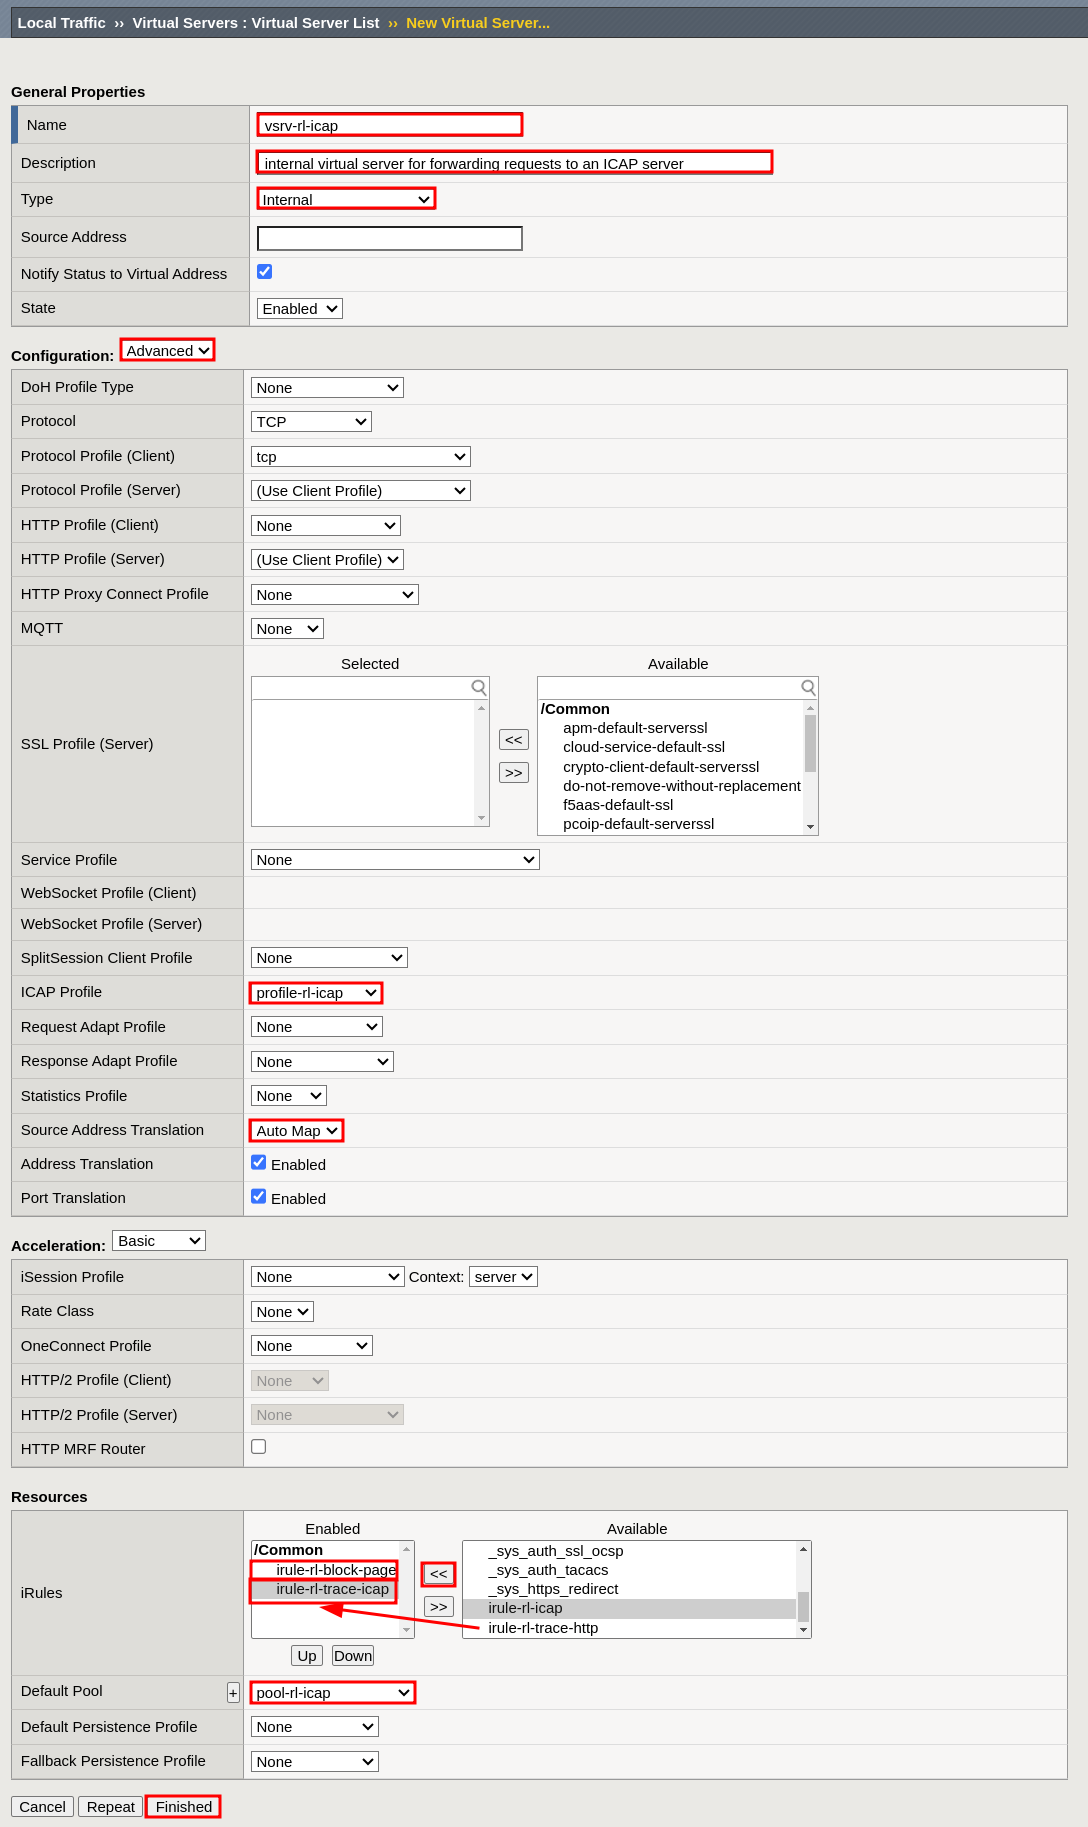
- Name:
vsrv-rl-icap - Description:
internal virtual server for forwarding requests to an ICAP server - Type:
Internal - Configuration:
Advanced - ICAP Profile:
profile-rl-icap - Source Address Translation:
Auto Map - Resources:
- iRules: move entries from
AvailabletoEnabled, in this order:irule-rl-block-pageirule-rl-trace-icap
- Default Pool:
pool-rl-icap
- iRules: move entries from
- Select Finished
To use ICAP over TLS, a.k.a ICAPS, Secure ICAP, ICAP/S:
- Enable TLS on Spectra Analyze by setting the 👤 > Administration > Connectors > ICAP Server > Use TLS toggle; and selecting Save Changes
- Enable TLS on F5 appliance by adjusting the
vsrv-rl-icapsettings, in Main tab > Local Traffic > Virtual Servers >vsrv-rl-icap, to:- Properties tab
- Configuration:
Advanced - SSL Profile (Server):
serverssl - ICAP Profile:
profile-rl-icaps
- Configuration:
- Resources tab
- Load Balancing > Default Pool:
pool-rl-icaps
- Load Balancing > Default Pool:
- Properties tab
Create a pool to process HTTP traffic
Main tab > Local Traffic > Pools
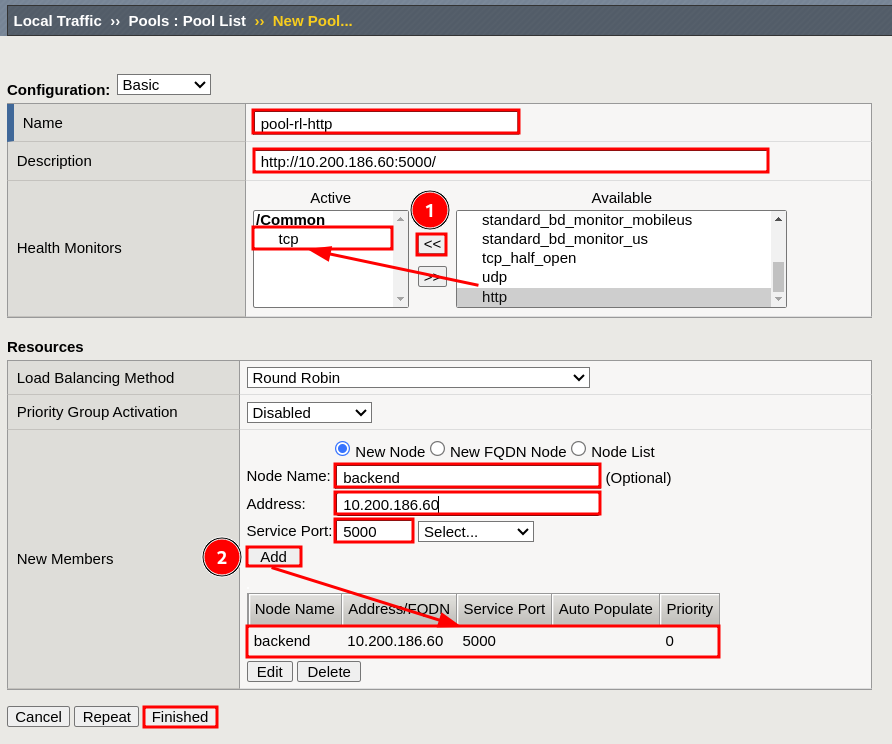
- Name:
pool-rl-http - Description:
http://10.200.186.60:5000/(replace10.200.186.60) - Health Monitors:
move tcp Available to Active
- New Members:
- Node Name:
backend - Address:
10.200.186.60 - Service Port:
5000 - Select Add to create an entry in the table
- Node Name:
- Select Finished
Create a Request Adapt profile
Main tab > Local Traffic > Profiles > Services > Request Adapt
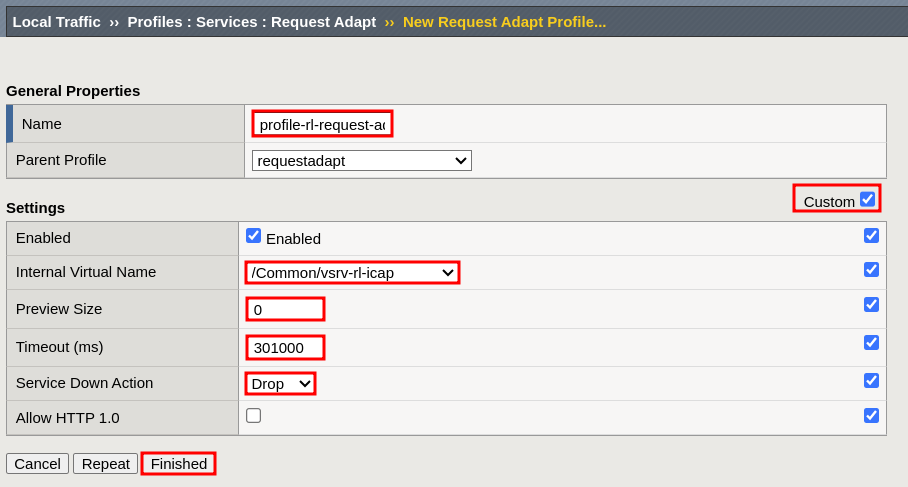
- Name:
profile-rl-request-adapt - Set
Custom - Internal Virtual Name:
/Common/vsrv-rl-icap - Preview Size:
0 - Timeout (ms):
301000 - Service Down Action:
Drop - Select Finished
Create a Response Adapt profile
Main tab > Local Traffic > Profiles > Services > Response Adapt
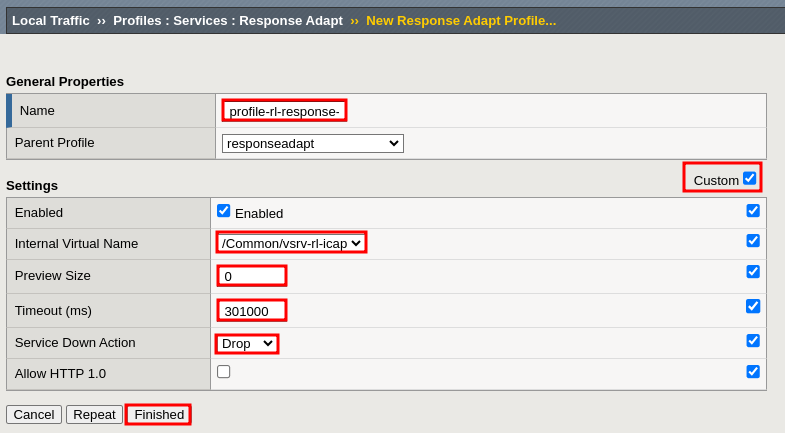
- Name:
profile-rl-response-adapt - Set
Custom - Internal Virtual Name:
Common/vsrv-rl-icap - Preview Size:
0 - Timeout (ms):
301000 - Service Down Action:
Drop - Select Finished
Create an HTTP Virtual Server for enabling request adaptation
Main tab > Local Traffic > Virtual Servers
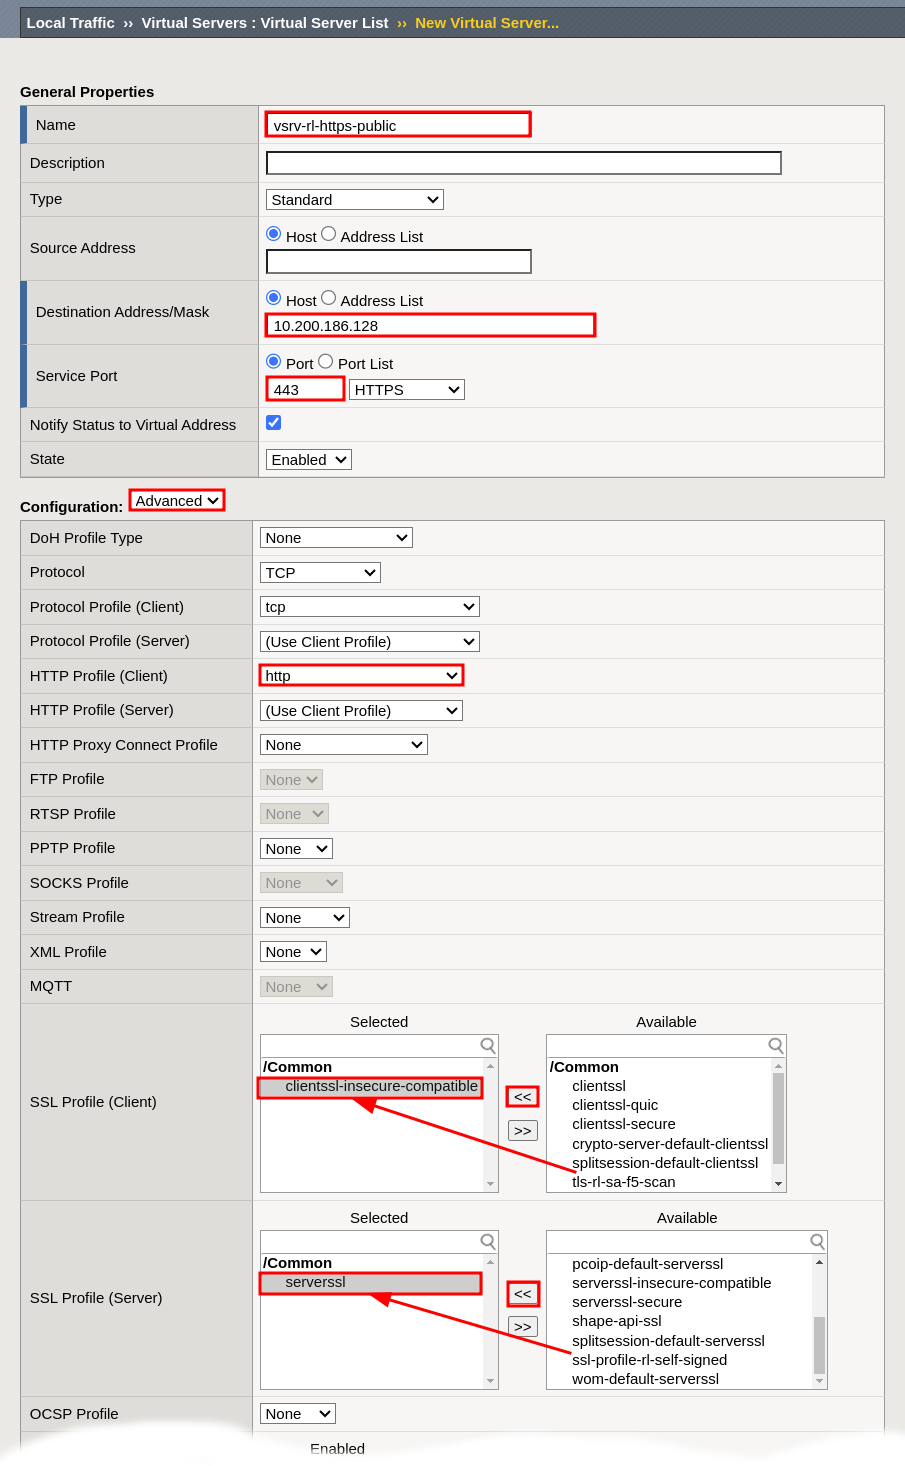
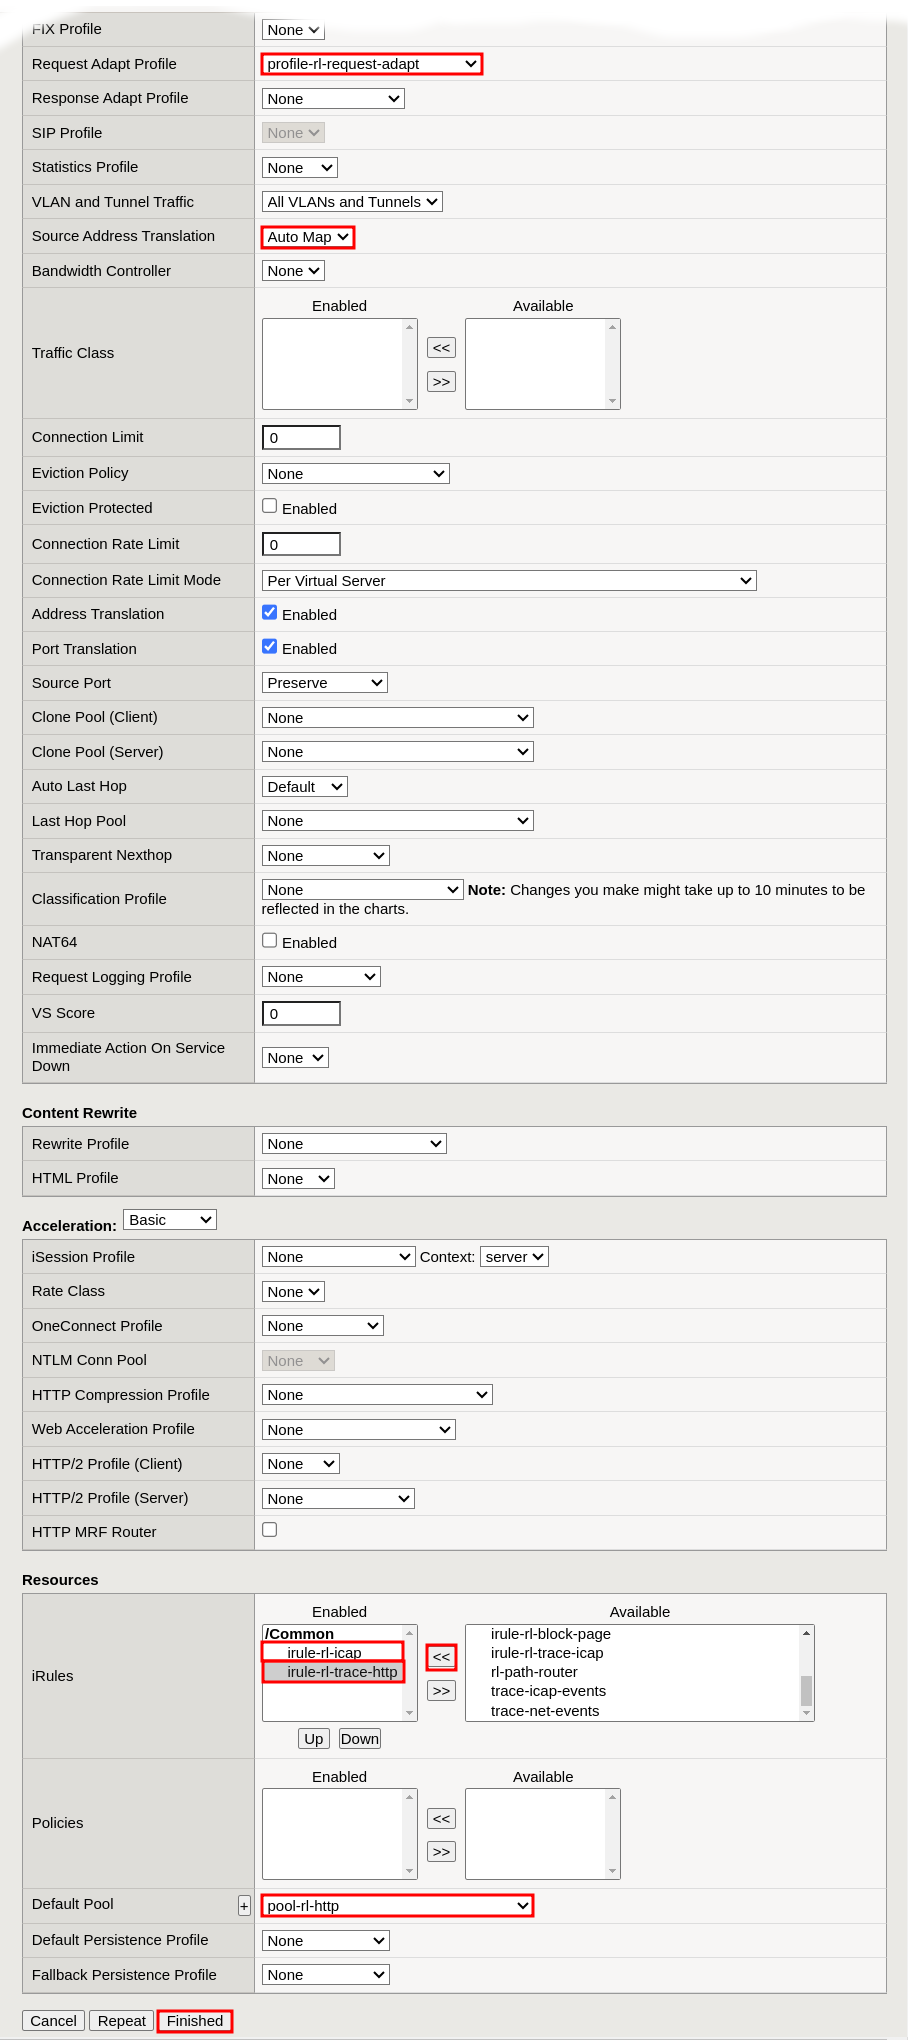
- Name:
vsrv-rl-https-public - Destination Address/Mask - Host:
10.200.186.128 - Service Port - Port:
443 - Configuration:
- HTTP Profile (Client):
http - SSL Profile (Client):
clientssl-insecure-compatible - SSL Profile (Server):
serverssl - Request Adapt Profile:
profile-rl-request-adapt - Response Adapt Profile:
profile-rl-response-adapt(optional) - Source Address Translation:
Auto Map
- HTTP Profile (Client):
- Resources:
- iRules: move entries from
AvailabletoEnabled, in this order:irule-rl-icapirule-rl-trace-http
- Default Pool:
pool-rl-http
- iRules: move entries from
- Select Finished
The Response Adapt Profile (RESPMOD) can be configured independently of the Request Adapt Profile (REQMOD).
If, in addition to request processing, you wish to send HTTP responses to ReversingLabs Spectra Analyze, or Spectra Detect appliance for inspection, set the Response Adapt Profile to profile-rl-response-adapt.